Are your woodworking projects missing that perfect finishing touch? If you’ve been struggling to achieve the desired results when staining red oak, we’re here to help. In this article, we will share tips, techniques, and ideal stain choices for achieving perfect results when staining red oak. Whether you’re a seasoned woodworker or a beginner, we have the knowledge and recommendations to enhance the beauty of your projects.
Staining red oak requires specific techniques and attention to detail. From choosing the right stain color to applying it correctly, there are several factors that contribute to achieving the perfect finish. We will guide you through each step of the staining process, providing valuable insights and practical advice along the way.
Ready to unlock the secrets of successful red oak staining? Read on to discover the tips and techniques that will take your woodworking projects to the next level.
Key Takeaways:
- Choosing the right stain color is essential for achieving perfect results when staining red oak.
- Proper preparation, including sanding and filling nail holes, is crucial before staining red oak.
- We have found a recommended stain combination that works exceptionally well for red oak, providing stunning results with minimized red undertones.
- Applying the stain correctly and using the right tools and techniques is crucial for obtaining the desired results.
- Water-based stain offers several benefits when staining red oak, including quick drying time, minimal odor, and ease of use.
Choosing the Right Stain for Red Oak
When staining red oak, it is important to choose the right stain color. The color you choose will greatly impact the final look of your project and how well it complements the natural beauty of the wood. With a wide range of red oak stain colors available, it can be overwhelming to make a decision. That’s why we’re here to help!
Let’s explore the different options and find the best stain for red oak.
Red Oak Stain Colors
Red oak is known for its beautiful grain patterns and warm undertones. To enhance these natural characteristics, consider using stain colors that accentuate the wood’s natural beauty.
Here are some popular red oak stain colors to consider:
- American Chestnut
- Golden Oak
- Weathered Oak
- Red Mahogany
- Dark Walnut
Each of these stain colors offers a unique look and can transform your red oak project into a stunning masterpiece.
Best Stain for Red Oak
While personal preference plays a significant role, there are a few stain colors that tend to work exceptionally well with red oak. If you’re looking to showcase the wood’s natural reddish hue, consider using a stain color that enhances and deepens it.
One popular choice is Red Mahogany. It brings out the rich red tones of red oak while adding depth and warmth to the wood. This stain color creates a classic and timeless look that complements a variety of interior styles.
For a lighter yet still warm tone, Golden Oak is an excellent option. It enhances the natural beauty of red oak while adding a warm and inviting feel to your project.
If you prefer a deeper, more dramatic look, Dark Walnut stain is a great choice. It provides a rich, almost chocolate-like color that can add depth and elegance to your red oak project.
Ultimately, the best stain for red oak will depend on your personal preferences, the style of the space, and the desired effect you want to achieve. It’s always a good idea to test your chosen stain color on a small, inconspicuous area of the wood to ensure it meets your expectations.
Remember, the stain color can vary depending on factors such as wood grain, application technique, and the specific stain brand you choose. It’s essential to follow the manufacturer’s instructions and guidelines when applying the stain.
In the table below, you’ll find a comparison of the recommended red oak stain colors:
| Stain Color | Description | Image |
|---|---|---|
| American Chestnut | A warm, golden brown with hints of red | |
| Golden Oak | A light, honey-toned stain that enhances the natural beauty of red oak | |
| Weathered Oak | A gray-brown stain with a slightly weathered look | |
| Red Mahogany | A rich, reddish-brown stain that brings out the natural red undertones of red oak | |
| Dark Walnut | A deep, dark brown stain with hints of black |  |
As you can see, each stain color offers a unique look and can transform your red oak project into a work of art. Take your time, experiment with different stain colors, and find the one that best matches your vision and style.
Preparing the Red Oak for Staining
Before achieving the perfect stain on your red oak, it is essential to follow proper preparation techniques. By taking the necessary steps, you can ensure optimal results and enhance the overall appearance of your woodworking projects.
Sanding Red Oak for a Smooth Finish
Start by sanding the red oak to create a smooth and even surface. Use a medium-grit sandpaper to remove any imperfections, such as rough spots or blemishes. Gradually progress to a fine-grit sandpaper to achieve a polished finish.
Filling Nail Holes for a Seamless Look
Next, fill any visible nail holes on the red oak to create a seamless appearance. Using a wood filler that matches the color of the oak, apply a small amount to each hole. Smooth it out with a putty knife, ensuring the filler is level with the surrounding wood.
Staining Techniques for Red Oak
When staining red oak, it is important to consider its unique characteristics. Red oak has a porous structure that can absorb stain unevenly, resulting in blotchy or splotchy patches. To avoid this, we recommend the following techniques:
- Preconditioning the Wood: Apply a wood conditioner to the red oak before staining. This helps prevent uneven absorption and promotes a more uniform color.
- Wipe-On Staining: Instead of applying the stain directly from the can, use a cloth or sponge to wipe on the stain in the direction of the wood grain. This allows for better control and ensures an even application.
- Multiple Coats: Consider applying multiple thin coats of stain rather than one thick coat. This builds up the desired color gradually and reduces the risk of blotchiness.
By following these staining techniques specifically tailored for red oak, you can achieve a beautiful and consistent finish that enhances the natural beauty of the wood.
“Proper preparation is the key to achieving a flawless stain on red oak.” – Woodworking Enthusiast
Recommended Stain Combination for Red Oak
When it comes to staining red oak, finding the right combination of products can make all the difference in achieving exceptional results. We have discovered a recommended stain combination that not only enhances the natural beauty of red oak but also minimizes red undertones for a stunning finish.
Behr Water Based Stain: The Foundation of Excellence
To begin this recommended stain combination, we suggest using Behr Water Based Stain as the foundation. This high-quality stain provides excellent coverage and dries quickly, allowing you to move forward with the staining process efficiently.
Behr Water Based Stain is known for its vibrant and rich color options, ensuring you can find the perfect shade to complement your red oak project. Whether you prefer a light or dark stain, Behr offers a wide range of options to suit your aesthetic preferences.
With its low odor and easy cleanup, Behr Water Based Stain is an ideal choice for both indoor and outdoor staining projects. Its water-based formula minimizes toxic fumes, making it a safer and more comfortable option for those sensitive to strong odors.
To further enhance the durability and protection of the stained red oak, we recommend applying a topcoat. This will help seal the stain and provide a long-lasting finish. Water-based poly is a popular choice for its ease of use and excellent results.
The Perfect Mixture: Achieving Stunning Results
While Behr Water Based Stain is an excellent standalone option for staining red oak, adding a specific mixture of stains can take the results to the next level. By combining stains, you can create a unique and customized look that brings out the natural beauty of the red oak while minimizing any undesired red undertones.
Here is the exact recipe for the recommended stain mixture:
- 50% Behr Water Based Stain in Classic Gray
- 25% Minwax Wood Finish in Provincial
- 25% Varathane Premium Fast Dry Wood Stain in Weathered Oak
These three stains work harmoniously to create a beautiful blend that enhances the grain and character of the red oak while achieving a balanced and timeless finish.
Application and Tips for Optimal Results
To apply the recommended stain combination, follow these steps:
- Prepare the red oak by sanding it to a smooth surface, ensuring all imperfections are removed.
- Apply the stain mixture using a brush or a clean cloth, following the wood’s grain for an even and consistent coat.
- Allow the stain to penetrate the wood for the recommended amount of time specified on the stain product.
- After the recommended time, wipe off any excess stain with a clean cloth to prevent uneven drying.
- Once the stain is dry, apply a water-based poly topcoat for added protection and a glossy finish.
- Let the topcoat dry according to the manufacturer’s instructions before handling or using the stained red oak.
Keep in mind that stain colors can vary depending on the wood’s natural color and porosity. It’s always a good idea to perform a test on a small, inconspicuous area of red oak before applying the stain mixture to the entire project.
Now that you have the recommended stain combination and application instructions, you’re ready to achieve stunning results with your red oak projects. Remember to take your time, follow the steps carefully, and enjoy the process of creating beautiful and timeless pieces.
| Benefits of the Recommended Stain Combination | Considerations |
|---|---|
| Enhances the natural beauty of red oak | Results may vary based on wood type and condition |
| Minimizes undesirable red undertones | Perform a test on a small area before staining the entire project |
| Creates a unique and customized look | Follow the manufacturer’s instructions for best results |
| Provides excellent coverage and dries quickly | Use appropriate safety measures when working with stains |
Applying the Stain to Red Oak
Now that you have chosen the perfect stain for your red oak project, it’s time to apply it correctly to achieve the desired results. Follow these step-by-step instructions to ensure a smooth and successful staining process.
Gather Your Tools
Before you begin, gather the following tools and materials:
- Staining brush or applicator
- Clean rags or lint-free cloth
- Painter’s tape (if needed)
- Drop cloth or plastic sheeting to protect your work area
Prep the Wood
Make sure the surface of your red oak project is clean, dry, and free from any dust or debris. Sand the wood using fine-grit sandpaper to create a smooth surface for the stain to adhere to. Remove any sanding dust with a tack cloth or a clean, slightly damp cloth.
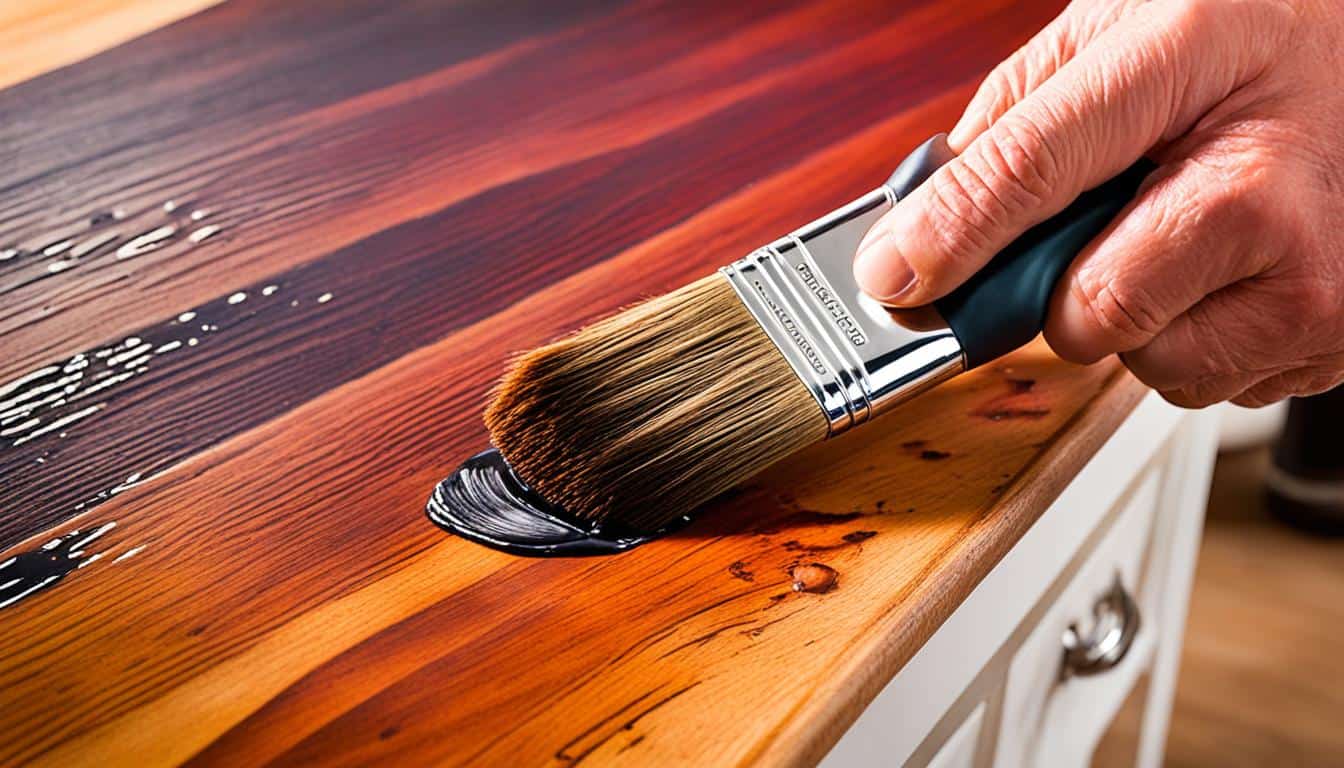
Apply the Stain
Using your staining brush or applicator, apply an even coat of stain to the red oak, following the grain of the wood. Work in small sections to ensure full coverage. If you prefer a lighter color, you can wipe off excess stain with a clean rag or cloth. Allow the stain to penetrate the wood for the recommended amount of time specified on the stain can.
Remove Excess Stain
After the recommended time, use a clean rag or cloth to gently wipe off any excess stain that has not been absorbed by the wood. Wipe in the direction of the grain for a smooth and uniform finish.
Let it Dry
Allow the stained red oak to dry completely according to the manufacturer’s instructions. Take care not to touch or disturb the surface during this time to prevent smudging or damaging the finish.
Add Additional Coats (If Desired)
If you prefer a deeper color or more intense finish, you can apply additional coats of stain following the same process. Allow each coat to dry completely before applying the next one.
Protect the Stained Wood
Once the stain is dry, you can apply a protective topcoat to seal and enhance the finish. This will provide durability and help preserve the beauty of your stained red oak project. Choose a topcoat specifically designed for wood surfaces, such as water-based polyurethane, and apply it according to the manufacturer’s instructions. Allow the topcoat to dry completely before using or moving the project.
Clean Up
Properly clean your tools and dispose of any unused stain or materials according to local regulations. Take care to follow the manufacturer’s instructions for safe and responsible disposal.
Congratulations! You have successfully applied the stain to your red oak project. Now you can step back and admire the beautiful, rich color you have achieved.
Sealing the Stained Red Oak
Once you have applied the stain to your red oak and achieved the desired color, it’s important to seal the wood to protect and enhance the finish. Sealing not only provides durability but also gives your project a polished and professional look. In this section, we will discuss the recommended red oak finishing products and guide you on how to apply them for optimal results.
Choosing the Right Topcoat
To seal your stained red oak, we recommend using a water-based polyurethane topcoat. Water-based polyurethane offers several benefits, including quick drying time, low odor, and ease of application. It is also more resistant to yellowing compared to oil-based options, preserving the natural beauty of your red oak for years to come.
Step-by-Step Application Process
Follow these steps to properly seal your stained red oak:
- Ensure the stain is completely dry before applying the topcoat. This usually takes about 24 hours, but refer to the specific drying time mentioned on the stain product label.
- Use a clean, high-quality brush or foam applicator to apply the water-based polyurethane. Start from one end of the wood and work your way to the other end, taking care to cover the entire surface evenly.
- Apply thin, even coats to avoid drips or streaking. Multiple thin coats are preferable to one thick coat.
- Allow each coat to dry according to the manufacturer’s instructions. This usually takes a few hours, but refer to the specific drying time mentioned on the polyurethane product label.
- Lightly sand the surface between coats with a fine-grit sandpaper to ensure a smooth finish.
Remember to clean your applicator thoroughly with water immediately after use, as water-based polyurethane dries quickly and can be challenging to remove once it hardens.
Pro Tip: Test the topcoat on a small inconspicuous area of your stained red oak project before applying it to the entire surface. This will help you ensure compatibility and achieve the desired finish.
Finishing Touch
Once you have applied the recommended number of coats and achieved the desired level of protection and sheen, allow the polyurethane to cure fully. This process can take up to a week, so avoid placing any objects on the surface or subjecting it to heavy use during this time. Once cured, your stained red oak will be ready for display and use, with a beautiful and durable finish.
Now that you know how to seal your stained red oak, let’s explore the benefits of using water-based stain in the next section.


Benefits of Water-Based Stain for Red Oak
When it comes to staining red oak, using a water-based stain can have numerous advantages. In this section, we will explore the benefits of choosing water-based stain for your red oak projects. From quick drying times to minimal odor, water-based stain offers convenience and excellent results.
Advantages of Water-Based Stain
- Quick Drying Time: One of the significant advantages of water-based stain is its rapid drying time. Unlike oil-based stains, water-based stains dry quickly, allowing you to proceed with your project without delay.
- Minimal Odor: Another benefit of water-based stain is its low odor. This makes it a more pleasant option for indoor projects, where strong odors may be undesirable.
- Ease of Use: Water-based stain is known for its ease of use. The consistency of water-based stain allows for smooth and even application, providing consistent color throughout your red oak project.
By choosing water-based stain for your red oak staining projects, you simplify the staining process and achieve excellent results. Now, let’s explore a detailed comparison between water-based stain and oil-based stain in the table below.
| Criteria | Water-Based Stain | Oil-Based Stain |
|---|---|---|
| Drying Time | Quick drying time | Slow drying time |
| Odor | Minimal odor | Strong odor |
| Application | Easy to apply | May require more skill |
| Clean-up | Water-based clean-up | Requires solvent for clean-up |
“Water-based stain is my go-to choice for staining red oak. It dries quickly, doesn’t have a strong odor, and provides consistent color. I highly recommend it!” – Sarah, Woodworking Enthusiast
As seen in the table and testimonials, water-based stain offers several advantages over oil-based stain for red oak projects. From the ease of application to the quick drying time, water-based stain simplifies the staining process and provides excellent results.
Avoiding Common Staining Mistakes with Red Oak
Staining red oak can be a daunting task, especially if you’re new to the world of woodworking. However, with a few expert tips and tricks, you can achieve professional-looking results and avoid common staining mistakes. Here are some valuable red oak staining tips to help you through the process:
1. Properly Prepare the Wood
Before applying the stain, make sure to properly prepare the red oak. Sand the wood with fine-grit sandpaper to create a smooth surface and remove any imperfections. Fill in any nail holes or gaps with wood filler, ensuring a flawless final result. Remember, proper preparation is key to a successful staining project.
2. Test the Stain on a Small Area
Before staining the entire piece of red oak, it’s essential to test the stain on a small, inconspicuous area. This will allow you to gauge the color and ensure it matches your desired outcome. Remember, different stains can react differently with red oak, so always test before committing to the entire project.
3. Apply an Even Coat
When applying the stain, make sure to apply an even coat across the entire surface of the red oak. Use a brush or cloth to spread the stain in long, smooth strokes, following the wood grain. Avoid applying too much stain, as it can lead to blotchy or uneven coloring. Take your time and ensure a consistent application for a flawless finish.
4. Wipe Off Excess Stain
After applying the stain, make sure to wipe off any excess using a clean cloth. This step is crucial to prevent the stain from pooling or drying unevenly. Wipe in the direction of the wood grain to achieve a seamless appearance. Removing the excess stain will also help enhance the natural beauty of the red oak.
5. Allow Sufficient Drying Time
Patience is key when staining red oak. Allow the stain to fully dry and cure before proceeding with any further steps. Rushing the drying process can result in smudging or smearing, compromising the overall finish. Follow the manufacturer’s instructions for drying time and ensure a well-ventilated area to facilitate proper drying.
6. Seal the Stained Red Oak
Once the stain has dried completely, it’s crucial to seal the red oak to protect the finish and enhance its longevity. Use a high-quality sealant or topcoat specifically designed for stained wood. Apply the sealant evenly, following the manufacturer’s instructions. This will provide a durable and professional-looking finish.
7. Learn from Mistakes
Even with the best intentions, mistakes can happen during the staining process. Don’t be discouraged if you encounter challenges along the way. Instead, view them as learning opportunities. Reflect on what went wrong and adjust your techniques accordingly. Remember, practice makes perfect, and each project is an opportunity to refine your skills.

“The only real mistake is the one from which we learn nothing.” – Henry Ford
By following these red oak staining tips, you can avoid common mistakes and achieve outstanding results. Remember to take your time, be patient, and enjoy the process. With practice and experience, you’ll become a master at staining red oak, creating beautiful woodworking projects that showcase the natural beauty of the wood.
Testimonials and Success Stories
Don’t just take our word for it – hear what others have to say about their experience with our professional red oak staining services. These testimonials and success stories serve as proof that achieving perfect results with red oak staining is possible.
“I was skeptical at first, but after seeing the amazing results achieved by the professional red oak staining services, I couldn’t be happier. The team took the time to understand my vision and delivered beyond my expectations.” – Mary Thompson, Woodworking Enthusiast
Our team of experts has consistently provided top-notch staining services to customers across the country. We take pride in our attention to detail and commitment to customer satisfaction. With years of experience in the industry, we have perfected our techniques and developed a deep understanding of red oak staining.
“I had attempted to stain red oak on my own and ended up with uneven and blotchy results. It was a frustrating experience, until I discovered the professional red oak staining services. Their expertise and guidance helped me achieve a flawless finish that I couldn’t have achieved on my own.” – James Johnson, DIY Woodworker
Whether you’re a professional woodworker or a DIY enthusiast, our professional red oak staining services are tailored to meet your specific needs. We pride ourselves on delivering exceptional results that enhance the natural beauty of red oak while providing a durable and professional-looking finish.
“I decided to invest in professional red oak staining services for my woodworking business, and it was one of the best decisions I’ve made. The expertise of the team and their dedication to perfection elevated the quality of my projects and left my clients impressed.” – Robert Davis, Woodworking Business Owner
Our comprehensive approach, from preparation to application and finishing, ensures that every project receives the highest level of attention and expertise. We understand the unique characteristics of red oak and employ techniques that bring out its rich grain pattern and vibrant colors.
When it comes to red oak staining, trust the professionals who have a proven track record of success. Our testimonials and success stories speak for themselves, demonstrating the quality and reliability of our services. Join the countless satisfied customers who have achieved stunning results with our professional red oak staining services.
Troubleshooting Common Staining Issues
Sometimes, despite your best efforts, staining issues may arise when working with red oak. These problems can be frustrating, but don’t worry, we’re here to help. In this section, we will address common staining problems related to red oak and provide troubleshooting solutions to help you overcome these challenges.
Problem: Uneven Stain Absorption
If you notice that the stain is being absorbed unevenly on your red oak, it could be due to inconsistent sanding or the presence of contaminants on the wood surface. To troubleshoot this issue:
- Ensure that you have sanded the wood surface uniformly, paying attention to any rough spots or imperfections.
- Clean the wood surface thoroughly before applying the stain to remove any dirt, dust, or oils that could affect the absorption.
- Consider using a pre-stain wood conditioner to promote even stain absorption.
Problem: Blotchy or Patchy Stain
Blotchy or patchy stain appearance on red oak can be caused by uneven wood grain or improper application techniques. To troubleshoot this issue:
- Apply a wood conditioner before staining to help seal the wood and minimize blotchiness.
- Use a gel stain instead of a liquid stain, as the thicker consistency of gel stain can help provide more even color distribution.
- Ensure that you are applying the stain evenly and wiping off any excess stain to prevent pooling in certain areas.
- If possible, test the stain on a scrap piece of red oak before applying it to your project to determine the best application technique.
Problem: Stain is Too Light or Too Dark
Obtaining the desired stain color can be challenging, especially if the stain appears too light or too dark on your red oak. To troubleshoot this issue:
- Experiment with different stain colors and test them on a scrap piece of red oak. Remember to consider the natural color of the wood when selecting a stain to achieve the desired result.
- If the stain appears too light, you can apply additional coats to darken the color. Allow each coat to dry before applying the next.
- If the stain appears too dark, you can try sanding the surface lightly to remove some of the excess stain and lighten the color.
Remember, troubleshooting staining issues may require some trial and error. Don’t be discouraged if you don’t achieve perfection on your first attempt. Practice, learn from your mistakes, and keep refining your skills.
In the image above, you can see the impact of uneven stain absorption on red oak. This visual example highlights the importance of troubleshooting and finding solutions to staining issues to achieve a consistent and beautiful finish.
Additional Tips for Red Oak Staining
When it comes to staining red oak, attention to detail is key. To further enhance your staining results, consider these additional tips and tricks. From surface preparation to post-staining care, every step in the process contributes to achieving beautiful and flawless finishes.
Surface Preparation
Preparing the surface properly sets the foundation for a successful staining project. Here are some tips:
- Begin by sanding the red oak to create a smooth and even surface. Start with a coarse-grit sandpaper and gradually move to finer grits until the wood feels silky to the touch.
- Before staining, make sure to remove any dust or debris from the wood surface to ensure proper stain adhesion. Use a tack cloth or a lint-free cloth slightly dampened with mineral spirits.
- If the red oak has any imperfections or nail holes, use a wood filler that matches the color of the wood. Apply the filler, let it dry, and sand it smooth before proceeding with staining.
Application Techniques
The way you apply the stain can greatly influence the final result. Consider these tips for effective application:
- Always start by testing the stain on a small, inconspicuous area of the red oak to ensure you achieve the desired color and effect.
- Apply the stain using a clean, lint-free cloth or a foam brush in long, even strokes, following the grain of the wood. Avoid over-saturating the wood with excess stain.
- If you want to achieve a darker color, you can apply multiple coats of stain, allowing each coat to dry completely before applying the next.
Post-Staining Care
Proper care after staining will help maintain the beauty of your red oak project. Consider these tips:
- Allow the stain to dry completely according to the manufacturer’s instructions before applying any protective topcoat or sealant.
- Once the stain has dried, you can choose to apply a clear topcoat for added protection and durability. Water-based polyurethane is a popular choice for sealing stained red oak.
- Regularly clean your stained red oak surfaces with a damp cloth or a mild wood cleaner. Avoid abrasive cleaners that can damage the stain.
Remember, practice makes perfect when it comes to staining red oak. Take your time, experiment with different techniques, and don’t be afraid to seek inspiration from professional stainers and craftsmen.
Maintaining Stained Red Oak
Proper maintenance is essential for preserving the beauty of stained red oak. By following these maintenance tips specifically tailored for stained red oak, including cleaning and refinishing recommendations, you can ensure that your stained red oak projects last for years to come.
First and foremost, regular cleaning is crucial to keep your stained red oak looking its best. Dust and dirt can accumulate on the surface, dulling its shine over time. To clean your stained red oak, simply:
- Use a soft, dry cloth or mop to remove loose dust and dirt.
- Mix a mild wood cleaner or a few drops of dish soap with warm water.
- Dampen a clean cloth or mop in the solution and gently wipe the stained red oak surface.
- Dry the surface thoroughly with a separate clean, dry cloth.
Regularly cleaning your stained red oak will not only keep it looking beautiful but also prevent dirt from scratching the surface or dulling the finish. Additionally, avoid using harsh chemicals or abrasives as they can damage the stain and wood.
If you notice any signs of wear or damage to the stained red oak, it may be time for refinishing. Refinishing helps restore the original beauty of the wood and prolongs its lifespan. Here are a few steps to follow when refinishing stained red oak:
- Thoroughly clean the stained red oak surface following the cleaning steps mentioned above.
- Sand the surface gently to remove any imperfections, being careful not to sand through the stain.
- Wipe away the sanding dust with a clean, damp cloth.
- Apply a fresh coat of stain, following the original staining technique used.
- Allow the stain to dry completely before applying a topcoat.
- Apply a protective topcoat, such as water-based polyurethane, to seal and protect the stained red oak.
- Allow the topcoat to dry according to the manufacturer’s instructions.
Regular cleaning and refinishing can help maintain the vibrant color and smooth finish of your stained red oak projects. By following these maintenance tips, your stained red oak will continue to impress for years to come.
Staining Red Oak: Your Journey to Perfection
Staining red oak may seem challenging at first, but with the right advice and techniques, you can achieve perfection. We have provided step-by-step guidance, recommendations, and troubleshooting tips to support you on your journey to perfect red oak staining. Start your woodworking staining projects with confidence!
When it comes to staining red oak, it’s essential to have a solid plan in place. By following these tried and true techniques, you can ensure beautiful results that enhance the natural beauty of the wood.
Red Oak Staining Advice
Here are a few key pieces of advice to keep in mind:
- Properly prepare the red oak by sanding and filling nail holes.
- Choose the right stain color that complements the natural beauty of the wood.
- Apply the stain in thin, even coats for a more uniform finish.
- Consider using water-based stain for its quick drying time and ease of use.
- Seal the stained red oak with an appropriate topcoat for added protection and a professional-looking finish.
Following these tips will help you avoid common staining mistakes and achieve the desired results with your red oak projects.
Woodworking Staining Techniques
Here are a few woodworking staining techniques to help you achieve perfection with red oak:
- Test the stain on a small, inconspicuous area of the wood to ensure it produces the desired color.
- Apply the stain using a brush, cloth, or sponge, depending on the desired effect.
- Remove any excess stain with a clean cloth to prevent blotching.
- Allow the stain to dry completely before applying a topcoat.
Remember, practice makes perfect. Don’t be afraid to experiment with different techniques and stains to find the combination that works best for you and your red oak projects.
By following these staining advice and woodworking staining techniques, you can embark on your journey to perfect red oak staining. With patience, practice, and attention to detail, you’ll achieve stunning results that will make your woodworking projects truly stand out.
Conclusion
Congratulations on completing this comprehensive guide to staining red oak! By following the techniques and recommendations discussed, you can achieve perfect results and enhance the beauty of your woodworking projects.
Remember, red oak staining is a skill that improves with practice. Don’t be afraid to experiment with different stain colors and application techniques to achieve your desired look. Whether you’re staining furniture, floors, or cabinetry, red oak’s natural grain and warm hues will bring elegance and charm to any space.
Now that you have learned the best practices for red oak staining, it’s time to put your knowledge into action. Grab your brushes, select your favorite stain combination, and embark on your next woodworking adventure with confidence. Enjoy the process and have fun, knowing that you have the skills to create beautiful, long-lasting finishes on your red oak projects.
FAQ
What is the best stain color for red oak?
The best stain color for red oak depends on personal preference and the desired look. Some popular stain colors for red oak include golden oak, provincial, and dark walnut.
How do I prepare red oak for staining?
To prepare red oak for staining, start by sanding the wood to create a smooth surface. Fill any nail holes or imperfections with wood filler, and then sand again to ensure a uniform texture.
What is the recommended stain combination for red oak?
A recommended stain combination for red oak is using Behr Water Based Stain with a specific mixture of stains to minimize red undertones. The exact recipe and application instructions can be found in our guide.
How do I apply stain to red oak?
To apply stain to red oak, use a brush or cloth to evenly distribute the stain onto the wood. It is important to work in small sections and wipe off any excess stain to achieve the desired color.
What should I use to seal stained red oak?
It is recommended to use a water-based polyurethane as a topcoat to seal stained red oak. Apply the topcoat using a brush or foam applicator, following the manufacturer’s instructions for best results.
What are the benefits of water-based stain for red oak?
Water-based stain offers several advantages when staining red oak, including a quick drying time, minimal odor, and easy cleanup. It is also compatible with water-based topcoats, making the finishing process more convenient.
How can I avoid common staining mistakes with red oak?
To avoid common staining mistakes with red oak, make sure to properly prepare the wood, apply the stain evenly, and wipe off any excess stain. It is also important to test the stain on a small area first to ensure the desired color is achieved.
Can you share any success stories from individuals who have stained red oak?
Yes, we have gathered testimonials and success stories from individuals who have achieved excellent results with red oak staining. Their stories serve as inspiration and proof that with the right techniques, perfect results are attainable.
What should I do if I encounter staining issues with red oak?
If you encounter staining issues with red oak, don’t panic. We provide troubleshooting solutions for common staining problems specific to red oak. These solutions can help you overcome challenges and achieve the desired results.
Are there any additional tips for successful red oak staining?
Yes, we have additional tips and tricks to enhance your red oak staining results. These tips cover various aspects, including surface preparation, application techniques, and post-staining care.
How can I maintain stained red oak?
To maintain stained red oak, regularly clean the surface with a mild detergent and warm water. Avoid using harsh chemicals or abrasive cleaners. If the finish begins to wear, you can refinish the wood by sanding and reapplying a topcoat.
How can I achieve perfection in staining red oak?
Achieving perfection in staining red oak requires following the techniques and recommendations provided in our guide. By practicing, experimenting, and incorporating our tips, you can enhance the beauty of your woodworking projects.