Are you tired of searching for the perfect outdoor couch that fits your style and budget? Why not take matters into your own hands and build your own DIY outdoor couch? Not only will you have complete control over the design and dimensions, but you’ll also save money and have the satisfaction of creating something with your own two hands. So, are you ready to embark on this exciting DIY project and transform your outdoor space?
Building your DIY outdoor couch is easier than you think, and with the right materials and tools, you’ll be lounging in style in no time. In this article, we’ll provide you with step-by-step instructions and tips on how to build your own outdoor seating project. From choosing the right lumber to adding the finishing touches, we’ve got you covered. So, grab your tools and get ready to create a cozy and inviting outdoor retreat.
Key Takeaways:
- Building a DIY outdoor couch allows you to customize the design and dimensions to fit your outdoor space and personal style.
- By building your own outdoor couch, you can save money compared to purchasing pre-built outdoor furniture.
- Choosing the right lumber and finishing materials is crucial to ensure the durability and longevity of your DIY outdoor couch.
- Adding outdoor cushions will provide the finishing touch and create a comfortable seating area for you and your guests.
- Consider building matching furniture pieces to create a cohesive and functional outdoor living space.
Materials and Tools Needed
To build your DIY outdoor couch, you will need the following materials and tools:
- 8 2x6x8 framing lumber
- 2 1/2″ pocket hole screws
- 2 1/2″ outdoor wood screws
- Wood glue
- Miter saw
- Drill
- Kreg Jig (optional)
- Table saw (optional)
These materials and tools will allow you to construct the frame of the couch and attach the seat slats and backrest. The pocket hole screws and wood glue will ensure a sturdy and secure construction, while the miter saw and drill will be used for cutting the lumber and making necessary holes.
Now that you have gathered all the necessary materials and tools, you are ready to start building your own DIY outdoor couch. The next section will guide you through the process of choosing the right lumber for your project.
Choosing the Right Lumber
When building your DIY outdoor couch, selecting the appropriate lumber is crucial in ensuring its durability and ability to withstand the outdoor elements. Two popular options are framing lumber and cedar boards.
Framing Lumber
Framing lumber is a cost-effective choice for constructing your outdoor couch. It is readily available and can be treated with an outdoor finish to protect it from weathering. This type of lumber offers a budget-friendly solution without compromising on quality or durability.
Cedar Boards
If you’re looking for a more premium and naturally weather-resistant option, consider using cedar boards for your outdoor couch. Cedar has inherent properties that make it resistant to rot, decay, and insect infestation. While cedar may incur a higher cost, it offers an attractive and long-lasting solution for your outdoor furniture needs.
| Lumber Type | Durability | Cost | Aesthetic Appeal |
|---|---|---|---|
| Framing Lumber | Moderate | Affordable | Varies based on finish |
| Cedar Boards | High | More expensive | Naturally beautiful |
Consider your budget, desired aesthetic, and the level of weather resistance you require when making a decision. Both framing lumber and cedar boards can be suitable choices for your DIY outdoor couch, depending on your specific needs and preferences.
Building the Frame of the Couch
To start building your DIY outdoor couch, you will first need to construct the frame. This involves cutting the legs and arms to size, drilling pocket holes, and attaching them together using pocket hole screws and wood glue. The side runner and bottom runner are then attached to the legs to provide stability and support. The cleats are added to support the seat slats, and the back runner is attached to connect the sides of the couch. Finally, the front runner is added to complete the frame and provide additional support.
Creating a sturdy frame is crucial for the stability and durability of your outdoor couch. It provides a solid foundation for the seat slats and backrest, ensuring a comfortable and secure seating experience. By following the step-by-step instructions and plans for your DIY outdoor couch, you can build a reliable frame that will withstand the outdoor elements and last for years to come.
When constructing the frame, it’s important to use the appropriate materials, such as 2x6x8 framing lumber, and secure the joints properly. The pocket hole screws and wood glue will help reinforce the connections, preventing wobbling or loosening over time. Taking the time to measure accurately and cut the pieces precisely will also contribute to a well-built frame that fits together seamlessly.
Incorporating a DIY outdoor couch into your outdoor living space not only provides a comfortable seating option but also adds a touch of style and personality to your patio or deck area. By building the frame of the couch yourself, you have the freedom to customize the design and size to fit your specific needs and preferences. Whether you prefer a streamlined modern look or a more rustic aesthetic, the frame of the couch sets the foundation for the overall design of the piece.
Building the Frame – Step by Step
- Cut the legs and arms to the desired size, ensuring they are all the same length for a balanced and symmetrical couch. Sand the edges to remove any rough edges or splinters.
- Drill pocket holes into the legs and arms at the appropriate locations using a pocket hole jig.
- Apply wood glue to the ends of the legs and attach them to the arms using pocket hole screws. Use clamps to hold the pieces together firmly while the glue dries.
- Attach the side runner and bottom runner to the legs using pocket hole screws and wood glue. These runners will provide stability and support to the frame.
- Add cleats inside the frame to support the seat slats. Measure and cut the cleats to the appropriate length, and attach them to the inside of the frame using wood screws.
- Attach the back runner to connect the sides of the couch. This runner will provide additional stability and support.
- Finally, attach the front runner to complete the frame and reinforce the structure. Make sure all screws are tightened securely and the frame is stable.
Building the frame of your DIY outdoor couch is an essential step in creating a comfortable and functional piece of furniture for your outdoor space. Once the frame is complete, you can move on to adding the seat slats, creating the backrest, and adding the finishing touches that will transform your outdoor couch into a cozy retreat.

Adding the Seat Slats
Once the frame of your DIY outdoor couch is complete, it’s time to add the seat slats. This step will provide the foundation for the cushions and add a finished look to your homemade outdoor couch.
Here’s how to add the seat slats to your outdoor seating project:
- Cut the slats to size according to the dimensions specified in your plans.
- Place the slats on top of the cleats, ensuring they are evenly spaced.
- Attach the seat slats to the cleats using wood screws and wood glue. This will ensure a secure and comfortable seating surface for your DIY outdoor couch.
By following these steps, you’ll create a sturdy and reliable seating area for your outdoor living space. The seat slats will not only provide a comfortable sitting experience, but they will also allow you to easily add cushions to enhance the coziness of your outdoor couch.
Creating the Back of the Couch
To complete the construction of your DIY outdoor couch, you will now focus on creating the back of the couch. This step will provide you with a comfortable and supportive backrest for your outdoor seating project. Follow these instructions to ensure a successful assembly:
Materials Needed:
- Back pieces
- Long pieces
- Pocket hole screws
- Wood glue
Step 1: Cut and Drill
First, cut the back pieces to the appropriate size according to your design. Make sure they are sturdy and durable enough to support the weight of the users. Next, drill pocket holes at each end of the back slats. These holes will allow you to attach the slats to the long pieces securely.
Step 2: Attach the Back Slats
Using pocket hole screws and wood glue, attach the back slats to the long pieces. Make sure each slat is positioned evenly, providing the desired level of comfort and support. The angled positioning of the slats can enhance the ergonomic design of your couch.
Step 3: Secure to the Couch Frame
Once the back is fully assembled, align it with the couch frame. Angle the back at approximately 5° for added comfort. Secure the back in place by using screws from the bottom and back of the couch. This will ensure a solid and stable connection to the frame.
With the back of your DIY outdoor couch complete, you’ve taken another significant step towards transforming your outdoor space into a cozy and inviting retreat. The backrest adds support and comfort to your seating area, making it the perfect spot to relax and enjoy the outdoors. Let’s move on to the finishing touches to complete your DIY backyard furniture project.
| Pros | Cons |
|---|---|
| Ergonomic design offers enhanced comfort | Requires precise measurements to ensure proper alignment |
| Sturdy and secure attachment to the couch frame | May require additional drilling and assembly time |
| Customizable design options to suit your preferences | Requires careful selection of back slat materials for durability |

The image above showcases a completed backrest of a DIY outdoor couch. Notice the angled positioning of the slats for optimal comfort and support.


Finishing Touches
Before completing your DIY outdoor couch, there are a few finishing touches to consider. Follow these steps to ensure a professional and polished look for your outdoor furniture.
Filling Screw Holes
Start by filling any exposed screw holes with outdoor wood filler. This will create a seamless finish and prevent moisture from entering the wood, keeping your outdoor couch in good condition for years to come.
Sanding for a Smooth Surface
Next, sand the entire piece of furniture to achieve a smooth surface. Begin with a coarse grit sandpaper and gradually move to a finer grit for a polished look. Sanding not only improves the appearance of the wood but also ensures a comfortable seating experience.
Protecting and Enhancing the Wood
Apply an outdoor wood stain or finish to protect the wood from weathering and enhance its natural beauty. Choose a product specifically designed for outdoor use to ensure long-lasting durability. Consider using an outdoor protective finish for an extra layer of defense against the elements.
| Finishing Touch | Description |
|---|---|
| Filling Screw Holes | Fill exposed screw holes with outdoor wood filler for a seamless finish. |
| Sanding for a Smooth Surface | Sand the entire piece with coarse and fine grit sandpaper to achieve a polished look and comfortable feel. |
| Protecting and Enhancing the Wood | Apply an outdoor wood stain or finish to protect against weathering and enhance the natural beauty of the wood. |
By following these finishing touches, you can ensure that your DIY outdoor couch looks professional and stands up to the elements. The extra time and effort put into these final steps will be well worth it when you have a beautiful and durable piece of furniture to enjoy in your outdoor living space.
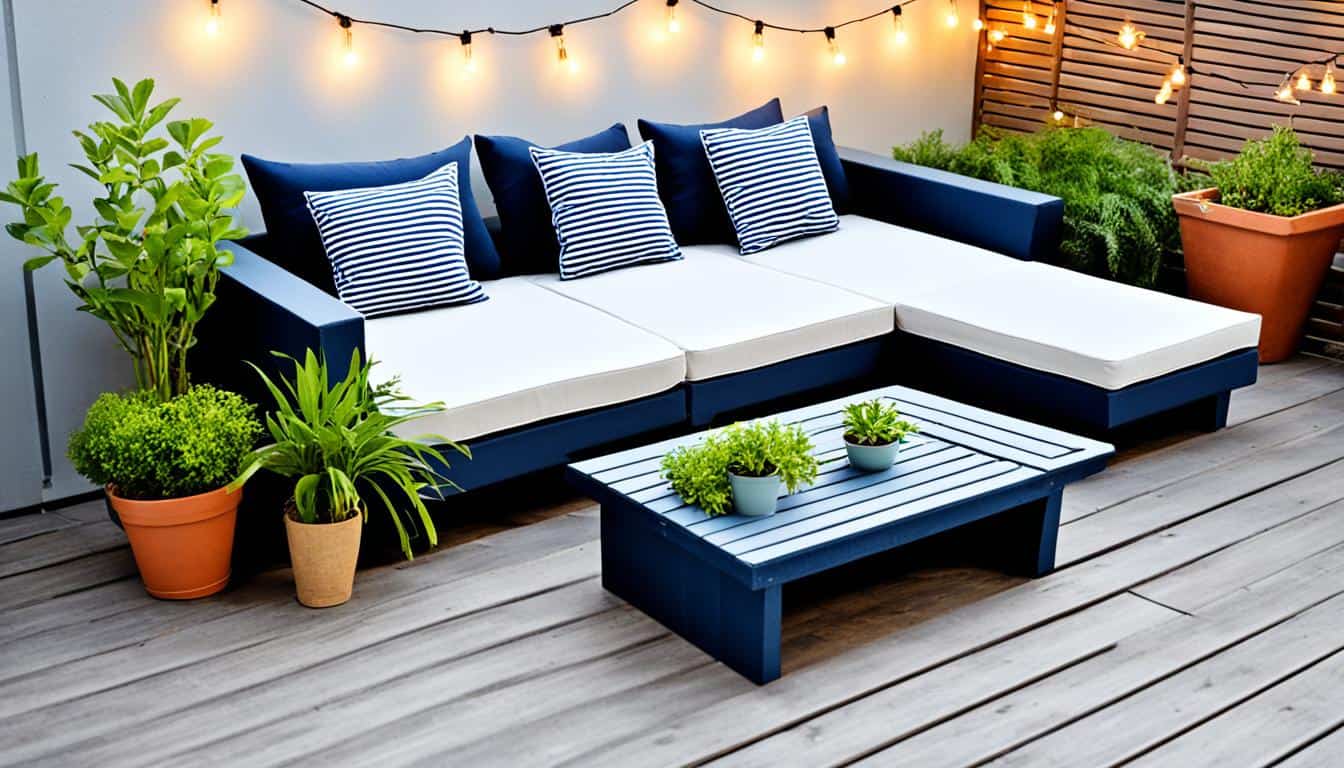
Adding Outdoor Cushions
Once your DIY outdoor couch is complete, it’s time to add the finishing touches by selecting and adding outdoor cushions. Measure the dimensions of your couch seat to ensure a proper fit, and choose cushions that complement your outdoor aesthetic. There are various sizes and styles available, so you can customize the look and comfort of your couch. Place the cushions on the seat slats and arrange them to your liking for a cozy and inviting outdoor seating area.
Adding outdoor cushions to your DIY outdoor couch not only enhances its visual appeal but also provides comfort and coziness. The right cushions can transform your outdoor seating project into a welcoming and inviting space where you can relax and unwind. Here are a few tips to help you choose and arrange your outdoor cushions:
- Measure your couch seat: Before purchasing cushions, measure the dimensions of your couch seat to ensure a proper fit. This will help you select cushions that are neither too big nor too small for your DIY outdoor couch.
- Select the right style: Consider the style of your outdoor space and choose cushions that complement the overall aesthetic. Whether you prefer a modern, bohemian, or coastal look, there are cushions available in a variety of colors, patterns, and textures.
- Consider durability: Since your outdoor couch will be exposed to the elements, it’s important to choose cushions that are made from durable and weather-resistant materials. Look for cushions with UV protection and water-resistant covers to ensure they last longer.
Arranging the cushions on your DIY outdoor couch is a creative way to add a personal touch to your outdoor seating area. You can create different looks by playing with colors, patterns, and sizes. Here are a few ideas:
- Mix and match: Experiment with different patterns and colors by mixing and matching cushions. This can create a playful and eclectic look.
- Layering: Layer cushions of different sizes and textures to add depth and comfort to your outdoor couch.
- Pillows as accents: Consider adding throw pillows as accents to your outdoor cushions. These can add pops of color and additional comfort.
Remember to choose cushions that are designed for outdoor use, as they are made to withstand the weather and will provide long-lasting comfort and style to your DIY outdoor couch.
Enjoying Your Outdoor Retreat
With your DIY outdoor couch complete, it’s time to sit back, relax, and enjoy your newfound outdoor retreat. Whether you’re hosting a summer gathering, reading a book, or simply soaking up the sunshine, your outdoor couch provides a comfortable and stylish seating option. Take pride in your DIY creation and create lasting memories in your outdoor living space. Make sure to share your success and inspire others with your DIY project on social media using hashtags such as #diyoutdoorcouch and #outdoorlivingdiy.
Creating your own homemade outdoor couch allows you to customize it to your specific preferences, ensuring that it perfectly complements your outdoor aesthetic. It’s a cost-effective way to enhance your outdoor living experience and make the most of your backyard or patio.
“After completing my DIY outdoor couch, my backyard has become my personal sanctuary. It’s where I relax, unwind, and enjoy quality time with friends and family. The satisfaction of building something with my own hands adds an extra layer of joy to every outdoor gathering.” – Emily, DIY enthusiast
Whether you choose to place your outdoor couch on a deck, lawn, or by the poolside, it’s important to create a cozy and inviting atmosphere. Consider adding a coffee table, outdoor rugs, and decorative pillows to enhance the comfort and aesthetics of your outdoor retreat. Your homemade outdoor couch will be the centerpiece of your outdoor living space, providing the perfect spot to kick back and enjoy the beauty of nature.
Remember to keep your DIY outdoor couch well-maintained to ensure its longevity. Clean it regularly and cover it when not in use to protect it from harsh weather conditions. By taking proper care of your outdoor furniture, you can enjoy its comfort and functionality for years to come.
So go ahead, grab a good book, your favorite beverage, and curl up on your homemade outdoor couch. Create your own little slice of paradise and indulge in the simple pleasures of outdoor living.
Matching Furniture Pieces
If you want to create a cohesive outdoor living space, consider building matching furniture pieces to accompany your DIY outdoor couch. By constructing a complete set of DIY backyard furniture, including a DIY outdoor sectional, outdoor chaise lounge, outdoor planter, outdoor daybed, or outdoor bar, you can transform your outdoor space into a functional and inviting oasis where you can relax and entertain with ease.
Creating matching furniture pieces allows you to maintain a consistent style and aesthetic throughout your outdoor living area. Not only will it enhance the visual appeal of your space, but it will also provide you with additional seating and storage options that perfectly complement your DIY outdoor couch.
Matching Furniture Pieces for Your Outdoor Living Space
| Furniture Piece | Description |
|---|---|
| DIY Outdoor Sectional | Create a luxurious and spacious seating area by building an outdoor sectional to accompany your DIY outdoor couch. This versatile piece of furniture can easily be customized to fit your specific outdoor space and seating needs. |
| Outdoor Chaise Lounge | Add a touch of relaxation and indulgence to your outdoor retreat with a DIY outdoor chaise lounge. This comfortable and stylish lounging option is perfect for soaking up the sun or enjoying a good book in your backyard. |
| Outdoor Planter | Elevate the beauty of your outdoor space by building DIY outdoor planters. These planters can be customized to match the design of your DIY outdoor couch and filled with your favorite flowers and greenery to create a vibrant and inviting atmosphere. |
| Outdoor Daybed | Create a cozy and intimate seating area with a DIY outdoor daybed. This versatile piece of furniture can be used as a comfortable spot to lounge, nap, or even sleep under the stars. Perfect for relaxing and unwinding in your outdoor oasis. |
| Outdoor Bar | Add a touch of entertainment to your outdoor living space with a DIY outdoor bar. This functional and stylish addition allows you to host outdoor gatherings and enjoy drinks with friends and family in the comfort of your own backyard. |
By building a complete set of DIY backyard furniture, you can create a harmonious and inviting outdoor space that reflects your personal style and enhances your outdoor living experience. Whether you choose to build one or all of these matching furniture pieces, you’ll be able to enjoy a well-designed and functional outdoor retreat for years to come.
Imagine lounging on your DIY outdoor couch, surrounded by beautifully crafted matching furniture pieces, as you bask in the warmth of the sun and the tranquility of nature. Embrace the opportunity to design and create your own outdoor haven by incorporating these stunning furniture pieces into your DIY project.
Cost and Affordability
One of the major advantages of building your own DIY outdoor couch is the significant cost savings compared to buying pre-built outdoor furniture. With just $60 spent on lumber and a few basic tools, you can create a high-quality and durable outdoor seating project that perfectly fits your budget. Customizing the design and dimensions of your DIY couch also allows you to optimize the use of materials and ensure a perfect fit for your outdoor space.
By opting for DIY outdoor furniture, you can enjoy affordability without sacrificing quality. With the right guidance and materials, you can create stylish and functional outdoor seating that stands the test of time. Investing a little time and effort into building your own outdoor couch can result in substantial savings, allowing you to allocate your budget towards other outdoor decor and enhancements.
Don’t let a limited budget hold you back from creating a stylish and inviting outdoor retreat. Embrace the affordability and versatility of DIY outdoor furniture and embark on a satisfying project that combines your creativity with practicality.
Get inspired by the cost-effective approach of building your own outdoor sofa and make the most of your outdoor living space without breaking the bank.
With the affordability of DIY outdoor furniture, you have the opportunity to create a budget-friendly outdoor retreat that reflects your personal style and enhances your outdoor living experience. By building your own outdoor couch, you not only save money but also gain satisfaction and a sense of accomplishment from creating a unique piece that meets your specific needs and preferences.
Continue reading to discover the next section, where we will explore personalization and customization options for your DIY outdoor couch.
Personalization and Customization
When it comes to building your own outdoor couch, one of the biggest advantages is the ability to personalize and customize the design according to your preferences. With a DIY project, you have full control over every aspect of the couch, allowing you to create a piece that perfectly matches your aesthetic vision and functional needs.
You can begin by choosing the type of lumber that best suits your style and budget. Whether you prefer the affordability and versatility of framing lumber or the natural beauty and weather-resistance of cedar, selecting the right material is an important step in the personalization process.
Once you’ve chosen the type of lumber, you can further customize your outdoor couch by selecting a stain color that complements your outdoor space. Whether you prefer a natural wood look or a bold statement color, the stain can enhance the overall appearance of your couch and tie it in with your existing outdoor decor.
Another aspect to consider is the style of cushions you’ll use. Outdoor cushions come in a variety of colors, patterns, and materials, allowing you to create a finished look that matches your personal taste. From vibrant prints to understated neutrals, choose cushions that reflect your unique style and provide utmost comfort.
In addition to these design choices, you can also modify the dimensions of the couch to fit your specific space. Whether you have a small patio or a spacious backyard, customizing the dimensions ensures a perfect fit and maximizes the functionality of your outdoor seating area.
Want to take the customization even further? Consider incorporating unique features into your DIY couch, such as built-in storage compartments or side tables. These additional touches can add convenience and practicality to your outdoor space, making it a true extension of your home.
With a DIY outdoor couch, the possibilities for personalization are endless. From choosing the lumber and stain colors to selecting cushions and incorporating special features, you have the freedom to create a one-of-a-kind piece that reflects your style and enhances your outdoor living experience.”
Benefits of Personalization and Customization
There are several benefits to personalizing and customizing your DIY outdoor couch:
- Express your unique style: Your outdoor couch is an extension of your personal style and taste. By customizing the design, you can ensure that it complements the overall aesthetic of your outdoor living space.
- Enhance comfort and functionality: Customization allows you to tailor the dimensions, cushion style, and other features of your couch to ensure optimal comfort and functionality. You can create a seating area that suits your specific needs.
- Create a cohesive outdoor space: By choosing materials, colors, and styles that align with your existing outdoor decor, you can create a cohesive and inviting outdoor space that feels harmonious and well-designed.
- Showcase your creativity: Building your own outdoor couch gives you the opportunity to showcase your creativity and DIY skills. You can take pride in your unique creation and share it with others as a testament to your craftsmanship.
By personalizing and customizing your DIY outdoor couch, you can create a beautiful and functional piece of furniture that truly reflects your style and enhances your outdoor living experience. Let your creativity shine and enjoy the satisfaction of lounging on a custom-made couch in your own backyard.
Conclusion
Building your own DIY outdoor couch is a cost-effective and rewarding way to create a stylish and comfortable seating area for your outdoor space. By following the step-by-step instructions and using the right materials and tools, you can construct a durable piece of furniture that will enhance your outdoor living experience.
Whether you are an experienced DIYer or a beginner, this project is achievable with a little bit of time and effort. With just a few basic tools and affordable materials, you can create a beautiful outdoor couch that will provide you with a cozy spot to relax and unwind in your backyard.
Start building your DIY outdoor couch today and enjoy the fruits of your labor for years to come. Take pride in your creation and customize it to suit your personal style and preferences. With this DIY project, you can have a functional and inviting outdoor seating area where you can entertain guests, spend quality time with family, or simply enjoy the beauty of nature.
FAQ
What materials and tools do I need to build a DIY outdoor couch?
To build a DIY outdoor couch, you will need 8 2x6x8 framing lumber, 2 1/2″ pocket hole screws, 2 1/2″ outdoor wood screws, wood glue, a miter saw, a drill, a Kreg Jig (optional), and a table saw (optional).
What type of lumber should I use for my DIY outdoor couch?
It is recommended to use framing lumber that can be treated with an outdoor finish to protect it from weathering. Alternatively, you can use cedar boards for a naturally weather-resistant option.
How do I build the frame of the outdoor couch?
To build the frame, you will need to cut the legs and arms to size, drill pocket holes, and attach them together using pocket hole screws and wood glue. Then, attach the side runner, bottom runner, cleats, back runner, and front runner to complete the frame.
How do I add the seat slats to the DIY outdoor couch?
Cut the slats to size and attach them to the cleats using wood screws and wood glue. Make sure to space them according to the plans to create a comfortable seating surface.
How do I create the back of the outdoor couch?
Cut the back pieces to size and attach them to the long pieces using pocket hole screws and wood glue. Drill pocket holes in the back slats and secure the back to the couch frame at a 5° angle using screws.
What finishing touches should I consider for my DIY outdoor couch?
Fill any exposed screw holes with outdoor wood filler and sand the entire piece for a smooth surface. Apply an outdoor wood stain or finish to protect the wood and enhance its natural beauty.
How do I add outdoor cushions to my DIY outdoor couch?
Measure the dimensions of your couch seat and choose cushions that fit properly. Arrange the cushions on the seat slats to create a cozy and inviting outdoor seating area.
How can I personalize and customize my DIY outdoor couch?
You can choose the type of lumber, stain color, and cushion style that best suits your outdoor space. You can also modify the dimensions or add unique features to make your couch one-of-a-kind.
What other matching furniture pieces can I build for my outdoor space?
Consider building a DIY outdoor sectional, outdoor chaise lounge, outdoor planter, outdoor daybed, or outdoor bar to create a cohesive and functional outdoor living space.
How much money can I save by building my own outdoor couch?
Building your own DIY outdoor couch can save you money compared to purchasing pre-built outdoor furniture. With just in lumber and basic tools, you can create a high-quality and durable seating project.
How can I make my DIY outdoor couch fit my personal style?
By customizing the design, dimensions, and finishing options, you can create an outdoor couch that reflects your personal style and enhances your outdoor living experience.