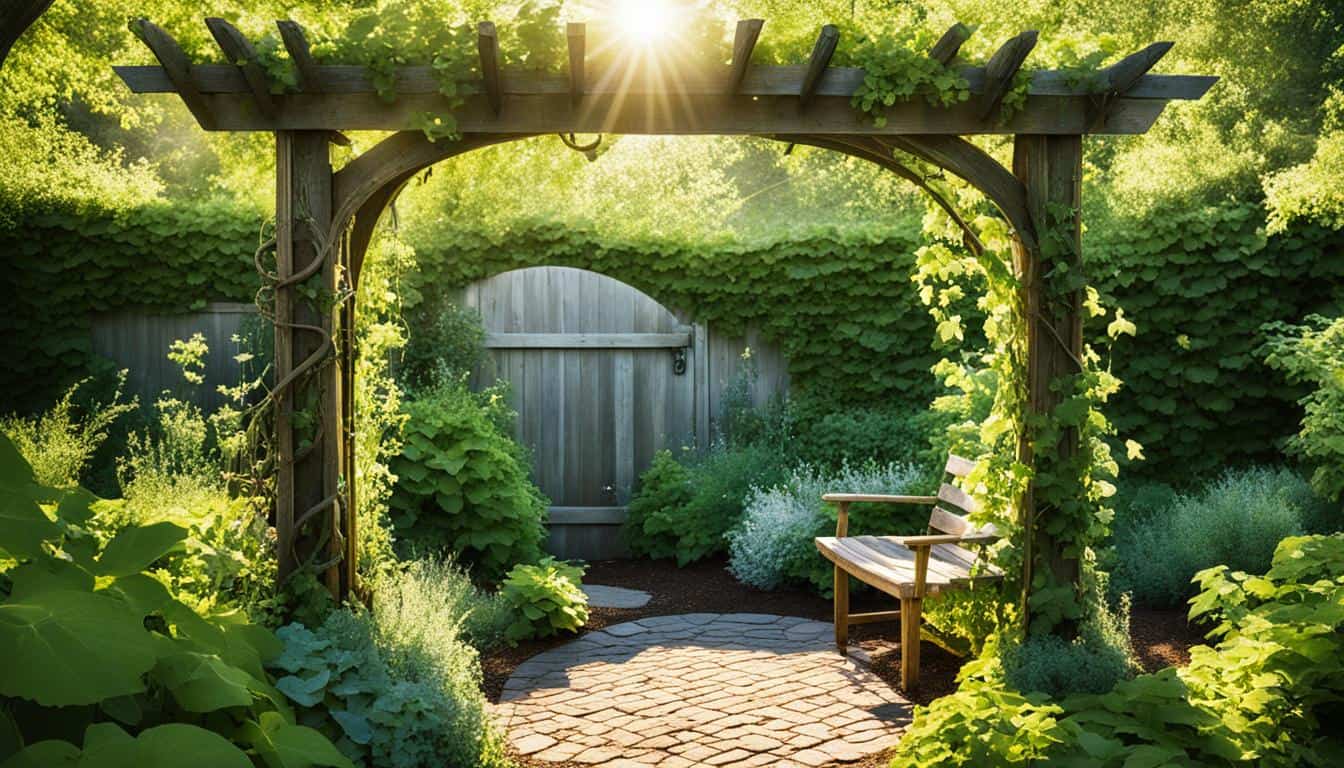
Are you dreaming of a tranquil outdoor retreat where you can unwind and reconnect with nature? Do you want to add a touch of elegance and charm to your backyard? Look no further! In this DIY arbor guide, we will take you through the step-by-step process of creating your own garden oasis. From selecting the perfect location to designing the structure and choosing the right plants, we’ve got you covered. Get ready to transform your outdoor space into a stunning sanctuary that reflects your personal style and brings a sense of serenity to your life.
Building an arbor is not only a rewarding DIY project, but it also offers a multitude of benefits for your outdoor space. An arbor provides support for climbing plants, adding lush greenery and vibrant blooms to your garden. It offers a shaded area where you can relax and enjoy the beauty of nature. And with our comprehensive guide, you’ll have all the knowledge and tips you need to create a custom arbor that perfectly fits your backyard landscaping vision.
Key Takeaways:
- Create a tranquil garden oasis with a DIY arbor.
- An arbor adds beauty, charm, and character to your outdoor space.
- Choose the perfect location and materials for your arbor.
- Customize the design and incorporate your personal style.
- Select the right plants to create a lush and vibrant landscape.
Why Build an Arbor?
Adding an arbor to your garden can significantly enhance your outdoor space, providing both functional and aesthetic benefits. Whether you have a small backyard or a spacious garden, building an arbor offers many compelling reasons to embark on this DIY project.
Reasons to Build an Arbor
- Support for climbing plants: An arbor serves as a sturdy structure for climbing plants, such as roses, vines, and jasmine. These plants can create a lush and captivating landscape, adding vertical interest to your garden.
- Visually appealing landscape: By incorporating an arbor, you can transform your outdoor space into a picturesque setting. The elegant design of an arbor adds a touch of charm and sophistication, enhancing the overall aesthetics of your garden.
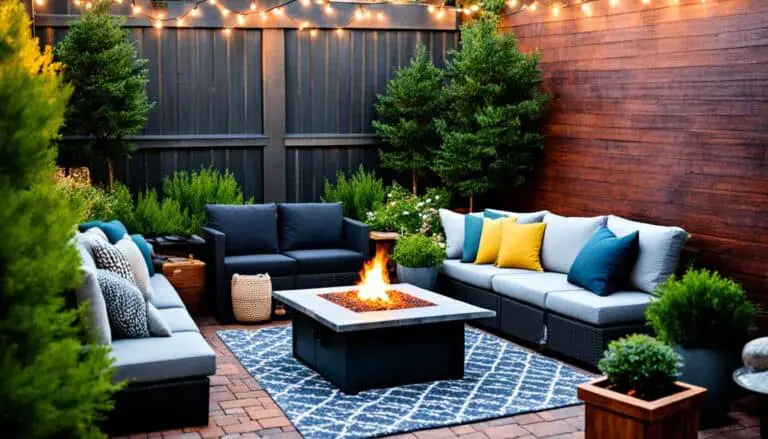
- Shaded relaxation area: An arbor provides a shaded retreat where you can relax and unwind amidst the natural beauty of your garden oasis. Whether you want to escape the heat of the sun or enjoy a peaceful afternoon with a book, an arbor offers a tranquil space to do so.
- Customized design: Building your own arbor allows you to personalize the design to suit your unique style and preferences. From selecting the type of wood to choosing the decorative elements, you have the freedom to create an arbor that perfectly complements your garden.
Enhancing outdoor space with an arbor offers a multitude of benefits, from providing support to climbing plants to creating a shaded area for relaxation. The ability to customize the design adds a personal touch, making your garden truly one-of-a-kind.
Captivating landscapes, shaded relaxation areas, and customized designs are just a few reasons why building an arbor is a worthwhile project for any garden enthusiast.
| Reasons to Build an Arbor | Benefits |
|---|---|
| Support for climbing plants | Creates a lush and visually appealing landscape |
| Visually appealing landscape | Adds charm and sophistication to your garden |
| Shaded relaxation area | Offers a tranquil space for relaxation and unwinding |
| Customized design | Allows for personalization and uniqueness |
Choosing the Right Location
Before beginning the construction process, selecting the right location for your arbor is crucial. Consider several key factors to ensure the best spot is chosen in your garden. You want to create an optimal environment where your arbor thrives and your climbing plants flourish.
First, assess the sunlight exposure in different areas of your garden. Find a location that receives adequate sunlight for your climbing plants to grow and bloom. Too much shade may hinder their growth, while excessive direct sunlight can be detrimental as well.
Next, evaluate the available space in your garden. Measure the dimensions to determine whether the chosen location accommodates the size of your arbor. Accounting for any surrounding structures or landscaping features is important to ensure a well-proportioned and visually pleasing arbor.
Consider the overall layout of your garden when selecting the spot for your arbor. Choose a location that complements the existing elements and flows harmoniously with the surrounding landscape. The arbor should enhance the aesthetics and create a natural focal point within your garden oasis.
| Considerations for Placing an Arbor in Your Garden |
|---|
| Assess sunlight exposure |
| Evaluate available space |
| Consider the overall garden layout |
With these considerations in mind, take the time to choose the right location for your arbor. A well-placed arbor adds beauty, functionality, and enhances the overall ambiance of your garden.
Gathering Materials and Tools
To build your own arbor, you will need a variety of materials and tools. Here is a comprehensive list of what you’ll need:
Materials
- Inexpensive pine or Douglas fir for the majority of the structure
- Pressure-treated wood for the parts that will be in contact with the ground
- Carriage bolts, nuts, and washers
- Sand and gravel for stabilizing the arbor
- Galvanized nails for securing the components
Tools
- Circular saw for cutting the wood
- Drill for making holes
- Chisel for shaping the wood
- Level for ensuring the arbor is straight
Having these materials and tools on hand will make the construction process much smoother. You can gather these supplies from your local hardware store or online retailers.
Now that you have everything you need, let’s move on to the next step: building the top of the arbor.
Building the Top of the Arbor
The construction process of your DIY arbor continues with building the top section. This crucial step involves constructing the arbor top, creating cross braces, and notching the support braces to ensure a strong and secure structure.
To start, you will need to cut and shape the cross braces according to your desired design and dimensions. These braces will help support the weight of the arbor and provide stability. Take your time to ensure accurate measurements and precise cuts for a perfect fit.
Once the cross braces are prepared, it’s time to create the support braces. These braces will be notched and attached to the upright posts, adding additional strength to the overall structure. Pay close attention to the positioning of the notches, as they need to align with the posts for a secure fit.
Using a chisel, carefully notch the support braces to fit securely against the posts. Ensure that the notches are deep and wide enough to provide a snug fit. This will help prevent any wobbling or movement of the arbor once it’s completed.
When constructing the top of the arbor, it’s important to follow proper carpentry techniques and take your time to create a precise and sturdy framework. Emphasize attention to detail, as each joint and connection plays a role in the structural integrity of the arbor.
Building the Top of the Arbor – Step by Step:
- Cut and shape the cross braces according to your design.
- Create notches in the support braces for a secure fit against the upright posts.
- Double-check the measurements and ensure all joints are aligned correctly.
- Securely attach the cross braces and support braces using appropriate fasteners.
Remember, the top of the arbor is a key component in the overall construction process. By constructing a solid and well-designed top section, you’ll lay the foundation for a beautiful and durable arbor that will enhance your outdoor space.
| Tools | Materials |
|---|---|
|
|
Making T-Shaped Supports
Creating a solid foundation for your arbor is essential to ensure its stability and longevity. T-shaped supports play a crucial role in providing the necessary structural support. Follow these steps to make T-shaped supports for your arbor:
- Begin by gathering the materials needed for this step, including:
- 4×4 posts
- 2×6 support braces
- Galvanized nails
- Carriage bolts
- Measure and mark the desired height for your arbor on the 4×4 posts.
- Cut the 4×4 posts to the desired length using a circular saw.
- Align the cut ends of the 4×4 posts to form a T-shape.
- Attach the 2×6 support braces to the 4×4 posts using galvanized nails and carriage bolts.
By attaching the support braces to the 4×4 posts, you ensure the stability and strength of your arbor structure. Take accurate measurements and use galvanized nails and carriage bolts to secure the support braces, providing a solid foundation for your arbor. With this step complete, your arbor is well on its way to becoming a beautiful and functional addition to your garden oasis.
Creating a Lattice-Like Look on the Sides
To achieve a lattice-like look on the sides of your arbor and add a touch of elegance to your outdoor space, you can incorporate 2×4 and 1×2 ladder rails. These rails will be positioned between the support braces, creating a visually appealing design that allows climbing plants to thrive. By securing the rails with nails or screws, you can ensure that your arbor not only provides structural support but also enhances the overall aesthetic of your garden oasis.
The lattice-like design created by the 2×4 and 1×2 ladder rails adds a decorative element to your arbor, accentuating the charm and character of your outdoor space. This design not only serves a functional purpose by providing support for climbing plants but also creates a visually striking focal point in your garden.
By utilizing lattice-like sides, you can transform your arbor into a stunning centerpiece that effortlessly blends with the natural surroundings. This design choice allows you to showcase your creativity and personal style, adding a unique touch to your garden oasis.

Advantages of using 2×4 and 1×2 ladder rails:
- Enhances the overall visual appeal of the arbor
- Provides support for climbing plants
- Creates a unique and elegant lattice-like design
- Allows for creative customization of your garden oasis
Adding lattice-like sides to your arbor not only enhances its structural integrity but also adds a touch of sophistication to your outdoor space. The visually appealing design created by the 2×4 and 1×2 ladder rails allows you to showcase your gardening skills and create a stunning focal point in your garden oasis. Transform your arbor into a work of art, where nature meets craftsmanship, by incorporating lattice-like sides.
Assembling and Raising the Arbor
Now that you have successfully constructed all the components of your arbor, it’s time to assemble and raise it into place. This is an exciting step that brings your vision to life and transforms your outdoor space into a stunning garden oasis.
Before you begin, ensure you have the necessary tools and materials on hand. Double-check that you have all the pieces you’ve built, including the top, T-shaped supports, and lattice-like sides.
Start by selecting the location where you want to install your arbor. Ensure that the area is clear of any obstructions and the ground is level. Then, mark the positions for the uprights by using stakes or spray paint. These markings will guide you when digging the holes for the uprights.
Use a post hole digger or an auger to dig holes for the uprights. The depth of the holes should be at least one-third the height of the uprights, ensuring stability for your arbor. Take your time to ensure the holes are deep enough and evenly spaced.
Once the holes are dug, carefully place the uprights into the holes. Ensure that they are level and straight by using a level and making any necessary adjustments. You may need assistance from a second person to hold the uprights in place while you verify their alignment.
Now, it’s time to secure the uprights. Use a mix of sand and gravel in the holes around the uprights to create a solid base. Compact the mixture firmly to provide stability and prevent shifting over time. Double-check the level one last time to ensure the uprights are perfectly aligned.
With the uprights securely in place, it’s time to assemble the rest of the arbor. Follow the instructions provided during the construction process, attaching the top, T-shaped supports, and lattice-like sides. Ensure that all connections are secure and tight.
Once the arbor is fully assembled, step back and admire your work. Take a moment to appreciate the beauty and craftsmanship of your creation. Your arbor is now ready to provide shade, support climbing plants, and add elegance to your garden.
Remember to follow any additional instructions or recommendations provided by the manufacturer or your chosen arbor design. These specific guidelines may vary depending on the materials and style of your arbor.
With your arbor assembled and raised into place, your garden oasis is well on its way to completion. The next step is to personalize your outdoor space and choose the right plants to enhance the beauty and ambiance of your garden oasis. In the following section, we will explore the process of selecting the perfect plants for your arbor and creating a lush and vibrant landscape.
Designing a Small Space Garden Oasis
If you have a small outdoor space, don’t let the limited area hold you back from creating a stunning garden oasis. With the right design and plant selection, you can transform even the smallest of spaces into a tranquil and inviting retreat.
When working with a small space, it’s important to maximize every inch. Consider utilizing vertical space by incorporating vining plants that can climb up walls or trellises. This not only adds visual interest but also allows you to make the most of your limited ground area.
In addition, stackable planters or hanging baskets can provide extra room for plants without taking up valuable floor space. These space-saving solutions allow you to add a variety of plants and create layers of greenery, enhancing the overall aesthetic of your garden oasis.
When choosing plants for your small space garden oasis, opt for varieties that offer visual stimulation. Consider incorporating blooming plants with vibrant flowers to add pops of color and fragrance to your outdoor space. These plants not only create a visually appealing environment but also attract beneficial pollinators such as bees and butterflies.
Remember, the key to designing a successful garden oasis in a small area is to create a serene and inviting atmosphere. Choose plants that thrive in your specific climate and growing conditions, ensuring that they will flourish in your limited space. By carefully selecting and arranging your plants, you can create a relaxing sanctuary that brings you joy every time you step outside.


Creating a Complete Backyard Getaway
If you have more space to work with, you have the opportunity to design a backyard garden oasis that will be the envy of all your neighbors. By incorporating beautiful structures and providing a variety of seating options, you can create a space that is both inviting and visually stunning.
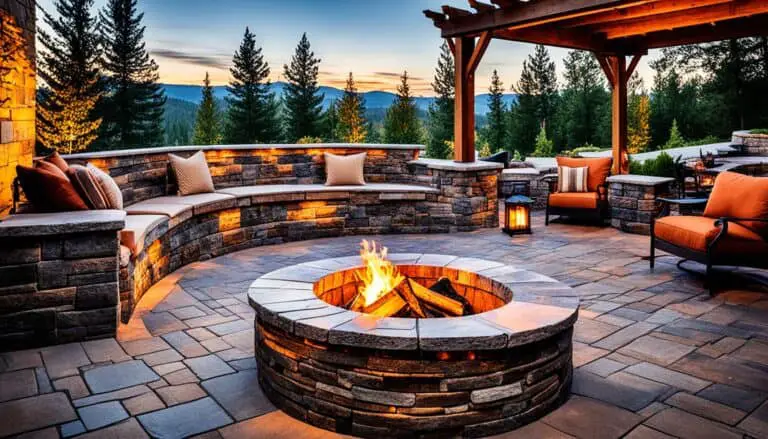
When designing your backyard garden oasis, consider adding structures such as a gazebo or a bird bath. These can become focal points in your outdoor space, adding charm and elegance. A well-placed gazebo can provide shade, shelter, and a cozy spot to relax or entertain. A bird bath, on the other hand, not only adds visual interest but also attracts a variety of birds, creating a soothing and peaceful environment.
Seating options are also essential for creating a welcoming outdoor space. Benches, chairs, or even hammocks can offer comfort and relaxation for you and your guests. Consider mixing different styles and materials to add visual interest. For example, a wooden bench provides a classic and rustic feel, while metal chairs add a modern touch. The key is to create a seating arrangement that encourages conversation and relaxation.
To bring your backyard garden oasis together, it’s important to plan your space around a central focal point. This could be a water feature like a fountain or a small pond. The soothing sounds of running water will enhance the tranquil atmosphere of your outdoor space, while the visual beauty of the water feature will create a sense of harmony.
In addition to a focal point, incorporating natural stone into your garden oasis can add texture and visual interest. Use stone as pathways, borders, or even as part of decorative features. The natural beauty of stone will create a seamless connection between the structures, seating options, and surrounding plants.
In summary, designing a complete backyard getaway involves considering the layout and functionality of the space. By incorporating structures like gazebos and bird baths, providing various seating options, and planning around a focal point, you can create a garden oasis that is both visually stunning and inviting. Don’t be afraid to personalize your space with decorative accents and plantings that reflect your unique style and taste.
Choosing the Right Plants for Your Garden Oasis
The selection of plants for your garden oasis is a critical decision that will contribute to creating the desired atmosphere and ambiance. By choosing the right mix of plants, you can transform your garden into a lush and vibrant space that brings joy and tranquility. When selecting plants for your garden oasis, consider the following factors:
1. Types of Plants
Incorporate various types of plants to add depth and visual interest to your garden oasis. Here are three key types of plants to consider:
- Flowering Plants: Choose plants that produce vibrant, colorful flowers to enhance the aesthetics of your garden. Roses, lilies, and dahlias are popular choices for their stunning blooms and captivating fragrances.
- Vining Plants: Vining plants add a touch of elegance and create a charming, picturesque scene. Consider incorporating ivy, jasmine, or climbing roses to add vertical dimension and create a beautiful backdrop for your arbor.
- Broadleaf Plants: Broadleaf plants, such as ferns, hostas, and elephant ears, provide a lush and tropical feel to your garden oasis. Their large, captivating leaves add texture and create a relaxing, inviting environment.
2. Climate and Growing Conditions
Before finalizing your plant selection, consider the climate and growing conditions in your area. Ensure that the chosen plants are suitable for your region and can thrive in the specific conditions of your garden. Factors such as sunlight exposure, soil type, and moisture levels should be taken into account to ensure the successful growth and longevity of your plants.
3. Complementary Plant Pairings
Create a harmonious and visually appealing garden oasis by considering the complementary pairings of different plant varieties. Choose plants that bloom at different times to ensure a continuous display of colors throughout the seasons. Additionally, consider the varying heights and textures of plants to achieve a well-balanced and visually engaging composition.

| Plant Type | Examples |
|---|---|
| Flowering Plants | Roses, Lilies, Dahlias |
| Vining Plants | Ivy, Jasmine, Climbing Roses |
| Broadleaf Plants | Ferns, Hostas, Elephant Ears |
By carefully selecting plants that incorporate flowering varieties, vining plants, and broadleaf plants, you can create a garden oasis that will captivate your senses and provide a serene and inviting space to relax and unwind.
Maintenance and Care Tips
Once your garden oasis is complete, it’s important to maintain and care for the arbor and plants to ensure their health and longevity. Regular pruning, watering, and fertilizing are essential tasks that will help your plants thrive.
Pruning Tips
Pruning is an important part of maintaining an arbor and promoting healthy plant growth. Here are some tips to keep in mind:
- Prune your plants during their dormant season to minimize stress and encourage new growth.
- Remove any dead or diseased branches to prevent the spread of infections.
- Trim back overgrown branches to maintain the desired shape and size of the plants.
- Use sharp, clean pruning shears to make clean cuts and prevent damage to the plants.
Watering Tips
Proper watering is crucial for the health of your plants. Follow these tips to ensure your garden oasis stays hydrated:
- Water your plants deeply and infrequently to encourage deep root growth.
- Check the soil moisture regularly and only water when it feels dry about one inch below the surface.
- Avoid overwatering, as it can lead to root rot and other fungal diseases.
- Consider using a drip irrigation system or soaker hoses to deliver water directly to the plants’ roots and minimize water waste.
Caring for the Arbor
In addition to maintaining the plants in your garden oasis, it’s important to care for the arbor itself. Here are some tips to keep it in good condition:
- Regularly inspect the arbor for any signs of damage or wear, such as loose bolts or cracks in the wood.
- Remove debris, such as fallen leaves or twigs, from the arbor to prevent moisture buildup and potential decay.
- Consider staining or sealing the wood to protect it from the elements and extend its lifespan.
- Add a fresh coat of paint or stain as needed to keep the arbor looking its best.
By following these maintenance and care tips, you’ll be able to enjoy a beautiful and thriving garden oasis for years to come.
Personalizing Your Garden Oasis
Creating a garden oasis is a wonderful way to enhance your outdoor space and bring your own unique style and taste to life. By adding personal touches and incorporating unique elements and decor, you can transform your garden into a true reflection of your individuality. Whether you prefer a cozy and intimate atmosphere or a vibrant and colorful retreat, there are countless ways to personalize your garden oasis.
Here are some ideas to inspire you:
Add Decorative Accents
Decorative accents bring charm and personality to your garden oasis. Consider incorporating items such as birdhouses, wind chimes, or garden sculptures. These small touches can instantly enhance the visual appeal of your space and create points of interest throughout your garden.
Illuminate with Outdoor Lighting
Outdoor lighting not only adds ambiance to your garden oasis but also extends the usability of your outdoor space into the evening hours. Choose from string lights, lanterns, or solar-powered pathway lights to create a warm and inviting atmosphere. Highlight key features of your garden, such as your arbor or favorite plants, with strategically placed lighting.
Showcase Artwork
Integrating artwork into your garden oasis can add a delightful element of creativity. Hang paintings or photographs on fences or exterior walls, or display sculptures and pottery amidst your plants. Artwork can act as a focal point, creating a captivating visual experience and adding an extra layer of beauty to your outdoor sanctuary.
Create a Customized Sign or Plaque
A customized sign or plaque can add a personal touch to your garden oasis. Display your family name, a meaningful quote, or even a quirky message on a specially crafted sign. This simple addition not only adds charm but also makes your garden space uniquely yours.
Remember, the key to personalizing your garden oasis is to let your imagination guide you. Choose elements that resonate with your style and preferences, and don’t be afraid to mix and match different elements for a truly unique look. Your garden oasis should be a reflection of who you are and a space that brings you joy and tranquility.
Maximizing Benefits: Mental Health and Well-Being
Creating a garden oasis has numerous benefits for your mental health and overall well-being. The impact of being in nature and surrounded by greenery can have a transformative effect on your stress levels, relaxation, and mindfulness. Spending time in your garden oasis provides a unique opportunity to rejuvenate your mind, alleviate stress, and find inner peace.
Research has shown that being in nature and engaging with green spaces has a positive impact on mental health. The calming effects of nature help reduce stress and anxiety, allowing you to unwind and recharge. By creating a garden oasis, you are providing yourself with a personal retreat where you can escape from the pressures of daily life and find solace in the beauty of nature.
Relaxation is another key aspect of a garden oasis. The serene environment created by your garden helps promote relaxation and tranquility. The gentle sounds of rustling leaves, the fragrance of blooming flowers, and the soothing colors of nature all contribute to a peaceful atmosphere that encourages relaxation. Whether you choose to sit and meditate, read a book, or simply enjoy the beauty around you, your garden oasis provides a sanctuary for relaxation.
Spending time in your garden oasis also offers an opportunity for mindfulness. Mindfulness is the practice of being fully present and engaged in the current moment, without judgment. By immersing yourself in the sights, sounds, and sensations of your garden, you can cultivate mindfulness and enhance your overall well-being. Mindful gardening, such as tending to plants, observing the growth and changes in nature, and connecting with the earth, allows you to fully engage with the present moment and find a sense of grounding and peace.
“In today’s fast-paced world, finding moments of peace and serenity is essential for our mental well-being. Creating a garden oasis provides a dedicated space for relaxation, stress reduction, and mindfulness. It’s a place where we can reconnect with nature and find comfort, joy, and inner peace.”
So, take advantage of the mental health benefits that a garden oasis offers. Spend time unwinding and de-stressing in your green sanctuary, embrace the beauty of nature, and cultivate a mindful connection with your outdoor space. From reducing stress to promoting relaxation and mindfulness, your garden oasis can truly be a haven that nurtures your well-being.
Building Memories and Enjoying the Garden Oasis
Building a garden oasis goes beyond creating a beautiful outdoor space; it provides an opportunity to create lasting memories and find joy and serenity in your own backyard. Whether you are sharing meals with loved ones, hosting gatherings, or simply enjoying quiet moments alone, your garden oasis becomes a cherished space that holds special moments.
Imagine dining under a canopy of flowering vines, the gentle breeze carrying the scent of blooming flowers. Your garden oasis becomes the perfect backdrop for intimate dinners with friends and family, creating memories that will be treasured for years to come.
Shared laughter, conversations, and the warmth of the sun on your skin transform your garden oasis into a gathering place for celebrations and good times. It becomes a space where friendships are strengthened and new connections are made. This is where you create memories that are woven into the fabric of your life.
But your garden oasis also offers moments of solitude and serenity, away from the demands of everyday life. It becomes your personal sanctuary, a place where you can retreat to find peace and tranquility. Surrounded by the beauty of nature, you can immerse yourself in the present moment, finding solace in the sounds of rustling leaves and birdsong.
Your garden oasis becomes an extension of your home, reflecting your unique style and personality. You can add personal touches, such as artwork, decorative accents, or outdoor lighting, to make it truly your own. It is in these details that you infuse your garden oasis with your essence, elevating it beyond a mere outdoor space.
“A garden to walk in and immensity to dream in – what more could he ask? A few flowers at his feet and above him the stars.” – Victor Hugo
Just as Victor Hugo eloquently expressed, your garden oasis offers a world of possibilities and wonder. It is where you can experience the simple joys of life and find respite from the complexities of the world. It is where you create lasting memories, find solace, and embrace the beauty of nature.
| Benefits of Enjoying a Garden Oasis | Memorable Moments in a Garden Oasis |
|---|---|
| 1. Stress reduction and relaxation | 1. Hosting outdoor parties and gatherings |
| 2. Improved mental well-being | 2. Sharing meals with loved ones |
| 3. A sanctuary for mindfulness and tranquility | 3. Enjoying quiet moments of solitude |
| 4. Connection to nature and natural beauty | 4. Creating a space for celebrations and special occasions |
| 5. Personalization and self-expression | 5. Making memories with family and friends |
In your garden oasis, you have the freedom to cultivate an environment that sparks joy and nurtures your soul. It is a space where you can find a moment of respite amid the chaos of life and create memories that will be cherished for a lifetime.
Takeaway:
Building a garden oasis provides the perfect opportunity to create lasting memories and find joy and serenity in your outdoor space. From hosting gatherings to sharing quiet moments alone, your garden oasis becomes a treasured sanctuary where you can unwind, connect with nature, and make unforgettable memories with loved ones. Embrace the beauty of your garden oasis, personalize it to reflect your unique style, and let it become a haven of lasting happiness.
Conclusion
Building a garden oasis with a DIY arbor is a fulfilling and rewarding project. By following this comprehensive guide, you can create a serene and immersive outdoor space that reflects your personal style and provides a sanctuary for relaxation and enjoyment. From selecting the right location to choosing the perfect plants, each step plays a crucial role in transforming your garden into a beautiful oasis.
Throughout the process, you have learned how to gather the necessary materials and tools, construct the arbor top, create T-shaped supports, add lattice-like sides, assemble and raise the arbor, and design a small space or complete backyard garden oasis. Additionally, you have discovered the importance of selecting the right plants, maintaining and caring for the arbor and plants, personalizing your garden oasis, and maximizing the mental health and well-being benefits.
Now it’s time to put your newfound knowledge into action and start building your dream garden oasis. Whether you have limited space or a spacious backyard, the satisfaction of creating a beautiful and inviting outdoor space will bring joy and serenity into your life. So grab your tools and let your creativity flourish as you embark on this exciting DIY arbor journey. Your garden oasis awaits!
FAQ
What are the benefits of adding an arbor to my garden?
Adding an arbor to your garden provides support for climbing plants, creates a visually appealing landscape, offers a shaded area for relaxation, and adds elegance to your outdoor space.
How do I choose the right location for my arbor?
Consider factors such as sunlight exposure, available space, and the overall layout of your garden. Choose a spot that provides the right amount of shade and allows your climbing plants to thrive.
What materials and tools do I need to build an arbor?
For materials, you can use inexpensive pine or Douglas fir for the structure, as well as pressure-treated wood for parts in contact with the ground. You will also need carriage bolts, nuts, washers, sand, gravel, and galvanized nails. Basic carpentry tools like a circular saw, drill, chisel, and level are necessary.
How do I build the top of the arbor?
Start by cutting and shaping the cross braces and support braces. Notch the support braces to create a sturdy structure. Pay attention to detail and use basic carpentry skills for this step.
How do I make T-shaped supports?
Attach 2×6 support braces to the 4×4 posts to provide a solid foundation for the arbor. Use galvanized nails and carriage bolts, and ensure accurate measurements.
How do I create a lattice-like look on the sides of the arbor?
Install 2×4 and 1×2 ladder rails between the support braces to achieve an elegant design. Secure these rails with nails or screws.
How do I assemble and raise the arbor into place?
Dig holes for the uprights, carefully follow the instructions, and make any necessary adjustments to ensure a stable and well-built structure.
How can I create a garden oasis in a small space?
Utilize vertical space with vining plants or stackable planters. Choose plants that offer visual stimulation, such as blooming plants with fragrant flowers. Maximize your limited space by carefully planning and selecting appropriate plants.
How can I create a complete backyard getaway?
Consider adding structures like a gazebo or bird bath, as well as multiple seating options such as benches, chairs, or hammocks. Plan your space around a central focal point and incorporate natural stone for added texture and visual interest.
What types of plants should I choose for my garden oasis?
Select a mix of flowering plants, vining plants, and broadleaf plants to create a lush and vibrant space. Consider the climate and growing conditions in your area to ensure the chosen plants will thrive in your garden.
How do I maintain and care for my arbor and plants?
Regular pruning, watering, and fertilizing will help keep your plants healthy. Monitor for pests and diseases and take necessary steps to prevent or treat any issues. Keep the arbor clean and free from debris.
How can I personalize my garden oasis?
Add personal touches such as decorative accents, outdoor lighting, artwork, or customized signs or plaques to make your garden oasis reflect your individual style and taste.
How can a garden oasis benefit my mental health and well-being?
Spending time in nature and being surrounded by greenery has been shown to reduce stress, promote relaxation, and improve overall mental well-being. A garden oasis can provide an opportunity for mindfulness and tranquility.
How can I build lasting memories and enjoy my garden oasis?
Whether it’s hosting gatherings, sharing meals, or simply spending quiet moments alone, your garden oasis can become a cherished space that brings joy and serenity to your life.