Are you looking to add some outdoor fun to your backyard? Have you considered building your own DIY horseshoe pit? Not only is it a cost-effective option, but it also allows you to customize the design and size to suit your preferences. But here’s the million-dollar question: Is building your own horseshoe pit as easy as it sounds? Let’s find out!
Key Takeaways:
- Building a DIY horseshoe pit in your backyard is a fun and rewarding project.
- Creating your own horseshoe pit allows you to customize the design and size.
- You can build a sturdy horseshoe pit with basic materials and tools.
- Consider adding a raised backstop for added convenience and safety.
- Following the proper steps and using quality materials is crucial for a successful project.
Why Build Your Own Horseshoe Pit?
Creating your own homemade horseshoe pit in your backyard offers numerous benefits. Not only can you customize the size, design, and materials to suit your preferences, but it also provides a cost-effective way to add a fun outdoor game to your backyard. A backyard horseshoe pit can be a great addition to your outdoor entertaining space, providing hours of entertainment for family and friends.
By building your own backyard horseshoe pit, you have complete control over the design and layout. You can choose the specific dimensions that fit your available space and desired gameplay experience. Whether you prefer a larger or smaller horseshoe pit, building it yourself allows you to tailor it to your needs.
Additionally, a homemade horseshoe pit gives you the freedom to select the materials that best suit your style and budget. While professional horseshoe pits may be made from expensive materials, such as steel or concrete, you can opt for more affordable alternatives without compromising on quality. This DIY approach not only saves you money but also allows you to get creative and add your personal touch.
Furthermore, the satisfaction of building your own backyard horseshoe pit cannot be overstated. It provides a sense of accomplishment and pride knowing that you have created a fun and enjoyable space for outdoor entertainment. The process of planning, constructing, and finally playing on your very own homemade horseshoe pit enhances the overall experience and creates lasting memories.
Building your own backyard horseshoe pit not only offers customization options and cost savings but also provides a sense of pride and accomplishment.
Whether you’re looking to engage in friendly competition with family and friends, host backyard gatherings, or simply enjoy some quality time outdoors, a homemade horseshoe pit is an excellent addition to any backyard. It provides an opportunity to engage in a classic outdoor game that has been enjoyed for generations.
Now that you understand the benefits of building your own horseshoe pit, it’s time to dive into the details of creating a sturdy and enjoyable backyard game area. In the next section, we will explore different horseshoe pit design ideas and materials that will ensure a successful DIY project.
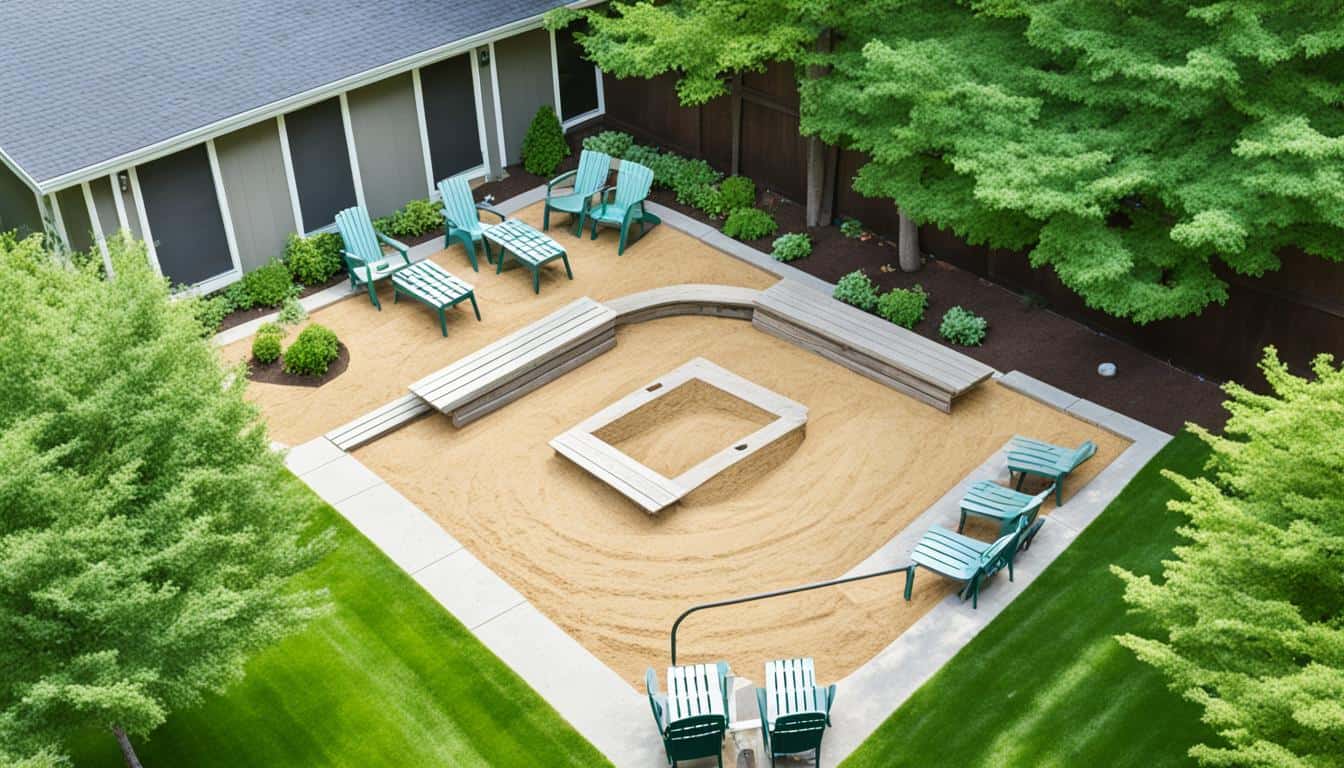
Sturdy Horseshoe Pit Design
When it comes to designing your horseshoe pit, durability is key. You want to create a structure that can withstand frequent use and provide a reliable playing surface. To achieve this, consider using treated lumber for the frame of your horseshoe pit. Treated lumber is resistant to decay and moisture, making it ideal for outdoor use. It will help ensure that your horseshoe pit stands the test of time.
In addition to using sturdy materials, it’s also important to incorporate a backstop into your design. A backstop is a barrier that prevents horseshoes from bouncing out of the pit, helping to keep the game fair and preventing any interference with neighboring players. This can be achieved by attaching a piece of plywood or another suitable material to the back of the horseshoe pit frame. The backstop should be at least three feet high and extend the width of the pit.
While functionality is important, don’t forget about the aesthetics of your horseshoe pit. Adding decorative elements can enhance the overall look of your backyard and make the pit more visually appealing. You can incorporate landscaping around the pit, such as flowers or shrubs, to create an inviting and attractive space for your outdoor games. Be creative and have fun with the design!
By considering these design ideas and materials, you can create a horseshoe pit that is not only sturdy but also visually appealing. Your backyard will become a popular gathering spot for family and friends to enjoy some friendly competition. So get ready to toss those horseshoes and have a great time!
Simple to Build Frame
Constructing a sturdy frame is an essential step in horseshoe pit construction. With a simple design and basic tools, you can create a solid foundation that will withstand countless hours of gameplay. Here’s how:
Gather Materials
- 2x4s: Choose quality lumber that is straight and free from knots or damage.
- Kreg Blue-Kote Pocket Hole Screws: These specialized screws offer durability and corrosion resistance.
Assemble the Frame
- Measure and cut the 2x4s according to the standard horseshoe pit dimensions.
- Drill pocket holes into the ends of each board, ensuring they align for secure connections.
- Attach the boards using Kreg Blue-Kote Pocket Hole Screws, creating a rectangular frame.
“A solid frame is the backbone of a horseshoe pit. It provides stability and ensures consistent gameplay.”
By following these steps, you can easily build a frame that will serve as a reliable and durable base for your horseshoe pit. The simple construction method and use of quality materials make this an achievable project for DIY enthusiasts of all skill levels.
Next, let’s explore the benefits of incorporating throwing platforms into your horseshoe pit design.
Throwing Platforms
Creating a level throwing platform is an essential aspect of building a horseshoe pit. A proper throwing platform not only ensures fair gameplay but also adds a professional touch to your backyard setup. One popular option for creating a consistent and stable surface is to use concrete pavers. These pavers not only provide a smooth and level area for throwing horseshoes but also serve as the foul line. By incorporating multiple throwing lines, you can accommodate players of different ages and skill levels.
Concrete pavers are durable, weather-resistant, and easy to install. They come in various shapes, sizes, and colors, allowing you to customize the design of your horseshoe pit. Here are a few design ideas to consider when incorporating concrete pavers into your throwing platforms:
1. Single Foul Line:
If you prefer a simple and clean design, a single foul line can be created using a straight row of concrete pavers. This design is straightforward and easy to maintain, providing a clear boundary for players to stand behind. It also offers a visually pleasing aesthetic that complements any backyard setting.
2. Multiple Foul Lines:
To cater to different skill levels and age groups, you can incorporate multiple foul lines into your horseshoe pit. Using different colored or patterned pavers, create separate throwing zones for beginners, intermediate players, and advanced competitors. This design allows everyone to enjoy the game at their own level, adding an element of inclusivity and friendly competition to your backyard.
Remember, when creating the throwing platforms, make sure that the pavers are securely placed and provide a stable surface for throwing horseshoes. Additionally, consider adding a slight slope to the platforms to encourage proper drainage and prevent water from pooling.
“The throwing platforms play a crucial role in the overall gameplay experience. They not only provide a level surface for throwing horseshoes but also create a defined boundary for players. Incorporating multiple lines adds an extra layer of challenge and excitement, making your horseshoe pit appealing to players of all skill levels.”
Materials & Tools Needed
Building your own horseshoe pit requires the right materials and tools. Here’s a list of what you’ll need to get started:
Materials:
- Landscaping timbers
- Galvanized nails
- Lag screws
- Play sand
Tools:
- Drill
- Shovel
- Level
Choosing the right materials is crucial for the durability and longevity of your horseshoe pit. Opt for landscaping timbers that are sturdy and weather-resistant. Galvanized nails and lag screws will ensure a secure and long-lasting construction. Play sand provides a suitable surface for gameplay, absorbing the impact of horseshoes. As for tools, a drill will help you assemble the frame, while a shovel and level are essential for excavation and leveling the ground.
Now that you have the necessary materials and tools, you’re ready to move on to the construction process. Continue reading to learn about finding the perfect location for your horseshoe pit.


Find The Location
Before you start building your own horseshoe pit, it’s essential to find the perfect location in your backyard. The right horseshoe pit location can make a significant difference in your gaming experience. Here are a few key considerations:
- Open Space: Look for an open area that can accommodate two horseshoe pits placed 40 feet apart. This spacing allows for two separate games and ensures safety.
- Backyard Size: Take into account the size of your backyard when selecting the horseshoe pit location. Ensure there is enough space to avoid any obstructions during gameplay.
- Accessibility: Consider accessibility for players of all ages and abilities. Choose a location that is easily accessible for everyone.
- Ground Conditions: It’s important to have a flat and level surface for the horseshoe pit. Avoid areas with slopes or uneven ground to ensure fair gameplay.
Once you’ve identified the ideal spot, prepare it for construction by clearing the area of any debris or vegetation. This will ensure a clean and safe playing environment for you and your guests.

Mark & Dig
Now that you have determined the ideal location for your horseshoe pit, it’s time to mark the dimensions and start digging. This step is crucial to ensure that your horseshoe pit is the right size and shape for optimal gameplay. Follow these steps to mark and dig your pit:
- Start by using stakes and twine to mark the dimensions of each pit. Make sure the corners are square and the lines are straight. This will help create a professional-looking horseshoe pit.
- Once you have marked the dimensions, it’s time to start digging. Excavate the marked areas to the appropriate depth. The standard horseshoe pit dimensions are 46 feet long and 6 feet wide, with a pit depth of approximately 4 inches.
- As you dig, make sure to level the ground. This will provide a solid base for your horseshoe pit and help with drainage. Use a shovel and a level to ensure that the ground is even and flat.
Take your time during this stage to ensure that your pit is accurately marked and properly excavated. A well-constructed horseshoe pit will enhance your gameplay experience and provide endless hours of fun.
Now that you have marked and dug your pit, it’s time to move on to the next step: constructing the frame. This is where the real fun begins!
Timber Time
To ensure the structural integrity of your horseshoe pit, it’s time to work on the frame using landscaping timbers. Follow these steps to create a sturdy and durable structure for your pit:
- Cut the landscaping timbers to the required lengths, considering the dimensions of your horseshoe pit.
- Drill holes in the timbers for easy assembly. Ensure the holes are evenly spaced and aligned for a secure frame.
- Use galvanized spikes to secure the timbers together. Hammer the spikes through the drilled holes, connecting the timbers and forming the frame of the horseshoe pit.
By using galvanized spikes, you’ll prevent corrosion and ensure that the frame remains stable and durable even through years of use. The secure frame provides a solid foundation for the rest of the horseshoe pit construction process.
Example:
“Cut the landscaping timbers to the required lengths and drill holes for assembly.”
“Use galvanized spikes to secure the timbers together and create the frame of the horseshoe pit.”
Drive the Stake
Now that you have prepared the foundation of your horseshoe pit, it’s time to drive the stakes into the ground. This step is crucial for both proper gameplay and safety.
Start by placing the metal stakes at a distance of 40 feet from each other. Make sure they are positioned at the correct angle and height to ensure fair competition. The stakes should be securely anchored in the ground to withstand the force of the horseshoes.
Here are some key points to consider when driving the stake:
- Use a sturdy mallet or hammer to drive the stake into the ground. Make sure it is deep enough to remain stable during gameplay.
- Ensure that the top of the stake is level with the ground to prevent any tripping hazards.
- Check the alignment of the stake to ensure that it is perpendicular to the throwing platform.
Remember, the proper placement and anchoring of the stakes are essential for the integrity of the game. Take your time to ensure everything is accurately set up before moving on to the next steps.
Pro Tip: For added stability, you can pour some concrete around the base of the stake once it is driven into the ground. This will provide extra support and prevent any wobbling during gameplay.
| Key Points for Driving the Stake |
|---|
| Place the stakes 40 feet apart |
| Ensure proper angle and height |
| Use a sturdy mallet or hammer |
| Anchor the stake securely |
| Check alignment with the throwing platform |
Pour and Level the Sand
Once you have excavated the pit and prepared the frame, it’s time to fill it with play sand. This step is crucial for creating a smooth and level playing surface in your horseshoe pit.

Fill the excavated pit with play sand, ensuring that it evenly covers the entire area. The sand will play a critical role in absorbing the impact of the horseshoes and preventing excessive bouncing. It also contributes to the overall stability and safety of the pit.
To evenly distribute and level the sand, use a shovel or a board. Start by pouring the sand in small piles across the pit. Then, using the shovel or board, spread the sand out, working from one end to the other. Make sure the sand is distributed uniformly to create a consistent playing surface.
While spreading the sand, take extra care to avoid disturbing the frame or the stakes. Keep the sand level and smooth, ensuring there are no mounds or trenches that could affect gameplay.
Pro Tip:
If you want to enhance the aesthetics of your horseshoe pit, consider adding a decorative border around the pit area. This can be done using landscaping stones, bricks, or pavers. Not only will it give your horseshoe pit a polished look, but it will also help keep the sand contained within the designated playing area.
Horseshoe Pit Sand Depth Recommendations:
| Player Skill Level | Sand Depth |
|---|---|
| Beginner | 4-6 inches |
| Intermediate | 6-8 inches |
| Advanced | 8-12 inches |
By following these recommended sand depth guidelines, you can ensure that your horseshoe pit is suitable for players of all skill levels. The deeper the sand, the greater the challenge, so feel free to adjust the sand depth based on your preferences and the level of competitiveness you desire.
“The levelness of the sand in your horseshoe pit is crucial for fair gameplay. An uneven pit can disrupt the natural trajectory of horseshoes, compromising the accuracy and enjoyment of the game.”
– Outdoor Games and Sports Association
Now that you’ve poured and leveled the sand, your horseshoe pit is almost complete! The next section will cover the optional addition of a raised backstop for added convenience and safety.
Raised Backstop (Optional)
If you want to enhance the convenience and safety of your horseshoe pit, consider adding a raised backstop. This additional feature helps prevent horseshoes from going beyond the pit area, keeping the game contained and minimizing the risk of accidents.
To construct a raised backstop, you will need additional timbers and lag screws. These materials will provide the necessary stability and support for the backboard.
“A raised backstop is a valuable addition to a horseshoe pit as it ensures that the horseshoes stay within the designated playing area. This not only makes the game more enjoyable but also reduces the chances of stray horseshoes causing damage or injury.”
Steps to Build a Raised Backstop:
- Measure the width of your horseshoe pit and cut the timbers to match this length.
- Position the timbers vertically and secure them to the ground using lag screws. Ensure the timbers are spaced evenly to create a solid backstop.
- For added stability, consider anchoring the backstop to the existing frame of the horseshoe pit. This will help prevent any movement during gameplay.
By incorporating a raised backstop into your horseshoe pit design, you can enhance the overall functionality and safety of your backyard game. It’s a practical addition that minimizes the risk of stray horseshoes and keeps the focus on the game itself.
So go ahead, build a raised backstop for your horseshoe pit and elevate your backyard horseshoe experience!
Conclusion
Building your own DIY horseshoe pit is a fantastic way to transform your backyard into a fun and entertaining space for family and friends. By following the step-by-step guide in this article and using high-quality materials, you can create a custom horseshoe pit that will provide endless hours of enjoyment.
With your newly built horseshoe pit, you can organize friendly competitions, host outdoor gatherings, and create lasting memories. The DIY approach allows you to customize the size, design, and materials of the pit to suit your preferences and needs. Whether you’re a seasoned horseshoe player or a beginner, this backyard addition is sure to bring entertainment and laughter to your outdoor activities.
By investing your time and effort into building a DIY horseshoe pit, you can create a space where friends and family can come together, engage in friendly competition, and enjoy the great outdoors. So gather your loved ones, grab those horseshoes, and let the fun begin in your very own backyard horseshoe pit!
FAQ
Can I build a horseshoe pit in my backyard as a DIY project?
Yes, building a horseshoe pit in your backyard can be a fun and rewarding DIY project.
What materials do I need to build a horseshoe pit?
To build a horseshoe pit, you will need landscaping timbers, galvanized nails, lag screws, play sand, and basic tools such as a drill, shovel, and level.
How should I design my horseshoe pit to make it sturdy?
It’s important to create a sturdy horseshoe pit by using treated lumber for the frame and incorporating a backstop to prevent horseshoes from bouncing out of the pit.
What are the dimensions for a standard horseshoe pit?
The standard horseshoe pit dimensions are 48 feet long and 6 feet wide, with stakes placed 40 feet apart.
How do I create a level throwing platform for the horseshoe pit?
Concrete pavers can be placed around the horseshoe pit to create a level throwing platform. These pavers also serve as the foul line.
Where should I locate my horseshoe pit in my backyard?
Choose an open area in your backyard with enough space for two pits that are 40 feet apart. Ensure there are no obstacles nearby.
How do I mark and dig the horseshoe pit area?
Use stakes and twine to mark the dimensions of each pit and ensure they are square. Then, excavate the marked areas to the appropriate depth and level the ground.
How do I construct the frame of the horseshoe pit?
Cut landscaping timbers to the required lengths and drill holes for assembly. Secure the timbers together with galvanized spikes to create the frame of the horseshoe pit.
How do I drive the stakes for the horseshoe pit?
Place the metal stakes in the ground at a 40-foot distance from each other, ensuring they are at the proper angle and height. The stakes should be securely anchored in the ground to withstand the force of the horseshoes.
How do I pour and level the sand in the horseshoe pit?
Fill the excavated pit with play sand and use a shovel or board to evenly distribute and level it. The sand helps absorb the impact of the horseshoes.
Can I add a raised backstop to the horseshoe pit?
Yes, if desired, a raised backstop can be added to the horseshoe pit for added convenience and safety. It can be constructed using additional timbers and lag screws.