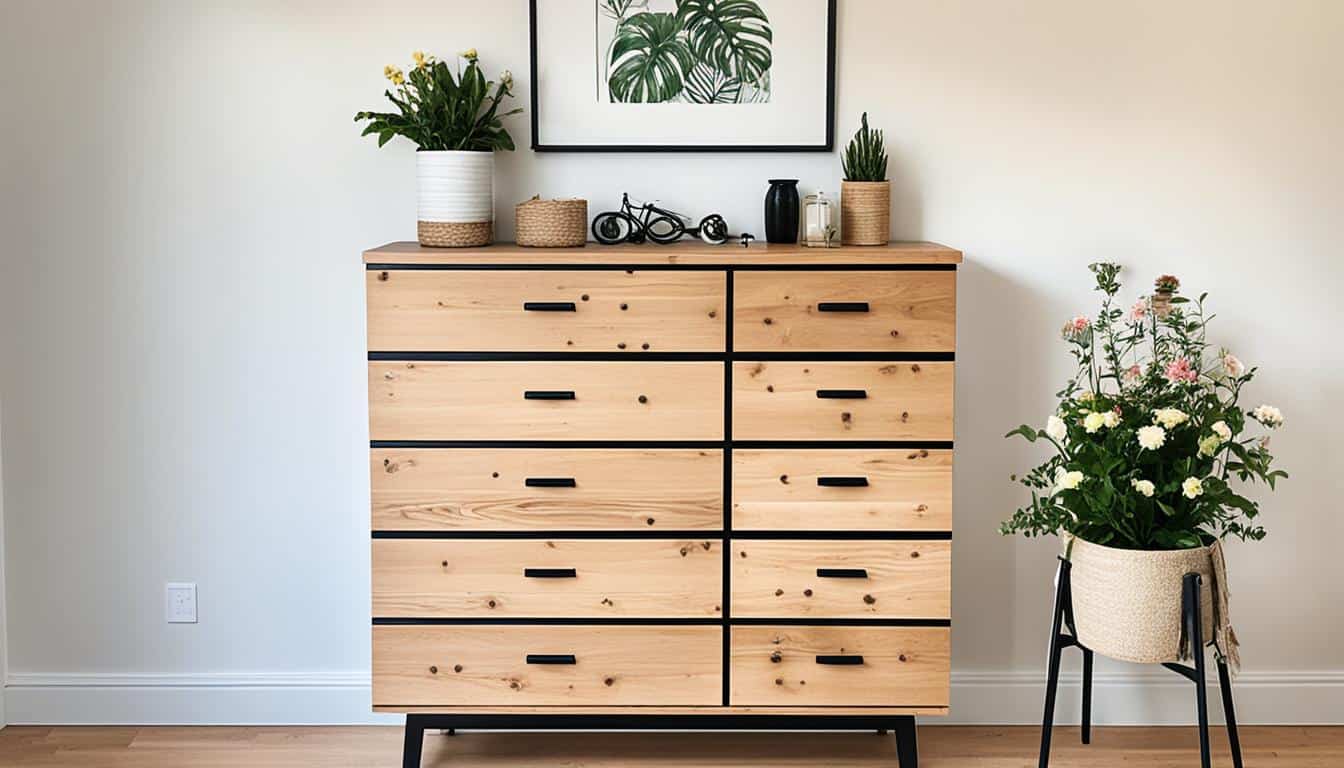
Are you looking to add more storage space to your bedroom? Or perhaps you’re itching to embark on a fun woodworking project? Either way, building your own DIY tall dresser might just be the solution you’re looking for. In this step-by-step guide, we’ll walk you through the process of creating a functional and stylish piece of furniture that will elevate your room’s decor. Get ready to unleash your creativity and craftsmanship!
Key Takeaways:
- Learn how to build a DIY tall dresser to add storage space to your home.
- Follow our detailed guide that covers everything from measuring and cutting wood to assembling the dresser.
- Discover tips, tricks, and considerations to ensure a successful and rewarding woodworking project.
- Customize your dresser with optional finishing touches and hardware to match your style.
- Maintain and care for your DIY tall dresser to enjoy its beauty and functionality for years to come.
- Expand your woodworking skills and explore future furniture-making projects.
Gather Your Supplies and Lumber
Before you begin building your DIY tall dresser, it’s essential to gather all the necessary supplies and lumber. By having all your supplies and lumber ready, you can ensure a smooth and efficient building process.
- Kreg Jig Pocket Hole: This handy tool will help you create sturdy joints in your dresser.
- Kreg pocket hole screws: These screws are designed specifically for pocket hole joinery.
- Drill: You’ll need a drill to create pilot holes and attach screws.
- Sandpaper or sanding tool: This will be used to smooth out any rough edges or surfaces.
- Wood glue: A strong adhesive that will help bond the different pieces of wood together.
- Clamps: These will hold the pieces in place while the glue dries.
- Level: A level will ensure that your dresser is straight and level.
- Right-angle square: Used to ensure your corners are at 90-degree angles.
- Drawer slides: These are necessary for smooth and easy drawer movement.
- Handles or knobs: Choose handles or knobs that match the style of your dresser.
- Screws: Various sizes of screws will be needed for different parts of the dresser.
In addition to these tools, you’ll also need specific types of lumber for your DIY tall dresser:
- ¾” plywood: This will be used for the top and side pieces of the dresser.
- ¼” plywood: You’ll need this for the bottom panels of the drawers.
- 2×2 boards: These will provide additional support and structure to the dresser.
- 1×2 boards: Use these boards to attach the 2×2 frame to the basic frame.
Make sure you have all your supplies and lumber ready before starting your DIY tall dresser project. This will save you time and ensure a successful construction process.
Assemble the Basic Frame
The first step in building your DIY tall dresser is to assemble the basic frame. This frame will serve as the foundation for the rest of the dresser, so it’s essential to ensure it is sturdy and properly constructed.
To begin, cut the ¾” plywood into the required sizes for the top and side pieces of the dresser. Measure carefully and use a circular saw or a table saw to make accurate cuts. If you don’t have access to these tools, many hardware stores offer cutting services, so you can take your measurements there and have the plywood cut to size.
Once you have your plywood pieces ready, it’s time to assemble the frame. Start by laying the side pieces flat on a work surface. Apply wood glue along the edges of the plywood and align the 1×2 boards with the sides of the dresser. Use clamps to hold the boards in place while the glue sets.
Next, secure the pieces together using pocket hole screws. Drill pocket holes along the edges of the plywood, then insert the screws to connect the boards. Make sure to countersink the screws so that they are flush with the surface of the plywood.
Throughout the assembly process, it’s crucial to check that the frame is level and square. Use a level to ensure that the top and side pieces are flat and even. Additionally, use a square tool to check that the corners are perfectly 90-degree angles. This attention to detail will result in a sturdy and well-built dresser.
Pro Tip:
When drilling pocket holes, make sure to choose the correct drill bit size to match the screws you are using. This will ensure a secure and tight connection between the plywood and the 1×2 boards.
Once you have assembled the basic frame, you can move on to the next steps in building your DIY tall dresser. This includes constructing the 2″ x 2″ frame, attaching the frame to the dresser, creating the drawers, and adding the finishing touches to complete your project.
Now that you have the basic frame in place, it’s time to continue the construction of your DIY tall dresser.
Build the 2″ x 2″ Frame
Now that you have assembled the basic frame, it’s time to add extra support and structure to your tall dresser by building the 2″ x 2″ frame. This frame will ensure the stability and durability of your dresser, making it a long-lasting piece of furniture for your home.
To start, you will need to cut the 2″ x 2″ boards to the required lengths for the top, sides, and back of the frame. Make sure to measure accurately and use a saw to make clean cuts.
Once you have your boards cut to size, it’s time to attach them to the corresponding areas of the basic frame. Use pocket hole screws and wood glue for a secure bond. The pocket holes will provide additional strength and support to the dresser.
When attaching the boards, ensure that the frame remains level and square. This will help maintain the overall stability of the dresser. Use clamps to hold the pieces in place while you secure them with screws.
Take your time during this step to ensure that the frame is properly aligned and securely attached to the basic frame of the dresser. A sturdy 2″ x 2″ frame will ensure that your tall dresser can withstand the weight of the drawers and provide a solid foundation for the overall structure.
Once the frame is complete, double-check that everything is level and secure before moving on to the next step in building your DIY tall dresser.
| Benefits of the 2″ x 2″ Frame: |
|---|
| 1. Enhanced stability and durability |
| 2. Provides additional support to the dresser |
| 3. Ensures a solid foundation for the structure |
| 4. Helps distribute the weight of the drawers evenly |
With the 2″ x 2″ frame securely in place, you’re ready to move on to the next step in building your DIY tall dresser.


Attach the Frame
With the 2″ x 2″ frame completed, it’s time to attach it to the basic frame of the dresser. This step is crucial for the stability and structural integrity of the dresser, so take your time to ensure everything is done correctly.
Here’s how to attach the frame:
- Apply a generous amount of wood glue to the ends of the 2″ x 2″ frame pieces.
- Position the frame on top of the basic frame of the dresser, making sure it is centered and level.
- Secure the frame to the sides and top of the dresser using pocket hole screws.
- Double-check that the frame is centered and level before tightening the screws.
- Wipe off any excess wood glue with a damp cloth.
By attaching the frame securely, you’ll ensure the dresser is sturdy and able to withstand everyday use.
Pro Tip: Use clamps to hold the frame in place while attaching it to the dresser. This will help prevent any shifting or misalignment during the installation process.
Take a moment to admire your progress. The dresser is really starting to come together!

Create the Dresser Drawers
Now that you have assembled the basic frame of your DIY tall dresser, it’s time to move on to the next step – creating the drawers. The drawers will provide the essential storage space for your dresser, allowing you to organize and store your belongings in a neat and convenient manner.
To create the dresser drawers, you will need to cut the required pieces of wood for the drawer boxes. Take accurate measurements and carefully cut the pieces to ensure a proper fit. Once the pieces are cut, assemble the drawer boxes using pocket hole screws and wood glue.
After assembling the drawer boxes, it’s important to reinforce them for added strength. Attach ¼” plywood bottom panels to the drawer boxes using nails and screws. This will help prevent the drawers from sagging and ensure their durability over time.
Remember to pay attention to detail and strive for precise and accurate construction. Well-constructed drawers will not only enhance the functionality of your tall dresser but also contribute to its overall aesthetic appeal.
Take a look at the diagram below to understand the dimensions and structure of a typical dresser drawer:
| Drawer Part | Dimension |
|---|---|
| Sides | Height: [insert dimensions] |
| Front and back | Height: [insert dimensions] |
| Bottom | Thickness: ¼”, Width: [insert dimensions], Length: [insert dimensions] |
Ensure that the dimensions of your drawer boxes align with the overall size and design of your tall dresser. Making accurate and precise cuts will ensure a tight fit and smooth operation of the drawers.
Continue to the next section to learn about installing the drawer slides, which will allow your drawers to glide open and closed effortlessly.
Install the Drawer Slides
Installing the drawer slides is a crucial step in ensuring that your dresser functions properly. Follow the manufacturer’s instructions for the specific drawer slides you are using. Attach the slides to the 1×2 slats on the side pieces of the dresser, ensuring they are level and properly aligned. Test the slides for smooth movement before proceeding to the next step.
Attach the Drawer Faces
Creating a Polished and Finished Look
Now that the drawer slides are in place, it’s time to give your DIY tall dresser a polished and finished look by attaching the drawer faces. This step will not only enhance the aesthetic appeal of your dresser but also ensure that the drawers function properly.
To attach the drawer faces, follow these steps:
- Apply wood glue to the back of each drawer face.
- Position the drawer face on the front of the corresponding drawer box, ensuring it is aligned evenly.
- Secure the drawer face in place by driving screws from the inside of the drawer box, at least two screws per side.
- Repeat this process for each drawer, taking care to ensure that all the faces are flush with the front of the dresser.
By attaching the drawer faces meticulously, you’ll achieve a seamless and professional-looking finish for your DIY tall dresser.
“Attaching the drawer faces is a crucial step that adds the final touch to your dresser. A well-aligned and flush face will give your dresser a polished and cohesive appearance.”
| Benefits of Proper Drawer Face Attachment | Common Mistakes to Avoid |
|---|---|
| 1. Provides a polished and finished look for your dresser | 1. Misalignment of drawer faces |
| 2. Ensures smooth operation of the drawers | 2. Over-tightening screws, which can cause damage |
| 3. Enhances the overall aesthetic appeal of the dresser | 3. Uneven placement of screws |
A properly attached drawer face is essential not just for achieving a visually appealing dresser, but also for ensuring the smooth and functional operation of the drawers. Avoid common mistakes like misalignment, over-tightening screws, and uneven placement, which can affect the overall look and functionality of your DIY tall dresser.
Sand and Stain the Dresser
Before adding the final touches to your DIY tall dresser, it’s important to sand the surfaces and edges for a smooth finish. This step will ensure that the wood is free from any roughness or imperfections.
Start by using sandpaper or a sanding tool to gently sand the entire dresser. Pay close attention to the edges, corners, and any other areas that may have rough spots. Sanding will create a smooth surface for the stain or paint to adhere to.
After sanding, wipe away any dust with a clean cloth or tack cloth. This will prevent any particles from getting trapped in the finish.
Once the dresser is sanded, you can choose to stain or paint it to your desired color or finish. Staining allows the natural beauty of the wood grain to show through, while painting gives you the opportunity to add a pop of color to your space.
If you choose to stain the dresser, apply the stain evenly using a brush or cloth, following the manufacturer’s instructions. Allow the stain to penetrate the wood for the recommended amount of time, typically around 10-15 minutes, before wiping away any excess.
If you prefer to paint the dresser, apply multiple coats of paint, allowing each coat to dry before adding the next. This will ensure a smooth and even finish.
Whichever finish you choose, be sure to allow it to dry completely before handling or moving the dresser.
Staining or painting your DIY tall dresser not only enhances its appearance but also protects the wood from wear and tear. It adds a personal touch to your furniture, allowing you to customize it to match your style and decor.
Pro Tip:
Want to add a distressed or vintage look to your dresser? After staining or painting, use sandpaper to lightly sand the edges and corners of the dresser. This will reveal some of the wood or underlying layers of paint, giving it a charming, aged appearance.
Add Hardware and Handles
To complete the look of your DIY tall dresser, it’s time to add the hardware and handles. This final step will not only add functionality but also enhance the overall aesthetic of your dresser.
Start by measuring and marking the center of each drawer face. This will ensure that the hardware is properly positioned and symmetrical. Once you have determined the center, use a drill to create holes that accommodate your chosen hardware.
Pro Tip: Consider using a template or guide to ensure consistent hole placement across all drawers.
Now it’s time to attach the hardware and handles. Insert screws or bolts from the inside of the drawer boxes, securing the hardware in place. Make sure everything is tightened securely, but be careful not to overtighten and damage the wood.
Pro Tip: If you’re using decorative handles that require additional hardware, follow the manufacturer’s instructions for installation.
Congratulations! With the hardware and handles in place, your DIY tall dresser is now complete. Take a step back and admire your craftsmanship. The addition of these finishing touches not only adds functionality but also gives your dresser a personalized touch.
Now let’s take a closer look at some tall dresser design ideas to inspire your next DIY furniture project.
Optional Finishing Touches
Depending on your personal preferences and style, you have the opportunity to customize your DIY tall dresser with additional finishing touches. These design ideas will elevate the look of your dresser and make it uniquely yours. Consider these easy DIY dresser projects and get creative!
Decorative Molding or Trim
Add an extra touch of elegance to your DIY tall dresser by incorporating decorative molding or trim. Choose from a variety of styles and sizes to complement the overall design of your dresser. Attach the molding or trim to the edges of the dresser or incorporate it as an accent on the drawer fronts. This simple addition can instantly enhance the visual appeal of your dresser.
Contrasting Paint Color for the Frame
If you want to make a bold statement with your DIY tall dresser, consider painting the frame in a contrasting color. Opt for a vibrant hue that complements the room’s decor or choose a classic black or white for a timeless look. The contrasting paint color will add a pop of personality to your dresser and make it a focal point in the space.
Decoupage or Stenciling on the Drawer Faces
Add a touch of creativity and personality to your DIY tall dresser by incorporating decoupage or stenciling on the drawer faces. Use decoupage techniques to apply patterned paper or fabric to the drawer fronts, creating a unique and eye-catching design. Alternatively, use stencils to create intricate patterns or designs on the drawer faces. Both decoupage and stenciling offer endless possibilities for customization.

Make the finishing touches on your DIY tall dresser truly your own by adding your personal style and creative flair. Whether it’s decorative molding, a contrasting paint color, or decoupage and stenciling, these easy DIY dresser projects will transform your dresser into a one-of-a-kind piece of furniture that reflects your taste and style.
Tips and Considerations
Building your own DIY tall dresser can be a rewarding and satisfying project. However, there are some tips and considerations to keep in mind:
Accurate Measurements are Key
Take accurate measurements and double-check them before cutting the wood to ensure a proper fit. Remember the old adage, “measure twice, cut once.” Taking the time to measure accurately will save you from costly mistakes later on.
Ensure Everything is Square and Level
Use clamps and a level to ensure that everything is square and level during assembly. A square and level dresser not only looks better but also functions properly. Taking the time to ensure precision will result in a more professional-looking finished product.
Follow Manufacturer’s Instructions
When working with hardware or tools, it’s important to follow the manufacturer’s instructions. Each piece of hardware may have specific requirements for installation that you need to adhere to. Following the instructions will ensure proper installation and functionality.
Take Your Time and Enjoy the Process
Building a DIY tall dresser should be enjoyable, not rushed. Take your time, work at your own pace, and enjoy the process. Building furniture is a craft that requires patience and attention to detail. Embrace the journey and take pride in creating something with your own two hands.
By keeping these tips in mind and approaching your DIY tall dresser project with care and consideration, you’ll be well on your way to creating a beautiful and functional piece of furniture for your home.
Safety Precautions
When building your DIY tall dresser, it’s important to prioritize safety to ensure a successful and injury-free woodworking experience. Here are some safety precautions to keep in mind:
- Wear Protective Gear: Always wear appropriate protective gear, such as safety glasses and ear protection. This will help protect your eyes and ears from any potential hazards.
- Handle Sharp Tools with Caution: Take extra caution when handling sharp tools and cutting equipment. Keep your fingers and body clear of the tool’s path to prevent accidental cuts or injuries.
- Follow Safety Procedures and Guidelines: Familiarize yourself with the safety procedures and guidelines provided by the manufacturer for each tool you use. This will ensure that you are using the tool correctly and minimize the risk of accidents.
- Consult Professionals if Unsure: If you’re unsure about any aspect of the building process or how to properly use a tool, it’s always best to consult a professional or seek guidance from experienced woodworkers. They can provide you with the necessary expertise and advice.
Remember, safety should always be a top priority when engaging in any DIY project. By implementing these safety precautions, you can enjoy a safe and rewarding woodworking experience while building your DIY tall dresser.

Maintenance and Care
Once your DIY tall dresser is complete, it’s important to properly maintain and care for it to ensure its longevity. By following a few simple steps, you can keep your dresser looking beautiful and functioning smoothly for years to come.
Cleaning and Dusting
Regularly dust the surfaces of your dresser using a soft, lint-free cloth or a microfiber duster. This will help prevent dust and dirt from accumulating on the wood and maintain its natural shine.
Pro Tip: Avoid using feather dusters or rough materials that may scratch the surface of your dresser.
In case of spills or stains, it’s essential to clean them immediately. Use a damp cloth or sponge with a mild, non-abrasive cleaner to gently wipe away any marks. Dry the area thoroughly with a clean cloth to prevent water damage.
Avoid Heavy and Sharp Objects
Avoid placing heavy objects on your dresser, as excessive weight can strain the structure and lead to damage or sagging. Similarly, refrain from placing sharp objects directly on the surface, as they can cause scratches or gouges.
Pro Tip: Use coasters, trays, or fabric-backed tableware to protect the surface of your dresser from scratches and water rings caused by glasses or cups.
Reapply Stain or Paint
Over time, the finish of your dresser may start to fade or show signs of wear. If necessary, periodically reapply a coat of stain or paint to keep the finish looking fresh and vibrant.
Pro Tip: Before applying a new coat, lightly sand the surface of your dresser to remove any rough spots or imperfections. This will help the new finish adhere better and result in a smoother final look.
Protect from Direct Sunlight
Excessive exposure to sunlight can cause the wood of your dresser to fade and become discolored over time. To prevent this, try to position your dresser away from direct sunlight or use curtains or blinds to filter the light.
| Tall Dresser Maintenance Tips | |
|---|---|
| Regularly dust the surfaces with a soft cloth or duster. | Store heavy or sharp objects separately to avoid damage. |
| Clean spills or stains immediately using a mild cleaner. | Reapply stain or paint as needed to maintain a fresh finish. |
| Avoid placing your dresser under direct sunlight to prevent fading. | Use coasters or trays to protect the surface from water rings. |
With proper care and maintenance, your DIY tall dresser will continue to be a functional and beautiful piece of furniture in your home. By implementing these maintenance practices, you can enjoy your dresser for years to come while preserving its integrity and aesthetic appeal.
Future Dresser Projects
Building your DIY tall dresser may have sparked a passion for woodworking and furniture making. If you enjoyed this project, there are endless possibilities for future dresser projects. You can explore different designs, styles, and finishes to create unique pieces of furniture for your home. Consider branching out to other types of furniture, such as nightstands, cabinets, or bookshelves. The world of DIY furniture making is vast, and the only limit is your imagination.
Conclusion
Congratulations on completing your DIY tall dresser! You have successfully created a functional and beautiful piece of furniture that adds both storage and charm to any room. Building your own furniture allows you to customize and personalize your space while also honing your woodworking skills.
We hope this guide has provided you with the knowledge and inspiration to embark on more DIY projects in the future. The satisfaction of seeing your vision come to life and the joy of using a handmade piece of furniture are truly rewarding. With each project, you’ll gain more confidence and expertise, allowing you to tackle more complex designs and techniques.
Remember, the possibilities are endless when it comes to DIY furniture making. Whether you want to try your hand at a DIY dresser makeover or explore other woodworking projects, don’t be afraid to let your creativity soar. Enjoy your new dresser and relish in the sense of accomplishment that comes with a job well done.
FAQ
What supplies do I need to build a DIY tall dresser?
To build a DIY tall dresser, you will need a Kreg Jig Pocket Hole, Kreg pocket hole screws, a drill, sandpaper or a sanding tool, wood glue, clamps, a level, a right-angle square, drawer slides, handles or knobs for the drawers, and various sizes of screws. Additionally, you will need ¾” plywood, ¼” plywood, 2×2 boards, and 1×2 boards.
How do I assemble the basic frame of a DIY tall dresser?
Cut the ¾” plywood into the required sizes for the top and side pieces of the dresser. Use clamps and wood glue to attach the 1×2 boards to the sides of the dresser and the top. Secure the pieces together with pocket hole screws and ensure they are level and square.
How do I build the 2″ x 2″ frame for a DIY tall dresser?
Cut the 2″ x 2″ boards to the required lengths for the top, sides, and back of the frame. Attach the boards to the corresponding areas of the basic frame using pocket hole screws and wood glue. Ensure the frame is level and secure before moving on to the next step.
How do I attach the frame to a DIY tall dresser?
Use pocket hole screws and wood glue to secure the frame to the sides and top of the dresser. Take your time to ensure that the frame is centered and level. This step is crucial for the stability and structural integrity of the dresser.
How do I create the drawers for a DIY tall dresser?
Cut the required pieces of wood for the drawer boxes and assemble them using pocket hole screws and wood glue. Attach the ¼” plywood bottom panels to the drawer boxes with nails and screws for added strength. These drawers will provide the essential storage space for your dresser and should be carefully constructed for smooth operation.
How do I install drawer slides on a DIY tall dresser?
Follow the manufacturer’s instructions for the specific drawer slides you are using. Attach the slides to the 1×2 slats on the side pieces of the dresser, ensuring they are level and properly aligned. Test the slides for smooth movement before proceeding to the next step.
How do I attach the drawer faces to a DIY tall dresser?
Use wood glue and screws from the inside of the drawer boxes to secure the faces in place. Take care to align the faces evenly and ensure that they are flush with the front of the dresser.
How do I sand and stain a DIY tall dresser?
Before adding the final touches to your DIY tall dresser, take the time to sand the surfaces and edges for a smooth finish. You can then choose to stain or paint the dresser to your desired color or finish. Apply multiple coats of stain or paint and allow each coat to dry before adding the next.
How do I add hardware and handles to a DIY tall dresser?
Measure and mark the center of each drawer face and drill holes to accommodate your chosen hardware. Attach the hardware and handles using screws or bolts from the inside of the drawer boxes.
Are there any optional finishing touches I can add to a DIY tall dresser?
Depending on your personal preferences and style, you may choose to add decorative molding or trim, a contrasting paint color for the frame, or even decoupage or stenciling on the drawer faces.
What tips and considerations should I keep in mind when building a DIY tall dresser?
Take accurate measurements and double-check them before cutting the wood to ensure a proper fit. Use clamps and a level to ensure that everything is square and level during assembly. Follow the manufacturer’s instructions for any hardware or tools you use. And most importantly, take your time and enjoy the process!
What safety precautions should I take when building a DIY tall dresser?
When working with power tools and woodworking materials, it’s crucial to prioritize safety. Always wear appropriate protective gear, such as safety glasses and ear protection. Use caution when handling sharp tools and cutting equipment. Follow proper safety procedures and guidelines for each tool you use.
How do I maintain and care for a DIY tall dresser?
Regularly dust the surfaces and clean any spills or stains immediately. Avoid placing heavy or sharp objects on the dresser that could cause damage. If necessary, periodically reapply a coat of stain or paint to keep the finish looking fresh.
What are some future dresser project ideas?
If you enjoyed building your DIY tall dresser, you can explore different designs, styles, and finishes to create unique pieces of furniture for your home. Consider branching out to other types of furniture, such as nightstands, cabinets, or bookshelves.