Are you looking for an affordable and customizable solution to maximize space in your kids’ room? Are you tired of searching for the perfect bunk bed that fits your specific needs and preferences? Look no further! In this comprehensive guide, we will provide you with easy-to-follow DIY bunk bed plans that will not only save you money but also allow you to create a unique piece of furniture that suits your style.
Building your own bunk bed may seem daunting at first, but with our step-by-step instructions and detailed measurements, you’ll be able to construct a sturdy and functional bunk bed that will provide years of comfortable sleep for your children.
Whether you’re a seasoned DIY enthusiast or a beginner, our bunk bed plans cater to all skill levels. From classic twin over full bunk beds to trendy loft designs, we’ve got you covered. So, why settle for generic store-bought bunk beds when you can unleash your creativity and build a customized bunk bed that your kids will love?
Get ready to embark on a rewarding DIY project and unlock the secrets to building your own bunk bed!
Key Takeaways:
- Save money and create a customized bunk bed with our DIY plans
- Choose from a variety of bunk bed designs to fit your space and style
- Follow our step-by-step instructions for a safe and sturdy construction
- Personalize your bunk bed with paint, stain, or additional features
- Maintain your bunk bed to ensure its longevity and safety
Materials and Tools Needed
To build the double bunk bed, you will need the following materials:
- Lumber
- Screws
- Mattress slats
The specific materials and quantities required are detailed in the plans. Make sure to gather all the necessary materials before you begin the construction process.
In addition to the materials, you will also need a set of basic tools:
- Tape measure
- Drill
- Saw
- Sander
Having these tools on hand will make the construction process easier and more efficient. If you don’t already own these tools, consider borrowing or renting them for the duration of the project.
Now that you have your materials and tools ready, let’s move on to building the bed frame.
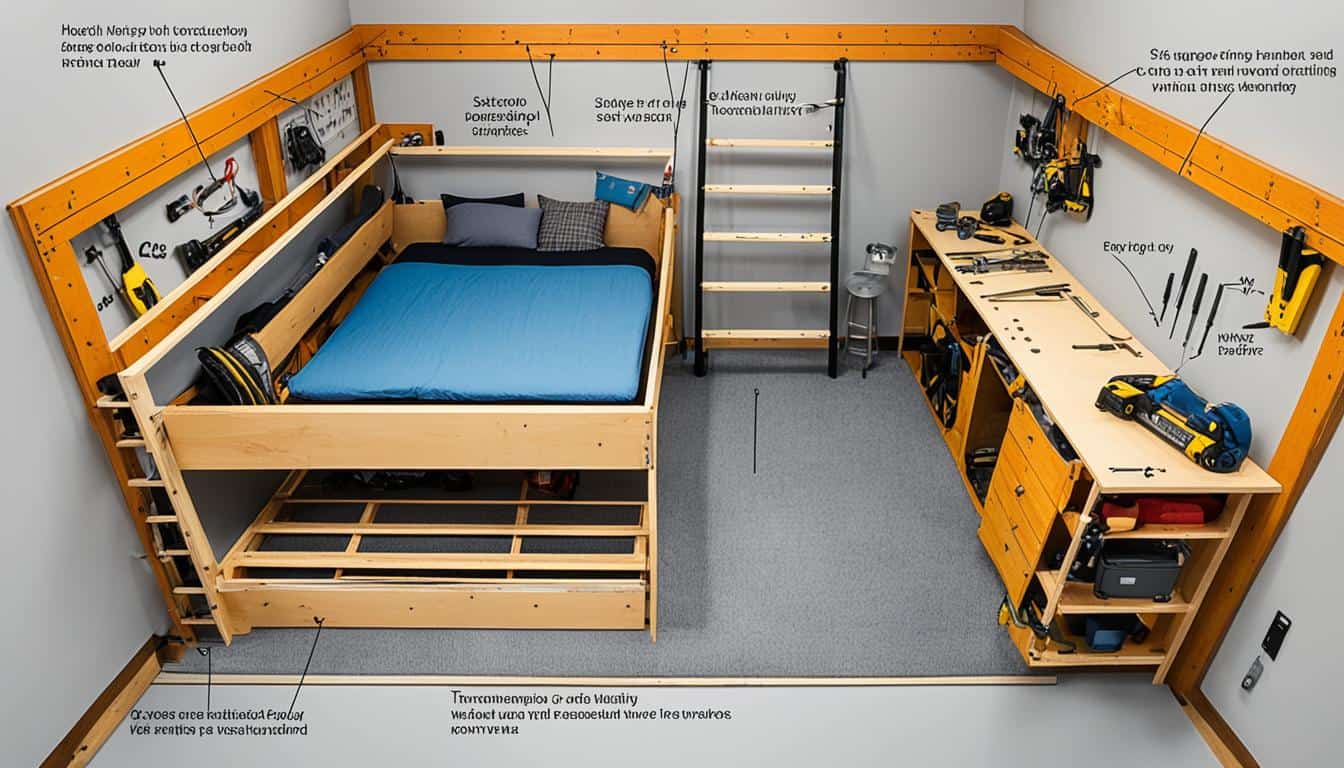
Building the Bed Frame
The first step in constructing your bunk bed is building the sturdy bed frame. This crucial component forms the foundation of the bunk bed, ensuring its stability and durability.
Start by constructing the legs, which will provide support and stability to the entire structure. Follow the provided measurements and instructions in the plans to cut and assemble the legs accurately. Use high-quality lumber to ensure the bed frame’s strength.
Next, attach the support boards to connect the legs, forming the perimeter of the bed frame. These support boards play a crucial role in distributing the weight evenly and enhancing the overall strength of the bunk bed.
Pro Tip: Secure the support boards using long screws or nails to ensure a solid connection. This will prevent any wobbling or squeaking noises when the bed is in use.
After attaching the support boards, connect the end boards to complete the basic structure of the bed frame. This step involves following the detailed measurements provided in the plans and aligning the boards properly for a seamless fit.
Throughout the construction process, it’s important to pay attention to the placement of pocket holes. These cleverly hidden holes allow for secure assembly by providing additional support and stability to the bed frame.
Pro Tip: Remember to countersink the pocket holes to ensure a flush and professional finish. A countersink bit can be used to create a wider, shallow hole that accommodates the screw head.
For joining the various components of the bed frame, use deck screws as recommended in the plans. These screws are specifically designed for wood-to-wood connections and offer superior strength.
Once you have completed these steps, your bunk bed’s bed frame will be ready for the next phase of construction. Remember to refer to the provided plans for accurate measurements, detailed instructions, and additional tips to ensure a successful assembly process.
Dimensions and Materials
| Component | Materials | Dimensions |
|---|---|---|
| Legs | 2×4 lumber | As specified in the plans |
| Support Boards | 2×4 lumber | As specified in the plans |
| End Boards | 2×6 lumber | As specified in the plans |
Adding the Ladder and Railings
Now that the bed frame is complete, it’s time to add the essential elements for safety and convenience – the ladder and railings. These components play a crucial role in ensuring a safe and functional bunk bed.
Attaching the Ladder
To attach the ladder, begin by constructing the ladder sides. These can be made from the same sturdy lumber used for the bed frame. Make sure the ladder sides are of equal length, and attach ladder rungs at appropriate intervals to create steps for easy access to the top bunk.
Securely fasten the ladder sides to the bed frame, ensuring they are properly aligned and sturdy. Use screws or nails specifically designed for this purpose to ensure a strong attachment.
Remember, stability and durability are key when attaching the ladder. Test the ladder’s stability by applying gentle pressure before allowing anyone to use the bunk bed.
Installing the Railings
Next, focus on installing the railings. Railings are an essential safety feature, preventing accidental falls from the top bunk. They can be built separately and attached to the bed frame to ensure a secure fit.
Measure the appropriate height and length for the railings based on your bed frame dimensions. Use the same type of lumber as the ladder and bed frame for consistency in both design and durability.
Once the railings are constructed, secure them to the bed frame using screws or nails. Ensure the railings are firmly attached and do not wobble or move when pressure is applied.
Remember, the safety of those using the bunk bed is of utmost importance. Regularly check the ladder and railings for any signs of wear or weakness, and make any necessary repairs or replacements immediately.
| Ladder and Railing Installation | Benefits |
|---|---|
| Enhances safety for users | Prevents accidental falls from the top bunk |
| Provides easy access to the top bunk | Convenience for users |
| Sturdy ladder attachment ensures long-lasting use | Durability for the bunk bed |
Remember to refer to the bunk bed plans for specific measurements and attachment instructions for the ladder and railings. Following these guidelines will ensure a safe and functional bunk bed for years to come.
Installing the Slat Supports
The slat supports play a crucial role in providing a stable foundation for the mattresses on your bunk bed. These supports are securely attached to the side boards of the bed frame, creating a sturdy platform for the slats to rest on. By properly installing the slat supports, you ensure that the mattress is adequately supported, ensuring a comfortable and safe sleeping experience.
To attach the slat supports, follow the specific instructions provided in the bunk bed plans. The plans will outline the precise placement and attachment method for the slat supports, ensuring that you achieve a solid and reliable foundation for your mattress.
Take care to measure and align the slat supports accurately, as any inconsistencies can lead to an uneven sleeping surface. Using a level or straight edge can help ensure that the slat supports are positioned correctly.
Here is a step-by-step guide to help you attach the slat supports:
- Begin by positioning the slat supports on the side boards of the bed frame according to the measurements specified in the plans. Ensure they are evenly spaced to provide proper support across the entire mattress.
- Securely attach the slat supports to the side boards using screws or other specified fasteners. Make sure to follow the recommended attachment method for optimal stability.
- Double-check the alignment of the slat supports to ensure they are level and evenly positioned.
- Repeat the installation process for the remaining slat supports on both sides of the bed frame.
- Once all the slat supports are attached, test their stability by applying gentle pressure. Ensure that they are firmly in place and can support the weight of the mattresses without any sagging or shifting.
By following the plans and carefully installing the slat supports, you can create a solid foundation for your bunk bed mattress, ensuring a comfortable and secure sleeping environment for those using the bed.
Attaching the Mattress Slats
After completing the construction of the bunk bed frame and installing the slat supports, it’s time to attach the mattress slats. These slats play a crucial role in providing a stable surface for the mattress to rest on, ensuring a comfortable sleep for whoever uses the bunk bed.
The plans will provide you with the measurements for spacing the mattress slats properly. Make sure to follow these measurements accurately to ensure optimal support for the mattress. The evenly spaced slats will distribute the weight evenly, preventing sagging and ensuring a sturdy foundation.
When it comes to attaching the mattress slats, the plans offer an alternative method using twine. This method allows for easy disassembly of the slats, making it convenient when it’s time to move or replace the mattress. Simply tie the twine to each end of the slat and secure it to the side rails of the bed frame, ensuring that the slats are held securely in place.
By attaching the mattress slats properly, you can create a reliable and comfortable sleeping surface for the bunk bed. Whether you’re building the bunk bed for your children, guests, or any other purpose, ensuring the mattress is properly supported is essential for a good night’s sleep.
Necessary steps: Follow the provided measurements to correctly space the mattress slats. Consider using twine to attach the slats for easy disassembly.

Why Properly Attaching the Mattress Slats Matters
Properly attaching the mattress slats is important for several reasons:
- Support: The slats provide the necessary support for the mattress, preventing it from sagging and ensuring a comfortable sleep.
- Distribution of Weight: By spacing the slats correctly, the weight of the mattress is evenly distributed across the bed frame, minimizing stress on individual slats and promoting durability.
- Easy Disassembly: Using twine to attach the slats allows for easy removal when it’s time to move or replace the mattress, making it a convenient option.
By taking the time and care to attach the mattress slats properly, you can enhance the overall functionality and longevity of your bunk bed. It’s a small step in the construction process but plays a significant role in ensuring a comfortable and supportive sleeping surface.


Advantages of Building a Bunk Bed
Building a bunk bed offers several benefits compared to purchasing one from a store. When you choose to use DIY bunk bed plans, you unlock a world of advantages that allow you to create the perfect bed for your space and needs.
Saving Money
One of the main advantages of building your own bunk bed is the opportunity to save money. DIY bunk beds cost significantly less than their store-bought counterparts, making them a budget-friendly option for families.
By sourcing materials and assembling the bed yourself, you can eliminate the markup and additional costs associated with ready-made bunk beds. With careful planning and smart shopping, you can build a high-quality bunk bed at a fraction of the cost.
Quality and Durability
DIY bunk beds also offer the advantage of superior quality and durability. When you build a bunk bed, you have complete control over the selection of materials and construction techniques, ensuring a sturdy and long-lasting bed.
Unlike mass-produced beds that may use low-quality materials and subpar construction methods, a DIY bunk bed allows you to choose high-quality lumber, appropriate hardware, and secure joinery techniques. This results in a bunk bed that can withstand the rigors of daily use and last for years to come.
Customization and Personalization
Another advantage of building your own bunk bed is the ability to customize and personalize it according to your preferences. DIY bunk bed plans provide a foundation for creativity, allowing you to add unique features and design elements that reflect your style.
You can customize the bunk bed to match the decor of the room, paint it in your child’s favorite colors, or even add storage solutions to maximize space. Building a bunk bed gives you the freedom to create a one-of-a-kind piece of furniture that perfectly suits your needs.
A Family Heirloom
When you build a bunk bed with love and care, it becomes more than just a piece of furniture. It becomes a treasured family heirloom that can be passed down through generations, creating lasting memories.
By building a bunk bed for your children, you’re not only creating a functional sleeping space, but also a symbol of your craftsmanship and dedication. This meaningful piece of furniture can become a cherished part of your family’s history, filled with stories and shared experiences.
Building a bunk bed offers numerous advantages, including cost savings, higher quality, customization options, and the creation of a cherished family heirloom. By taking on the DIY approach, you can enjoy these benefits while creating a unique and personalized sleeping space for your children.
Different Styles of Bunk Bed Plans
When it comes to bunk bed plans, there is a wide variety of styles to choose from. Each style offers its own unique aesthetic and functionality, allowing you to find the perfect fit for your space and preferences. Here are some popular types of bunk bed designs:
Twin over Full Bunk Beds
If you’re looking for a versatile bunk bed design that accommodates different sleeping arrangements, twin over full bunk beds are a great option. These beds feature a twin-sized bed on top and a full-sized bed on the bottom, providing flexibility for siblings with varying age and size differences. The twin over full design combines practicality with a classic bunk bed layout.
Loft Bunk Beds
Loft bunk beds are ideal for smaller spaces or rooms with high ceilings. These beds feature a raised sleeping area, allowing you to maximize the floor space underneath. You can use the area below the loft bed for storage, a study desk, or even as a cozy reading nook. Loft bunk beds offer a functional and space-saving solution for tight quarters.
Built-in Bunk Beds
If you’re looking to create a custom and seamless bunk bed design, built-in bunk beds are the way to go. These beds are built directly into the wall and often incorporate additional storage or shelving units. Built-in bunk beds provide a sleek and integrated look, making them a popular choice for modern and contemporary bedroom designs.
These are just a few examples of the different bunk bed styles available. The plans featured in this article focus on a traditional double bunk bed design, but don’t be afraid to explore other styles to find the one that suits your needs. Remember to consider the size of your room, the desired functionality, and the overall aesthetic when selecting a bunk bed plan.
Cost of Building a Bunk Bed
When it comes to building a bunk bed, cost is a significant consideration. The overall expense will vary depending on the materials chosen and the complexity of the design. However, opting for a DIY approach using budget-friendly bunk bed plans can result in substantial savings compared to buying a pre-made bunk bed.
By building your own bunk bed, you have more control over the cost and can choose affordable materials without compromising on quality. Additionally, DIY plans often provide a detailed list of required materials, which allows you to compare prices and make cost-effective choices.
Not only can you save money by building a bunk bed yourself, but you also have the opportunity to customize it to your liking. This means you can create a bunk bed that fits your budget without sacrificing style or functionality.
Let’s take a look at a cost breakdown for building a bunk bed using DIY plans:
| Item | Estimated Cost |
|---|---|
| Lumber | $X |
| Screws and Fasteners | $X |
| Mattress Slats | $X |
| Paint or Stain | $X |
| Other Tools and Accessories | $X |
| Total Cost | $X |
Note: The cost estimates provided above are for illustrative purposes only and may vary depending on your location and the specific materials and tools chosen.
By following the budget-friendly bunk bed plans outlined in this article, you can create a durable and functional bunk bed without breaking the bank. With careful planning and smart material choices, your DIY bunk bed project can be both cost-effective and rewarding.
Tips and Tricks for Building a Bunk Bed
Building a bunk bed can be a fun and rewarding DIY project, but it’s important to follow some tips and tricks to ensure successful construction. These additional pointers will help you create a sturdy and professional-looking bunk bed.
Accurate Measurements and Cutting
When building a bunk bed, precision is key. Take accurate measurements of all components to ensure a proper fit. Use a tape measure and square to ensure straight cuts. Double-check your measurements before making any cuts to avoid costly mistakes.
Use Proper Safety Precautions
Working with power tools and heavy materials can be hazardous, so prioritize safety. Wear protective gear like safety goggles, gloves, and a dust mask. Follow the manufacturer’s instructions for operating your tools safely. Additionally, take precautionary measures like securing your workpiece properly and keeping your work area clean and organized to prevent accidents.
Sand and Finish for a Professional Look
After completing the construction, don’t forget the finishing touches. Sand all visible surfaces to achieve a smooth and polished appearance. Use different grits of sandpaper, starting with a coarser grit and gradually moving to a finer one until the wood feels smooth to the touch. Once sanded, apply a finish coat of paint or stain to protect the wood and enhance its appearance.
“Accurate measurements, proper safety precautions, and meticulous finishing are the secrets to building a professional-looking bunk bed.”
Building a bunk bed requires attention to detail and patience. By following these tips and tricks, you’ll be well-equipped to tackle this DIY project and create a beautiful and functional piece of furniture for your home.
| Tips and Tricks for Building a Bunk Bed |
|---|
| Take accurate measurements of all components |
| Use proper safety precautions while working |
| Sand all visible surfaces for a professional finish |

Personalization and Customization Options
One of the advantages of building a bunk bed is the ability to personalize and customize it to fit your needs and style. The plans provided in this article serve as a starting point, but you have the creative freedom to add your own unique touches to make it truly yours.
Personalize with Paint or Stain: You can customize the bunk bed by painting or staining it in colors that match your room decor. Whether you prefer a bold and vibrant look or a more subtle and natural finish, applying paint or stain allows you to create a customized appearance that fits your personal taste.
Add Storage Features: If you’re looking to maximize functionality, consider incorporating additional storage features into your bunk bed design. This could include built-in shelves, drawers, or cubbies to provide convenient storage solutions for toys, books, or clothes.
Example of Personalization Options:
| Customization Option | Description |
|---|---|
| Colorful Paint | Paint the bunk bed in bright and playful colors to create a fun and energetic look in a child’s room. |
| Natural Stain | Apply a natural wood stain to highlight the beauty of the wood grain and create a warm and timeless appeal. |
| Built-in Bookshelf | Add a bookshelf along the side of the bunk bed to provide a convenient space for storing books, toys, or display items. |
| Underbed Drawers | Incorporate pull-out drawers beneath the bottom bunk for extra storage of bedding or clothing. |
“By personalizing your DIY bunk bed, you can turn it into a statement piece that reflects your style and meets your specific needs.”
With endless customization possibilities, you have the freedom to design a bunk bed that suits your preferences and enhances the overall look of your space. Whether you opt for a sleek and modern design or a rustic and cozy feel, customizing your bunk bed allows you to create a unique piece of furniture that is both functional and aesthetically pleasing.
By following the provided plans as a foundation and infusing your own personal touch, you can enjoy a one-of-a-kind DIY bunk bed that stands out and complements your interior design. Get creative and make your bunk bed a true reflection of your style and personality.
Safety Considerations for Bunk Beds
Safety is a crucial factor when it comes to bunk beds. Whether you are building a bunk bed or using one, it is important to prioritize the safety of your children. Ensuring that the bed is structurally sound and follows safety guidelines can significantly reduce the risk of accidents and injuries. Here are some essential safety considerations to keep in mind:
Structural Soundness
The structural integrity of the bunk bed is of utmost importance. Check that all the components, such as the bed frame, ladder, and railings, are sturdy and securely attached. Ensure that the materials used are durable and able to withstand the weight and movement of children.
Mattress Support
Proper support for the mattresses is vital for the safety and comfort of the children. Make sure that the bunk bed is designed to accommodate the type and size of mattresses intended to be used. The slat supports should be evenly spaced and securely attached to prevent any sagging or collapse.
Positioning
The location of the bunk bed in the room is another crucial consideration for safety. Keep the bed away from hazards such as windows, ceiling fans, and light fixtures. Ensure that there is enough clearance above the upper bunk to prevent any injuries from hitting the ceiling.
Safety Rails
Installing safety rails on the upper bunk is a must to prevent falls. These rails should be securely attached and tall enough to provide adequate protection. Check that there are no gaps between the mattress and the safety rails where a child could potentially become trapped.
Safety Guidelines
Follow the safety guidelines provided in the bunk bed plans or instructions. These guidelines are designed to ensure the safe use of the bunk bed. Pay attention to weight limits, recommended age ranges, and any specific safety precautions to be followed.
Remember, the safety of your children should always be the top priority. By adhering to bunk bed safety guidelines and implementing the necessary precautions, you can create a safe and secure sleeping space for your little ones.
Maintenance and Care for Bunk Beds
To keep your bunk bed in good condition and ensure its longevity, it’s essential to perform regular maintenance and care. By following these simple steps, you can keep your bunk bed safe, clean, and functional for years to come.
- Check for Loose Screws: Periodically inspect the bunk bed for any loose screws or structural issues. Tighten any loose screws or bolts to ensure the bed remains stable and secure.
- Clean the Bed Frame: Regularly clean the bed frame using a mild detergent and water solution. Avoid using harsh chemicals or abrasive cleaners that can damage the paint or finish. Wipe the frame thoroughly and dry it completely to prevent any moisture-related issues.
- Inspect the Mattresses: Check the mattresses regularly for any signs of wear or damage. Look for sagging areas, loose springs, or visible tears. If necessary, replace the mattresses to maintain proper support and comfort for sleepers.
- Address Structural Issues: If you notice any structural issues such as cracked or damaged wood, address them promptly. Repair or replace any compromised components to maintain the bed’s stability and safety.
- Preventative Measures: Consider using mattress protectors or covers to shield the mattresses from spills, stains, and allergens. These protective covers can prolong the life of the mattresses and make cleaning easier.
- Stain or Paint Touch-Ups: If the bunk bed’s finish starts to fade or wear off, you can touch it up with stain or paint. Sand the affected area lightly, apply the appropriate stain or paint color, and let it dry completely before using the bed again.
- Keep the Area Clean: Regularly clean the surrounding area around the bunk bed to prevent dust accumulation and potential allergens. Vacuum the floor, wipe down surfaces, and keep the space clutter-free for a healthier sleeping environment.
By following these maintenance and care practices, you can ensure that your bunk bed remains sturdy, safe, and aesthetically pleasing, providing a comfortable and secure sleeping space for your loved ones.
Expert Tip:
Consider creating a maintenance schedule for your bunk bed to stay on top of upkeep tasks. By setting reminders to perform regular checks and cleaning, you can maintain the bunk bed’s condition and address any issues promptly.
Conclusion
Building a bunk bed using DIY plans offers a cost-effective and customizable solution for creating a space-saving and functional piece of furniture. The plans provided in this article serve as a comprehensive guide, offering step-by-step instructions and detailed measurements for constructing a double bunk bed.
By following these plans and taking the necessary safety precautions, you can build a bunk bed that will provide years of comfortable and safe sleep for your children. The DIY approach allows you to have full control over the materials and design elements of the bunk bed, ensuring that it perfectly fits your needs and style.
Whether you’re a seasoned woodworker or a beginner, these plans are designed to be accessible and easy to follow. With a set of basic tools and some patience, you can unlock the secrets to building your own bunk bed and create a cozy space for your kids or guests today.
FAQ
What are the materials and tools needed to build a bunk bed?
To build a bunk bed, you will need materials such as lumber, screws, and mattress slats. The specific materials and quantities are listed in the plans. Additionally, you will need tools like a tape measure, drill, saw, and sander.
How do I build the bed frame for the bunk bed?
Building the bed frame involves constructing the legs, attaching support boards, and connecting the end boards. The plans provide detailed measurements and instructions for each step, including the use of pocket holes and deck screws for secure assembly.
How do I add the ladder and railings to the bunk bed?
The ladder sides are attached using ladder rungs, while the railings are built separately and then attached to the bed frame. The plans include measurements and instructions for building and attaching these components, ensuring a safe and functional bunk bed.
How do I install the slat supports for the bunk bed?
The slat supports are attached to the side boards of the bed frame, creating a platform for the mattress slats. The plans specify the placement and attachment method for the slat supports, ensuring proper mattress support.
How do I attach the mattress slats to the bunk bed?
The mattress slats are laid across the slat supports and provide a stable surface for the mattress to rest on. The plans provide measurements for spacing the slats and offer an alternative method of attaching them using twine for easy disassembly.
What are the advantages of building a bunk bed?
Building a bunk bed allows you to save money, create a higher quality bed, and customize it to fit your needs and style. It also offers the opportunity to create a unique piece of furniture that can be passed down as a family heirloom.
What are the different styles of bunk bed plans available?
There are various styles of bunk bed plans available, including twin over full bunk beds, loft bunk beds, and built-in bunk beds. The plans featured in this article provide a traditional double bunk bed design, but it’s important to explore different styles to find the one that suits your space and preferences.
How much does it cost to build a bunk bed?
The cost of building a bunk bed can vary depending on the materials chosen and the complexity of the design. However, building a bunk bed using DIY plans generally offers significant cost savings compared to purchasing a pre-made bunk bed.
What are some tips and tricks for building a bunk bed?
Some tips for building a bunk bed include measuring and cutting accurately, using proper safety precautions, and taking the time to sand and finish the bed for a professional look. The plans provide detailed instructions, but these additional tips can enhance the construction process.
How can I personalize and customize my bunk bed?
One advantage of building a bunk bed is the ability to personalize and customize it. You can add your own touches such as paint, stain, or additional storage features to create a unique piece of furniture that reflects your individual taste and preferences.
What safety considerations should I keep in mind when building and using a bunk bed?
It’s important to ensure that the bunk bed is structurally sound, with secure attachments and proper support for the mattresses. Additionally, the bed should be positioned away from hazards, and safety rails should be installed to prevent falls. Following the guidelines provided in the plans and practicing proper safety measures will help create a safe sleeping space.
How do I maintain and care for a bunk bed?
Regular maintenance and care for a bunk bed include checking for loose screws or structural issues, as well as cleaning the bed frame and mattresses. This ensures that the bunk bed remains safe and functional for years to come.