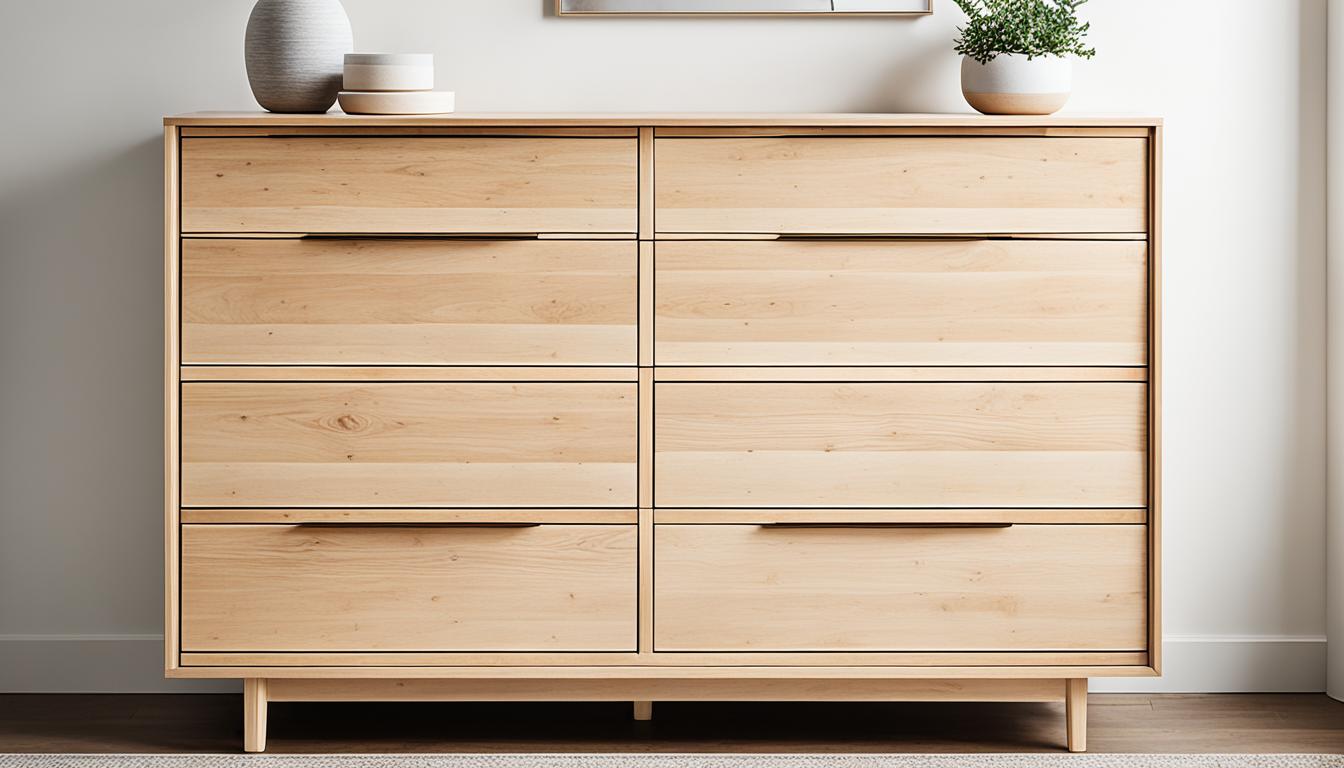
Have you ever looked at a basic, plain dresser and wished it had a touch of elegance and style? What if you could transform that dull piece into a chic and fashionable storage solution that perfectly complements your home decor? With our comprehensive DIY dresser guide, you’ll learn the art of furniture restoration and create a stunning dresser makeover that will leave everyone in awe.
Whether you’re a seasoned DIY enthusiast or a beginner looking to embark on your first furniture project, this guide is your go-to resource. From planning and designing to the building process and finishing touches, we’ll take you step-by-step through the entire process of creating your very own DIY dresser.
Ready to unleash your creativity and showcase your craftsmanship? Let’s dive in!
Key Takeaways:
- Transforming a basic dresser into a chic storage solution is easier than you think.
- With careful planning and the right tools, you can create a personalized DIY dresser.
- Repurposing old furniture is a great way to add unique touches to your DIY dresser.
- Proper maintenance and care will ensure your DIY dresser withstands the test of time.
- Showcase your DIY dresser proudly and inspire others with your creativity.
Planning and Designing Your DIY Dresser
Before you start building your DIY dresser, take the time to plan and design your project. By doing so, you can ensure that your dresser meets your style preferences and functional needs. Here are some steps to consider when planning your DIY dresser:
- Determine the style: Think about the overall style you want to achieve with your DIY dresser. Are you aiming for a modern and minimalist look or a rustic and vintage vibe? Consider the existing decor in your space and choose a style that complements it.
- Choose the right measurements: Decide on the dimensions of your dresser based on the available space in your home and your storage requirements. Consider the number and size of drawers you need, as well as the overall height and width of the dresser.
- Explore dresser painting ideas: If you want to add a pop of color or unique patterns to your dresser, explore different dresser painting ideas. Look for inspiration online or in interior design magazines to find exciting colors and patterns that match your style.
- Select hardware and finishes: Pay attention to the hardware and finishes you want to incorporate into your DIY dresser. Drawer pulls, knobs, and hinges can add a decorative touch and enhance the functionality of your dresser.
- Consider your skill level and tools: Be realistic about your DIY skills and the tools you have access to. If you are new to DIY projects, opt for an easy dresser DIY design that matches your skill level. This will help ensure a successful and enjoyable project.
A well-planned and thoughtfully designed DIY dresser will not only meet your storage needs but also bring a unique and personal touch to your home decor. Now that you have a clear plan in mind, you’re ready to move on to the next steps in building your DIY dresser.
Gathering Materials and Tools
To build your DIY dresser, you’ll need a variety of materials and tools. Here’s a list of essential items you’ll need to get started:
Materials:
- Hardwood plywood for the carcass and drawer boxes
- 1×4 boards for the face frame
- Pocket hole screws
- Brad nails
- Hinges
- Pulls
- Wood glue
Tools:
- Miter saw
- Drill
- Kreg jig
- Sander
- Stapler
Gathering the right materials and tools is crucial for a successful dresser renovation project. Hardwood plywood provides durability and stability, making it perfect for the carcass and drawer boxes. Utilizing 1×4 boards for the face frame adds a touch of elegance to your DIY dresser. Pocket hole screws, brad nails, hinges, pulls, and wood glue ensure the different components are securely held together.
Having the proper tools is equally important. A miter saw allows you to make precision cuts, while a drill is essential for creating holes and assembling the dresser. A Kreg jig helps with joining pieces together securely. A sander ensures a smooth surface before applying finishes, and a stapler comes in handy for attaching fabric or lining to the drawers.
Make sure you gather all the necessary materials and tools before diving into your easy dresser DIY project. Being prepared will save you time and make the construction process smoother.
“Great things are done by a series of small things brought together.” – Vincent Van Gogh
| Materials | Tools |
|---|---|
| Hardwood plywood | Miter saw |
| 1×4 boards | Drill |
| Pocket hole screws | Kreg jig |
| Brad nails | Sander |
| Hinges | Stapler |
| Pulls | |
| Wood glue |
Building the Carcass
In order to create your own DIY dresser, you’ll first need to construct the carcass. This serves as the foundational structure of the dresser, providing stability and support to the entire piece. To get started, follow these steps:
- Measure and cut the plywood to the desired size for the sides, shelves, and back of the dresser.
- Use pocket hole screws and wood glue to assemble the pieces together, creating the main body of the carcass.
- Consider adding a face frame to the front of the dresser for both visual appeal and added strength. This can be made from 1×4 boards.
One creative idea to incorporate into your DIY dresser is repurposing old furniture by using parts or pieces in the construction of the carcass. This can add a unique touch and give your dresser a one-of-a-kind look. For example, you could use an old door as the back panel of the dresser or repurpose drawer fronts as decorative accents on the sides. Let your creativity shine through!
Take a look at the table below for a summary of the steps involved in building the carcass:
| Step | Description |
|---|---|
| 1 | Measure and cut plywood for sides, shelves, and back. |
| 2 | Assemble pieces with pocket hole screws and wood glue. |
| 3 | Add a face frame for strength and visual appeal. |
Building the Drawers
Now that you have constructed the carcass of your DIY dresser, it’s time to focus on building the drawers. The drawers are an essential element of any dresser, providing functional storage space for your belongings. Follow these steps to ensure a successful and well-built drawer for your DIY dresser.
Measuring and Cutting
Start by measuring the space where the drawer boxes will go. Accurate measurements are crucial to ensure that the drawers fit properly within the dresser. Use a tape measure to determine the height, width, and depth of the drawer space. Once you have your measurements, cut the sides, front, and back of the drawer boxes accordingly.
Choosing Drawer Slides
Consider the type of drawer slides you want to use for your DIY dresser. Wooden drawer slides provide a more traditional and rustic feel, while metal slides offer a smoother glide. Decide based on your personal preference and the overall style of your dresser.
Assembling the Drawers
Begin by attaching the sides, front, and back of the drawer boxes using nails or screws. Ensure that the joints are secure and the pieces fit together snugly. Pay attention to the alignment of the pieces to avoid any gaps or misalignments.
Once the main structure of the drawer is assembled, attach the drawer faces and bottoms. Measure and cut the drawer faces to fit perfectly within the dresser’s frame. Secure them in place using screws or nails. Attach the drawer bottoms, ensuring a proper fit and secure assembly.
Tip: To achieve a professional finish, sand the edges of the drawer faces and bottoms before attaching them. This step will create smooth, seamless lines and prevent any splintering or rough edges.
Securing the Drawers
After assembling the drawers, it’s essential to ensure that they fit properly within the dresser’s carcass. Test each drawer by sliding them in and out of their designated spaces. Make any necessary adjustments to ensure a smooth and seamless operation. If the drawers are too loose or tight, adjust the size or position of the drawer slides accordingly.
Once you are satisfied with the fit, secure the drawers in place by attaching the slides to the carcass and drawer boxes.
Finalizing the Drawer Assembly
To complete the drawer assembly, check that all connections are secure and that the drawers glide smoothly. If necessary, make any final adjustments or tighten any loose screws or nails. Take a moment to step back and admire your work as the drawers come together, revealing the functional storage space that will enhance your DIY dresser.
With the drawers built and installed, your DIY dresser is one step closer to completion. In the next section, we will explore the essential process of installing drawer slides to ensure the functionality and longevity of your dresser.
Installing Drawer Slides
Properly installing drawer slides is an essential step in ensuring that your DIY dresser functions smoothly. By attaching the slides correctly to the carcass and drawer boxes, you can achieve a seamless opening and closing experience. Here is a step-by-step guide to help you install drawer slides for your DIY dresser:
- Carefully read and follow the manufacturer’s instructions for your specific drawer slides.
- Measure and mark the desired position for the slides on both the carcass and drawer boxes.
- Attach the slides to the carcass using screws or other fasteners as specified by the manufacturer.
- Align the corresponding slides on the drawer boxes and secure them in place.
- Test the operation of the slides by gently pulling and pushing the drawers in and out.
- Make any necessary adjustments to ensure smooth movement and proper alignment.
For added convenience and safety, consider installing soft-close drawer slides. These slides provide a gentle closing mechanism that prevents slamming, reducing noise and prolonging the lifespan of your dresser.
Pro Tip: Before installing the slides, double-check the measurements and ensure that the slides are level to avoid any misalignment issues.
With the drawer slides properly installed, you can now enjoy the seamless functionality of your DIY dresser. Whether you’re accessing your favorite clothes or storing everyday essentials, the smooth operation of the slides will make your dresser a joy to use.

| Advantages of Proper Drawer Slide Installation | Disadvantages of Improper Drawer Slide Installation |
|---|---|
| Smooth and effortless opening and closing of drawers | Difficulty in accessing the contents of the drawers |
| Increase in the functionality and usability of the dresser | Potential damage to the drawers and their contents |
| Improved organization and storage capabilities | Uneven alignment and misalignment of the drawers |
By following these installation steps, you can ensure that your DIY dresser functions flawlessly and provides convenient storage for your belongings.
Finishing Touches: Staining and Hardware
Once the construction is complete, it’s time to add the finishing touches to your DIY dresser. These final steps will bring your dresser to life and make it a stunning addition to your home decor.
First, choose a stain or paint color that matches your desired aesthetic. Consider the overall style of your room and select a finish that complements it. Whether you prefer a natural wood grain or a bold, vibrant hue, the choice is yours. Apply the stain or paint evenly to the dresser, following the manufacturer’s instructions for the best results.
Tip: Use a wood conditioner before staining to ensure an even and smooth finish.
For those who love the vintage charm, consider distressing or antiquing techniques. Distressing creates a worn look by intentionally aging the wood and exposing the underlying layers of paint or stain. Antiquing involves applying a dark glaze to highlight the details and give the dresser an aged appearance.
“The right stain or paint color can completely transform the look of your DIY dresser, so take your time and choose wisely.” – Interior Design Expert
| Step | Action |
|---|---|
| 1 | Choose and apply the desired stain or paint color to the dresser. |
| 2 | Consider distressing or antiquing techniques for a vintage look. |
Next, it’s time to install the hardware that will enhance the functionality and style of your dresser. Select pulls, handles, or knobs that complement the overall design and match your personal taste. Choose hardware that is durable and easy to use, ensuring it stands the test of time.
Tip: Measure and mark the exact placement of the hardware before drilling to achieve a professional look.
Installing the hardware is a simple process. Use a screwdriver to attach the pulls, handles, or knobs to the designated spots on the dresser. Make sure they are secure and properly aligned to ensure smooth operation.
With the completion of staining and hardware installation, your DIY dresser is ready to showcase its unique beauty and functionality in your home.
Tip: Take a step back and admire your handiwork. You’ve transformed an ordinary piece of furniture into a personalized masterpiece!
Dresser Makeover: Before and After
Transforming an old or outdated dresser into a chic storage solution is a rewarding experience. With a little creativity and some DIY skills, you can give new life to your furniture and create a stunning centerpiece for your room. Take a look at these before and after photos of dresser makeovers to see the incredible transformations:
| Before | After |
|---|---|
| A worn-out wooden dresser with chipped paint and outdated hardware. | A beautifully restored dresser with a fresh coat of paint, stylish hardware, and a modern finish. It looks brand new! |
| A plain and unremarkable dresser that blends into the background. | A bold and eye-catching dresser with a vibrant color, decorative accents, and unique details. It’s now a statement piece in the room. |
| An old-fashioned dresser with a dated design that doesn’t fit your style. | A stylish and contemporary dresser that matches your decor and personal taste. It’s the perfect addition to your home. |
Showcasing these incredible before and after transformations can inspire others to embark on their own furniture restoration projects. Share your dresser makeover journey on social media to spread the DIY love and encourage others to try their hand at repurposing furniture.
Don’t limit yourself to just dressers – consider repurposing other pieces of furniture in your home. By giving new life to old items, you can create a cohesive design theme and make your space truly unique. Let your creativity shine!
Tips and Tricks for DIY Dresser Projects
Building a DIY dresser comes with its own set of challenges and considerations. Use these tips and tricks to navigate your project successfully.
Careful Measurement for Proper Fit
Before cutting any materials, measure carefully to ensure a proper fit for your DIY dresser. Accurate measurements are crucial for achieving a polished final product.
Take Your Time and Double-Check Connections
Assembling components requires patience and attention to detail. Take your time during each step of the construction process, ensuring all connections are secure. Double-checking your work will help prevent any potential issues in the future.
Meticulous Sanding and Finishing
To achieve a professional look, dedicate time to meticulously sand and finish your DIY dresser. Smooth out any rough edges, remove imperfections, and apply a finish that complements your desired aesthetic.
Customize and Embrace Your Personal Style
A DIY dresser project offers the opportunity to showcase your creativity. Don’t be afraid to experiment and customize your dresser to reflect your personal style. Consider unique features or embellishments that will make your dresser truly one-of-a-kind.
Inspiration and Ideas
When undertaking a DIY dresser project, it can be helpful to gather inspiration and ideas from various sources. Browse online platforms, social media, and home improvement magazines to discover different styles, finishes, and design possibilities.
“A well-crafted DIY dresser reflects your individuality and adds a touch of personality to your home decor.”
Attention to Detail
Pay attention to the small details that will elevate your DIY dresser project. Consider coordinating drawer pulls, decorative hardware, or stylish trim to enhance the overall appearance.
Seek Advice and Resources
If you encounter any challenges or have questions throughout your DIY dresser project, seek advice and resources. Online communities, forums, and woodworking groups can provide valuable insights, tips, and troubleshooting strategies.
Build Confidence with Simple Projects
If you’re new to DIY furniture projects, start with simpler dresser designs and gradually progress to more complex builds. Building confidence and acquiring experience with smaller projects will prepare you for larger and more intricate creations.
Enjoy the Process
Building a DIY dresser is a labor of love. Embrace the process and enjoy the journey of creating a functional and beautiful piece of furniture for your home.
Troubleshooting Common DIY Dresser Issues
While building your DIY dresser, it’s important to be aware of common issues that may arise. Understanding how to troubleshoot these problems will help ensure a successful furniture restoration project. Here are some common DIY dresser issues you may encounter and how to resolve them:
Issue 1: Drawers Not Sliding Smoothly
If your dresser drawers are not sliding smoothly, the problem could be misalignment or incorrect installation of the drawer slides. To resolve this issue:
- Check the alignment of the drawer slides by measuring and positioning them accurately.
- Ensure that the slides are securely attached to both the dresser carcass and the drawer boxes.
- If necessary, adjust the slides according to the manufacturer’s instructions to ensure smooth operation.
Issue 2: Improperly Fitting Drawers
Another common issue is drawers that do not fit properly within the dresser. To address this problem:
- Double-check your measurements to ensure that the dimensions of the drawers are accurate and consistent.
- Make any necessary adjustments to the drawer boxes, sides, fronts, and backs to ensure a proper fit.
- Consider sanding or planing the edges of the drawers to create a better fit within the dresser carcass.
Issue 3: Challenges and Seek Advice
If you encounter any challenges while building your DIY dresser, don’t hesitate to seek advice from experienced builders. There are various resources available, such as woodworking forums and communities, where you can ask specific questions and get valuable insights and solutions.
“Seeking advice from experienced builders can help you overcome any challenges you may encounter during your DIY dresser project. Don’t hesitate to ask for help and tap into the knowledge of the woodworking community.”
By troubleshooting these common DIY dresser issues and seeking guidance when needed, you can ensure a successful furniture restoration project. Remember to take your time, follow proper measurements and installation techniques, and always double-check your work for a professional and polished end result.
Maintaining and Caring for Your DIY Dresser
Once your DIY dresser is complete, it’s important to properly maintain and care for it. By following these tips, you’ll ensure that your dresser remains in excellent condition for years to come.
Avoid Heavy Objects
One of the key considerations when maintaining your DIY dresser is to avoid placing heavy objects on it. Heavy items can cause the dresser to sag or potentially damage the structure. Keep in mind the weight limits specified during the construction process and be mindful of the items you display on top of the dresser.
Cleaning and Care
To keep your DIY dresser looking its best, it’s essential to clean it regularly. Use a gentle cleaner and a soft cloth to remove dust, dirt, and any spills. Avoid using harsh chemicals or abrasive materials that can damage the finish of the dresser. Be sure to follow the manufacturer’s instructions on cleaning and care for any specific finishes you have used.
Protect and Enhance the Finish
Consider using furniture wax or polish to protect the finish of your DIY dresser. Applying a thin coat of wax or polish will help to seal and protect the wood, while also enhancing its natural beauty. Follow the manufacturer’s instructions on how to apply and maintain the wax or polish to ensure optimal results.
Regular Inspections and Repairs
Regularly inspect your DIY dresser for any signs of wear or damage. Check for loose screws, damaged hinges, or any other issues that may require repair. By catching and addressing problems early on, you can prevent further damage and prolong the lifespan of your dresser.
“Regular maintenance and care are essential for keeping your DIY dresser in great condition. By following these tips, you’ll preserve its beauty and functionality for years to come.” – Expert DIY Furniture Designer
Your DIY Dresser Maintenance Checklist
| Task | Frequency |
|---|---|
| Clean the surface with a gentle cleaner and soft cloth | Weekly |
| Avoid placing heavy objects on the dresser | Ongoing |
| Apply furniture wax or polish to protect the finish | Monthly |
| Inspect for any signs of wear or damage | Quarterly |
| Make necessary repairs promptly | As needed |
By following this maintenance checklist, you can keep your DIY dresser in optimal condition and enjoy its functionality and beauty for years to come.

Showcasing Your DIY Dresser in Your Home
After all your hard work, it’s time to showcase your DIY dresser in your home. Position the dresser in a prominent location where it will be both functional and visually appealing. Style the dresser with decorative items, such as lamps, vases, or framed photos, to personalize the space. Share photos of your DIY dresser on social media or home décor websites to inspire others with your creativity and craftsmanship.
| Ways to Showcase Your DIY Dresser |
|---|
| Position it in the entryway to create a stunning first impression. |
| Place it in the bedroom as a stylish storage solution for your clothes and accessories. |
| Use it as a statement piece in the living room as a TV stand or media console. |
| Transform it into a chic bar cabinet for displaying your glassware and spirits. |
| Showcase it in the nursery as a changing table with added storage space. |
Tips for Styling Your DIY Dresser
- Choose decorative items that complement the style and color of your DIY dresser.
- Use a variety of heights and textures to create visual interest.
- Add a mirror above the dresser to create the illusion of more space.
- Consider using trays or baskets to organize and display smaller items.
- Play with different lighting options, such as table lamps or fairy lights, to enhance the ambiance.
“Your DIY dresser is a reflection of your creativity and ingenuity. Showcase it proudly in your home and inspire others with your repurposed furniture masterpiece.”
Conclusion
Building your own DIY dresser is a fulfilling and rewarding project. Whether you choose to give an old piece of furniture a much-needed makeover or start from scratch, the end result will be a unique and stylish storage solution. With careful planning, attention to detail, and the right tools, you can create a personalized DIY dresser that perfectly suits your needs and enhances your home décor.
By undertaking a dresser renovation, you can breathe new life into a worn-out piece and transform it into a stunning focal point in your room. The process of diy furniture project allows you to express your creativity and design a dresser that reflects your personal style. You have the freedom to choose the materials, finishes, and hardware that resonate with your aesthetic preferences.
Remember, diy projects like these require patience and dedication. Take your time during each step of the process to ensure precision and quality craftsmanship. Whether you’re a seasoned DIY enthusiast or a beginner, this project is within your reach. So roll up your sleeves, gather your tools, and embark on the journey of creating your own DIY dresser—a functional and beautiful addition to your home.
FAQ
What is a DIY dresser?
A DIY dresser is a piece of furniture that is built or renovated by individuals themselves, often using repurposed materials or giving new life to an old dresser.
Why should I consider building my own DIY dresser?
Building your own DIY dresser allows you to customize the design, style, and functionality to suit your specific needs and preferences. It can also be a cost-effective option compared to buying a new dresser.
Can I give my existing dresser a makeover instead of starting from scratch?
Yes, you can give your existing dresser a makeover by repainting or refinishing it, changing the hardware, or adding decorative elements to transform its look.
What should I consider when planning and designing my DIY dresser?
When planning and designing your DIY dresser, consider the style, drawer sizes, hardware, and finishes you want to incorporate. Explore dresser painting ideas for color and pattern inspiration.
What materials and tools do I need for building a DIY dresser?
You will need hardwood plywood for the carcass and drawer boxes, 1×4 boards for the face frame, pocket hole screws, brad nails, hinges, pulls, wood glue, and tools such as a miter saw, drill, Kreg jig, sander, and stapler.
How do I build the carcass of a DIY dresser?
To build the carcass, cut the plywood to size and assemble the sides, shelves, and back using pocket hole screws and wood glue. Attach a face frame for added strength and visual appeal.
How do I build the drawers for a DIY dresser?
Measure the space where the drawer boxes will go and cut the sides, front, and back accordingly. Attach the drawer faces and bottoms, ensuring a proper fit and secure assembly.
How do I install drawer slides for a DIY dresser?
To install drawer slides, attach them to the carcass and drawer boxes following the manufacturer’s instructions. Test the slides to ensure smooth operation and adjust if necessary.
How can I add the finishing touches to my DIY dresser?
Choose a stain or paint color that matches your desired aesthetic and apply it to the dresser. Consider distressing or antiquing techniques for a vintage look. Install hardware, such as pulls and hinges, to enhance functionality and style.
How can I troubleshoot common issues with my DIY dresser?
If your drawers don’t slide smoothly, make sure the slides are properly aligned and installed. Double-check your measurements and make adjustments if the drawers don’t fit properly.
How do I maintain and care for my DIY dresser?
Avoid placing heavy objects on the dresser that could cause sagging or damage. Clean the surface regularly with a gentle cleaner and soft cloth. Consider using furniture wax or polish to protect the finish and enhance its natural beauty.