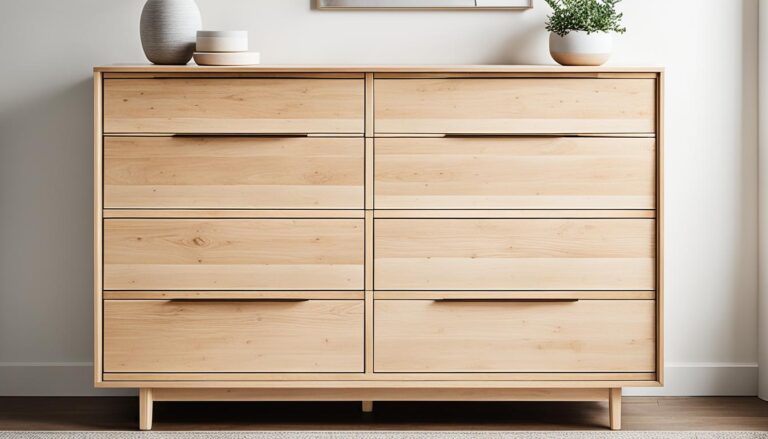
Are you tired of your outdated bathroom vanity? Looking to add a touch of modern elegance to your space? Say goodbye to traditional vanities and embrace the sleek and stylish appeal of a floating vanity. But how exactly can you create your own DIY floating vanity? Follow our step-by-step guide and discover the secrets to designing and building a floating vanity that will transform your bathroom into a contemporary oasis.
Determine the Ideal Size
The first step in your DIY floating vanity project is to determine the ideal size that will work best for your bathroom. Consider the length, depth, and height of the vanity to ensure it fits perfectly in your space. Take into account the layout of your bathroom and any existing features or obstacles that may affect the dimensions of your vanity.
For a seamless and polished look, you may choose to butt the vanity into the corners of the wall. This will not only add stability but also conceal the sides of the vanity for a sleek appearance.
Measure the dimensions of your chosen space accurately and record them. It is important to leave enough space for plumbing and storage if desired. This will ensure that your DIY floating vanity is both functional and aesthetically pleasing.
Take your time during this step to carefully plan and visualize how your vanity will fit into your bathroom. It is crucial to get the dimensions right before moving forward with the construction process.
Factors to Consider:
- Layout and dimensions of your bathroom
- Existing features and obstacles in your bathroom
- Plumbing requirements
- Desired storage capacity
By carefully determining the ideal size of your DIY floating vanity, you are setting the foundation for a successful bathroom remodel project.
Make sure to refer back to your measurements and plans throughout the construction process to ensure accuracy and a seamless installation.
Build and Install the Frame
Now that you have determined the perfect size for your DIY floating vanity, it’s time to build and install the frame. This step is crucial for ensuring stability and durability. Follow these instructions to create a solid foundation for your vanity:
- Start by gathering the necessary materials, including 2×4’s or 2×2’s, screws, a drill, and a level.
- Measure and mark the desired height for your vanity on the wall. Use a level to ensure accuracy.
- Cut the 2×4’s or 2×2’s to the appropriate length for the sides and back of the frame.
- Attach the side pieces vertically to the wall studs, using screws to secure them in place.
- Next, attach the back piece horizontally between the side pieces, again using screws.
- Ensure that the frame is level and securely fastened to the wall.
- Leave space on top of the frame for a 3/4″ thick piece of MDF that will serve as the vanity top.
- Also, create a hole in the back of the frame to accommodate the plumbing for the sink.
- Use wood filler to fill any gaps or holes in the frame, creating a smooth surface.
- Allow the wood filler to dry completely before proceeding.
Once the frame is built and securely installed, you are ready to move on to the next step in creating your DIY floating vanity.

Quote:
“A sturdy frame is the foundation of a successful DIY floating vanity project.”
Select and Apply Veneer
When it comes to designing your floating vanity, selecting the right veneer material is crucial. The type of veneer you choose will greatly impact the overall aesthetic of your vanity. Some popular options for floating vanity ideas include walnut, oak, and maple. These materials offer a modern and sophisticated look that can enhance any bathroom design.
Before applying the veneer, it is important to pre-cut it to fit the tops and fronts of your vanity. Precise measurements and marking the corners will ensure a seamless and professional finish. Once you have the veneer cut, it’s time to secure it to the MDF (Medium Density Fiberboard) surface.
To effectively adhere the veneer, use contact cement. Work in sections, applying the cement to both the veneer and the MDF surface. Carefully place the veneer on top, smoothing it out as you go to remove any air bubbles or creases. This will give your floating vanity a clean and polished look.
Allow the veneer to set according to the manufacturer’s instructions before moving on to the next step. This will ensure that the veneer is properly secured and ready for the final touches.
Advantages of Veneer
Veneers offer several advantages for your floating vanity design:
- Wide range of options: Veneers come in various hues and patterns, allowing you to find the perfect match for your modern vanity design.
- Durability: Veneers provide a robust and resilient surface that can withstand daily wear and tear.
- Natural beauty: The use of real wood veneer adds a touch of elegance and sophistication to your bathroom space.
- Environmentally friendly: Veneers conserve wood resources by utilizing thin sheets of wood rather than solid pieces.
By carefully selecting and applying veneer, you can transform your DIY floating vanity into a stunning centerpiece that reflects your unique style. The next step will involve finishing the wood to protect and enhance its appearance, bringing your modern vanity design to life.
Comparison of Veneer Types
| Veneer Type | Appearance | Price Range | Durability |
|---|---|---|---|
| Walnut Veneer | Rich, dark brown tone with unique grain patterns | $$$ | High |
| Oak Veneer | Subtle, light brown color with prominent grain markings | $$ | Medium |
| Maple Veneer | Pale, creamy color with a smooth, uniform grain | $$ | Medium |
Finish with Lacquer
Once you have securely placed the veneer on your DIY floating vanity, it’s time to apply a wood lacquer to seal and protect the surface. Choosing the right lacquer compatible with your chosen veneer material is essential for achieving a durable and beautiful finish.
To complete this step, follow the manufacturer’s instructions for the lacquer you have selected. Apply an even layer of lacquer on the entire surface of the vanity using a brush or a sprayer, making sure to cover all the exposed areas. Allow the lacquer to dry completely before moving forward with the final stage of your DIY project.
Applying a lacquer to your floating vanity not only adds an extra layer of protection but also enhances the natural beauty of the wood, providing a smooth and polished appearance.
Benefits of Using a Lacquer
Using a wood lacquer offers several benefits for your DIY floating vanity:
- Protection: The lacquer forms a protective barrier, shielding the vanity surface from moisture, stains, and scratches.
- Enhancement: A lacquer finish enhances the color and grain pattern of the wood, making your vanity visually appealing.
- Durability: Lacquer provides a durable and long-lasting finish, ensuring that your floating vanity withstands daily use and retains its beauty for years to come.
By including this final step in your DIY project, you are adding both style and functionality to your bathroom space.

Lacquer Application Tips
“Proper application of lacquer is crucial for achieving a professional and flawless finish.”
Here are some tips to ensure a successful lacquer application:
- Clean the surface of your floating vanity thoroughly before applying the lacquer. Remove any dust or debris using a clean, lint-free cloth.
- Avoid applying the lacquer in a dusty or humid environment, as it can cause imperfections on the surface.
- Apply thin and even coats of lacquer to prevent drips or runs. Multiple thin coats provide better coverage and a smoother finish compared to applying one thick coat.
- Allow each coat of lacquer to dry completely before applying the next. Follow the drying time mentioned on the lacquer product label.
- Lightly sand the surface between coats using fine-grit sandpaper. This helps to level any imperfections and create a smoother finish.
- Wear appropriate protective gear, such as gloves and a mask, when working with lacquer to avoid skin contact and inhalation of fumes.
By following these tips and taking your time to apply the lacquer carefully, you can achieve a professional-quality finish on your DIY floating vanity.
| Lacquer Type | Pros | Cons |
|---|---|---|
| Nitrocellulose Lacquer | Fast-drying, easy to repair, provides a glossy finish | Not very durable, may yellow over time |
| Water-Based Lacquer | Low odor, quick drying, non-yellowing, environmentally friendly | Not as durable as other options, may require multiple coats for desired finish |
| Polyurethane Lacquer | Durable, resistant to scratches and stains, provides a clear finish | Long curing time, may require sanding between coats for smooth finish |
Consider these lacquer types and weigh their pros and cons to determine the best option for your DIY floating vanity, taking into account your desired finish and durability requirements.
Install the Sink and Plumbing
Now that your DIY bathroom vanity is taking shape, it’s time to install the sink and plumbing. Whether you’ve chosen a stylish vessel sink or a sleek undermount sink, the installation process is relatively straightforward.
Follow the manufacturer’s instructions carefully to ensure a proper installation. Start by positioning the sink in the desired location on the vanity top. Make sure it is centered and aligns with the pre-cut hole. Use a level to ensure the sink is flat and level.
Next, apply a bead of silicone sealant around the edges of the sink where it will come into contact with the vanity top. This helps create a watertight seal and prevents any water from seeping between the sink and the vanity, protecting both your vanity and the surrounding walls.
Take care to also apply silicone sealant along the back edge of the sink where it meets the wall. This further reinforces the water-resistant barrier and prevents any moisture from seeping into the walls.
Once the sink is in place, it’s time to connect the plumbing. Use the appropriate plumbing fittings and connectors according to your specific sink and plumbing configuration. Pay attention to the finish of the plumbing parts, such as chrome or brushed nickel, to ensure they blend seamlessly with the overall design aesthetic of your bathroom.
Double-check all the connections to ensure they are secure and properly aligned. Turn on the water supply and check for any leaks. If necessary, make any adjustments or tighten any fittings to eliminate any leaks.
Completing the installation of the sink and plumbing is an essential step in finishing your DIY bathroom vanity. It brings functionality to your vanity and ensures that water flows smoothly without any leaks or water damage.
Maintenance and Care
To keep your DIY floating vanity looking brand new, it’s important to properly maintain and care for it. By following these tips, you can ensure that your vanity remains in top condition for years to come.
Regular Cleaning
Regular cleaning is essential to prevent dirt, grime, and water stains from building up on your floating vanity. Wipe down the surface regularly using a soft cloth or sponge and mild soap or a gentle cleaner. Avoid using harsh chemicals or abrasive cleaners, as they can damage the finish of your vanity.
Water Prevention
Water can be damaging to the wood or veneer of your floating vanity, so it’s important to wipe up any water droplets or spills immediately. Be especially mindful of areas around the sink where water is more likely to accumulate. A quick wipe with a dry cloth can help prevent water damage and keep your vanity looking its best.
Gentle Cleaning Products
When choosing a cleaner for your floating vanity, opt for gentle and non-abrasive products. Avoid using bleach, ammonia, or any harsh chemicals that can strip away the protective finish or cause discoloration. Look for cleaners specifically made for wood or laminate surfaces to ensure compatibility.
Sanding and Lacquer Refresh
Over time, the surface of your floating vanity may start to look worn or scratched. If this happens, gently sand the surface to remove any imperfections. Once sanded, you can apply a fresh coat of lacquer to refresh the appearance and protect the wood or veneer. Be sure to follow the lacquer manufacturer’s instructions for the best results.
| Cleaning Tips | Lacquer Refresh |
|---|---|
| Regularly wipe down the surface with a soft cloth or sponge and mild soap. | Gently sand the surface to remove imperfections. |
| Avoid using harsh chemicals or abrasive cleaners. | Apply a fresh coat of lacquer to refresh the appearance. |
| Wipe up water droplets and spills immediately. | Follow the lacquer manufacturer’s instructions for application. |
By implementing these maintenance and care practices, you can ensure that your DIY floating vanity remains a beautiful and functional centerpiece in your bathroom. With regular cleaning and proper upkeep, your vanity will continue to impress for years to come.

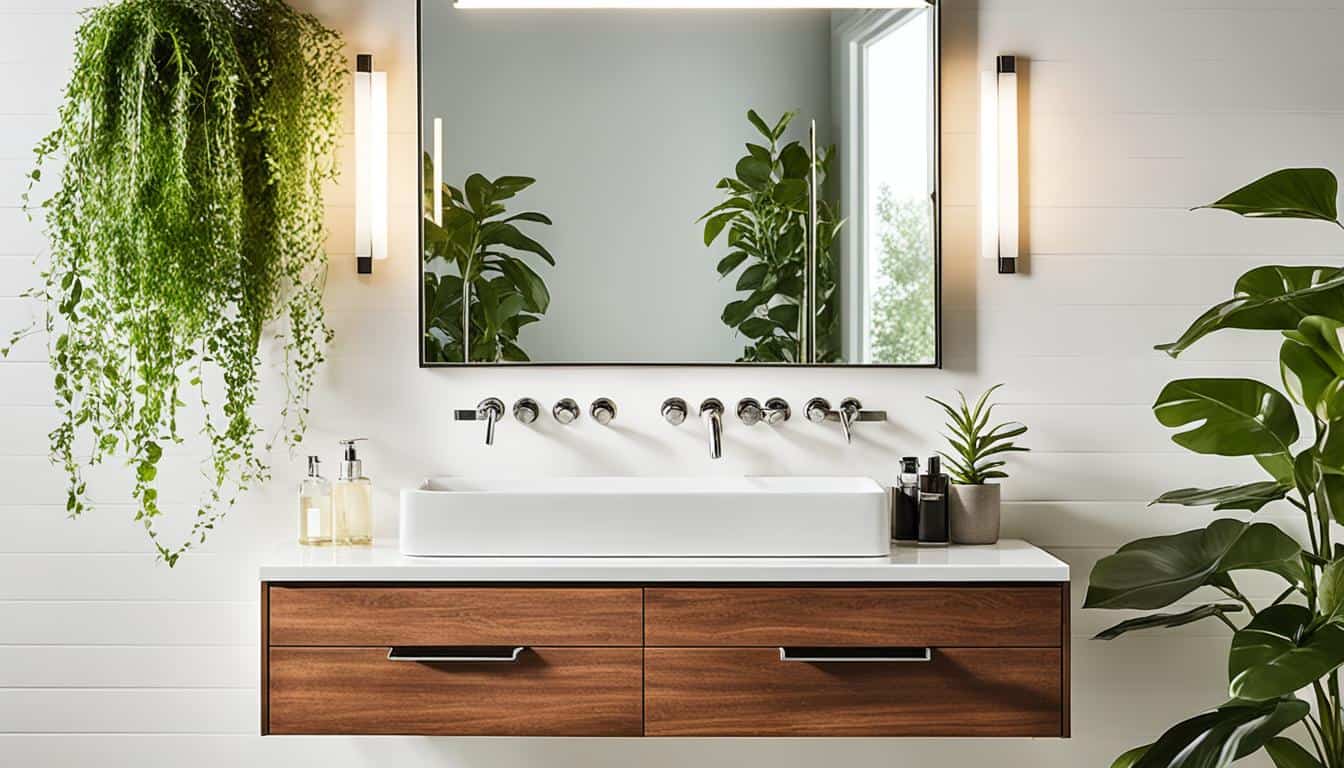
The Modern Style of Floating Furniture
Floating furniture, including floating vanities, has become increasingly popular in modern design. The clean and straight lines of floating furniture make it an attractive option for DIY projects. By building your own floating vanity, you can create a sleek and functional piece for your bathroom that matches your style preferences.

When it comes to modern vanity design, the floating vanity offers a unique and contemporary aesthetic. Its suspended appearance creates a sense of airiness and spaciousness in the bathroom, making it perfect for smaller spaces or those seeking a minimalist look. The absence of traditional floor support also gives the illusion of a larger room.
Another advantage of floating vanities is their versatility in design. They can be customized to fit any style or color scheme, whether you prefer a sleek monochromatic look or a bold and vibrant statement piece. The absence of visible plumbing and storage also adds to their streamlined appeal.
Additionally, floating vanities provide practical benefits beyond their visual appeal. The open space underneath allows for easy cleaning, making it more hygienic and preventing the buildup of dust and debris. It also offers greater flexibility in plumbing installation, making maintenance and repairs more accessible.
Whether you’re looking for floating vanity ideas or wanting to incorporate modern design elements into your bathroom, a DIY floating vanity is a perfect choice. It allows you to unleash your creativity while creating a functional and aesthetically pleasing piece. So why not take the plunge and embark on your own floating vanity project?


Gather Tools and Materials
Before starting your DIY floating vanity project, gather the necessary tools and materials. Having everything you need at hand will ensure a smooth construction process. Here’s a list of essential tools and materials to get you started:
Tools:
- Circular saw
- Kreg jig for pocket holes
- Drill
- Measuring tape
- Wood glue
- Screws
- Clamps
Materials:
- Various sizes of solid oak boards
With these tools and materials, you’ll have everything you need to kick off your DIY floating vanity project. Remember to follow safety precautions while using power tools and handle all materials with care.
Now that you’ve gathered your tools and materials, you’re ready to dive into the construction process. Let’s move on to the next section to assemble the floating vanity sides.
Assemble the Floating Vanity Sides
Now that you have determined the ideal size for your DIY floating vanity, it’s time to start assembling the sides. Follow these steps to ensure a sturdy and secure construction:
- Begin by cutting the solid oak boards to the desired lengths for the sides of the floating vanity.
- Use a Kreg jig to create pocket holes in the boards. These pocket holes will provide added strength and stability to the vanity.
- Next, assemble the sides by connecting the boards using screws and wood glue. Make sure to align the boards flush with each other for a seamless look.
- Secure the joints by tightening the screws and applying wood glue to ensure a strong bond.
By following these steps, you will create a solid foundation for your floating vanity. Remember to double-check the alignment and stability of the sides before proceeding to the next step.
Build the Front of the Vanity Frame
Now that you have assembled the sides of your DIY floating vanity, it’s time to build the front frame. This front frame will provide crucial support and structure to your vanity, ensuring its stability and durability.
To build the front frame, you will need additional solid oak boards. Cut the boards to the appropriate length, considering the dimensions of your vanity and the design you have in mind. It’s essential to measure accurately to ensure a precise fit.
Once you have cut the boards, use pocket holes and screws to attach them together. This method will create a tight and sturdy connection, ensuring that the front frame remains securely in place. Take your time during this step to ensure that the boards are properly aligned before screwing them together.
As you build the front frame, it’s important to maintain consistency in the materials and construction techniques used throughout your DIY project. This will contribute to the overall visual appeal and structural integrity of your floating vanity.
With the front frame complete, you can now move forward with the construction of your DIY floating vanity. The next steps will focus on adding the vanity shelf, side panels, and drawers, bringing your project closer to completion.
Stay tuned for the upcoming sections of our comprehensive guide on building a DIY floating vanity. In the following sections, we will guide you through the process of adding the vanity shelf, side panels, and drawers, as well as finishing touches to make your floating vanity a stunning addition to your bathroom.
Add Vanity Shelf and Side Panels
Now that you have built the frame of your DIY floating vanity, it’s time to add the vanity shelf and side panels for additional stability and functionality. Here’s how:
-
Attach Solid Oak Boards: Take solid oak boards and attach them to the front and sides of the vanity frame using pocket holes and screws. This will create the foundation for the vanity shelf and side panels.
-
Cut Plywood: Cut plywood pieces to fit into the side openings of the vanity frame. These plywood pieces will provide extra support and stability to the vanity.
-
Secure Plywood: Attach the cut plywood pieces to the inside of the vanity frame using screws. Make sure the plywood pieces fit snugly and are securely fastened to enhance the stability of the vanity.
By adding the vanity shelf and side panels, you not only enhance the overall design of your floating vanity but also make the installation of drawer slides easier. These additional components provide support and functionality to your DIY floating vanity, ensuring it is sturdy and reliable.
Continue to the next section to learn how to add drawers to your floating vanity frame.
Add Drawers to the Floating Vanity Frame
Now it’s time to add functional drawers to your DIY floating vanity. Follow these steps to ensure a smooth installation:
- Attach drawer slides: Start by attaching drawer slides to the inside of the vanity frame. Position them according to the measurements and spacing you desire. Make sure they are level and securely fastened.
- Build the drawers: Use appropriate measurements to construct the drawers. Cut the necessary pieces of wood to create the sides, front, and back of each drawer. Assemble the pieces using screws and wood glue for added stability.
- Install the drawers: Carefully slide the drawers into the vanity frame, ensuring that they fit snugly on the drawer slides. Test the smoothness of the sliding motion to ensure proper alignment and functionality.
- Add drawer fronts: Complete the look of your drawers by attaching stylish drawer fronts. These can be made from the same wood material as the rest of the vanity or a complementary material of your choice. Secure the drawer fronts to the drawer boxes using screws or other appropriate fasteners.
With the drawers now in place, your DIY floating vanity is one step closer to completion. Take a moment to admire your progress before moving on to the finishing touches.
Finish the Floating Vanity
Once you have built and installed the frame of your DIY floating vanity and applied the veneer, it’s time to finish the vanity and prepare it for installation in your bathroom.
Start by sanding the surfaces of the vanity to create a smooth finish. Use a sanding block or sandpaper with a moderate grit to remove any rough edges or imperfections. Pay extra attention to the edges and corners to ensure a seamless result.
After sanding, you have the option to stain or paint the vanity to match your desired color and style. If you prefer a natural wood look, applying a stain will enhance the grain and provide a rich, warm tone. Alternatively, you can paint the vanity with a color that complements your bathroom decor or adds a pop of personality.
Once the stain or paint has dried, it’s essential to protect the wood and enhance the appearance of the vanity. Apply a clear coat or sealer to seal the surface and guard against moisture and wear. Choose a sealer that is suitable for the type of wood used in your vanity to ensure proper adhesion and long-lasting protection.
Allow the finish to dry completely according to the manufacturer’s instructions before proceeding with the installation of the floating vanity in your bathroom. This drying time is crucial to ensure that the finish is fully cured and hardened, providing a durable and beautiful result.
Now that you have finished your DIY floating vanity, you can enjoy the satisfaction of creating a custom piece that adds style and functionality to your bathroom. The next step is to install the vanity and admire the transformation it brings to your space.
Continue reading to learn how to properly install your floating vanity in Section 15.
Installation and Support
Now that you have completed building your DIY floating vanity, it’s time to install it in your bathroom. Proper installation and support are crucial to ensure the stability and functionality of your vanity. Follow these steps to ensure a successful installation:
1. Determine the Placement
First, decide where you want to place your floating vanity in your bathroom. Consider the available space, plumbing connections, and any other fixtures or features that may affect the placement. Measure the wall and mark the desired height for your vanity.
2. Locate the Wall Studs
Using a stud finder, locate the wall studs in the area where you will be installing the vanity. Wall studs provide the necessary support for your vanity, so it’s important to attach it securely to them.
3. Install Cleats
Attach wooden cleats to the wall studs at the marked height for your vanity. Use a level to ensure that the cleats are straight and level. The cleats will provide additional support and stability for your floating vanity.
4. Mount the Vanity
With the help of another person, carefully lift the vanity onto the cleats. Make sure it is level and aligned with the marks on the wall. Use screws to secure the vanity to the cleats, ensuring a strong and secure attachment.
5. Check for Level
Use a level to double-check that your floating vanity is perfectly level. Adjust the positioning if necessary to ensure a balanced and visually pleasing installation.
6. Additional Support
If you have a large or heavy vanity, or if you want extra support for added peace of mind, consider installing additional support brackets or legs. Consult a professional if you are unsure about the weight requirements or if you have any concerns about the stability of your vanity.
With proper installation and support, your DIY floating vanity will add both style and functionality to your bathroom. Enjoy the satisfaction of your completed project and the beauty it brings to your space!
Conclusion
Building a DIY floating vanity is a rewarding home improvement project that can transform the look and feel of your bathroom. By following the step-by-step guide provided, you can create a customized floating vanity that combines style and functionality to suit your space and design preferences.
Throughout the process, make sure to carefully measure and plan the ideal size of your vanity, considering the layout and existing features of your bathroom. Building and installing the frame is a crucial step, providing stability and support for the vanity.
Once the frame is in place, choose the perfect veneer material and apply it to the top and front of the vanity for a sleek and modern look. Finish off with a durable lacquer to protect the surface and add a professional touch.
With the sink and plumbing properly installed, your DIY floating vanity is ready to enhance your bathroom space. Regular maintenance and care will keep it looking brand new for years to come. Enjoy the satisfaction of completing this impressive home improvement project and the stylish enhancement it brings to your bathroom!
FAQ
What is a floating vanity and why should I consider building one?
A floating vanity is a bathroom vanity that is mounted to the wall, giving the illusion that it is “floating” above the floor. Building a DIY floating vanity can add a sleek and modern touch to your bathroom, elevating the design and providing functional storage.
How do I determine the ideal size for my DIY floating vanity?
To determine the ideal size, consider the length, depth, and height of the vanity, taking into account the layout of your bathroom and any existing features. Measure the dimensions and make sure to leave space for plumbing and storage if desired.
How do I build and install the frame of my DIY floating vanity?
Use 2×4’s or 2×2’s to create the frame, securing it to the wall at your preferred height. Leave space for a 3/4″ piece of MDF on top and in front of the frame, as well as a hole for the sink’s plumbing. Use wood filler to create a smooth surface and secure the frame in place.
What material should I use for the veneer of my floating vanity?
Popular options for veneer materials include walnut, oak, and maple. Choose a veneer material that matches your desired aesthetic for the vanity.
How do I apply the veneer to my DIY floating vanity?
Pre-cut the veneer to fit the tops and fronts of the vanity, marking the corners for precise placement. Use contact cement to secure the veneer to the MDF, working in sections and smoothing out any air bubbles. Allow the veneer to set before moving on to the next step.
How do I finish the surface of my floating vanity?
Apply a wood lacquer to seal and protect the surface of the vanity. Choose a lacquer that is compatible with your chosen veneer material. Apply the lacquer according to the manufacturer’s instructions and allow it to dry completely before moving on to the next step.
How do I install the sink and plumbing for my DIY floating vanity?
Follow the manufacturer’s instructions for installing your chosen sink, whether it’s a vessel sink or an undermount sink. Use silicone to seal the edges of the sink and where the vanity meets the walls. Double-check the connection of the plumbing to ensure everything is properly aligned and functioning.
How do I maintain and care for my DIY floating vanity?
Regularly clean the vanity and avoid using harsh chemicals. Wipe up any water droplets and use a gentle cleaner to maintain the finish. If the surface starts to look worn over time, sand it gently and reapply a coat of lacquer to refresh the appearance.
Why are floating vanities popular in modern design?
Floating furniture, including floating vanities, has become increasingly popular in modern design. The clean and straight lines of floating furniture make it an attractive option for DIY projects, providing a sleek and functional piece for your bathroom.
What tools and materials do I need for building a DIY floating vanity?
You may need a circular saw, Kreg jig for pocket holes, drill, measuring tape, wood glue, screws, clamps, and various sizes of solid oak boards. Make sure you have everything you need before beginning the construction process.
How do I assemble the sides of the floating vanity?
Cut the solid oak boards to the desired lengths for the sides of the floating vanity. Use a Kreg jig to create pocket holes for added strength and stability. Assemble the sides by connecting the boards with screws and wood glue, ensuring the joints are flush and secure.
How do I build the front of the vanity frame for my floating vanity?
Cut additional solid oak boards to create the front of the vanity frame. Use pocket holes and screws to attach the boards together, ensuring a tight and sturdy connection. This front frame will provide support and structure to the floating vanity.
How do I add a vanity shelf and side panels to my floating vanity?
Attach solid oak boards to the front and sides of the vanity frame to create a vanity shelf. Use pocket holes and screws for a secure attachment. Cut plywood to fit in the side openings and attach them to the inside of the vanity frame for added stability.
How do I add drawers to my floating vanity frame?
Attach drawer slides to the inside of the vanity frame for the drawers. Build the drawers using appropriate measurements and techniques. Install the drawers into the vanity and add drawer fronts to complete the look. Make sure the drawers are aligned and functioning smoothly.
How do I finish the floating vanity?
Sand the surfaces of the floating vanity to create a smooth finish. Stain or paint the vanity according to your desired color and style. Apply a clear coat or sealer to protect the wood and enhance the appearance. Allow the finish to dry completely before installing the floating vanity.
How do I install the floating vanity and ensure it is properly supported?
Consult a professional if you are unsure about the weight and stability requirements of your floating vanity. Install it in your bathroom, ensuring that it is properly supported and secured. Add additional support if needed using appropriate materials and techniques. Double-check the installation for any potential issues.