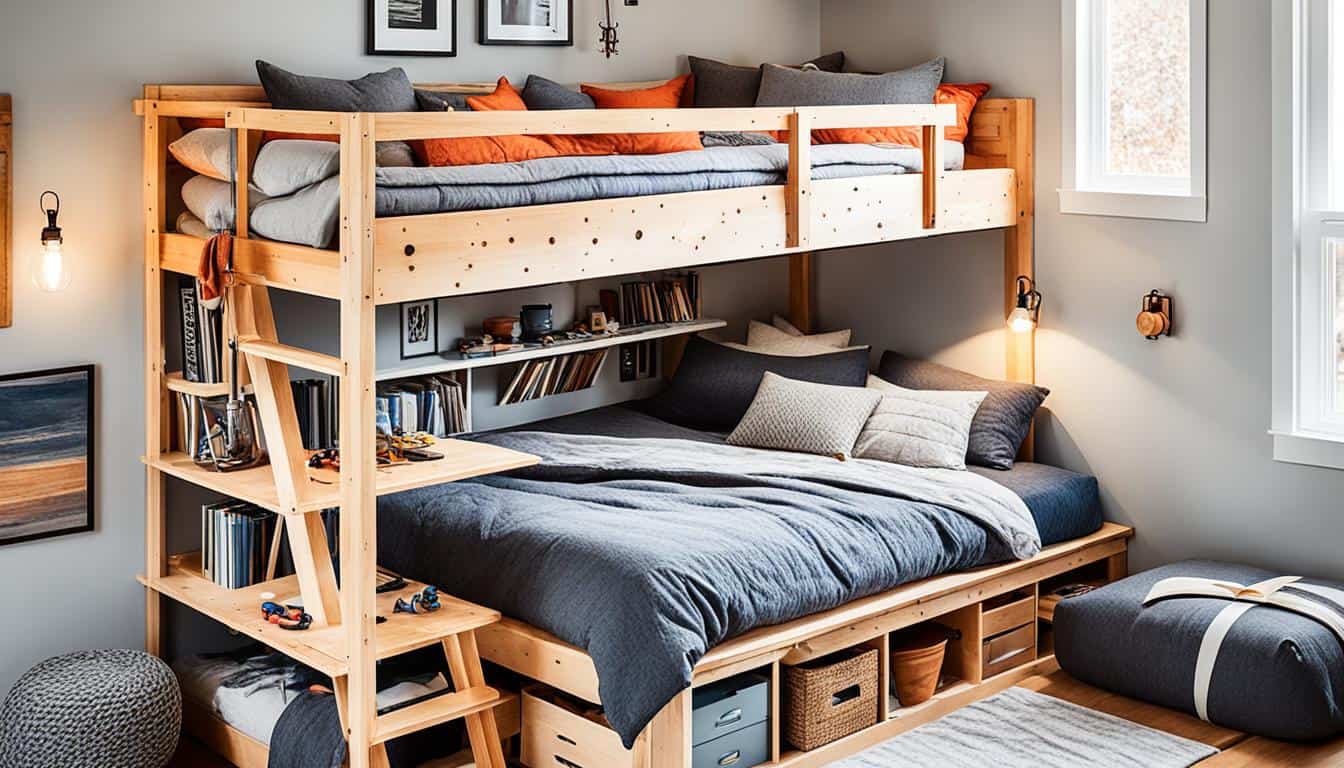
Are you looking to maximize space in your home and add a touch of functionality and style to your bedroom? Have you ever considered building your own loft bed with stairs?
Building a DIY loft bed with stairs is not only a cost-effective solution but also a fun and engaging project that allows you to unleash your creativity and customize your sleeping space exactly how you want it. But where do you start? How do you ensure that the bed is sturdy and safe?
In this step-by-step guide, we will walk you through the process of building your own loft bed with stairs. From gathering materials to adding personalized touches, we’ve got you covered. Get ready to embark on this exciting DIY journey and create a functional and stylish sleeping solution that reflects your unique personality.
Key Takeaways:
- Building a DIY loft bed with stairs can help maximize space in your home.
- Loft bed plans are essential for achieving the desired result.
- Gathering loft bed ideas can inspire your design and ensure it meets your needs.
- Having the appropriate materials and tools is crucial for the construction process.
- The step-by-step construction process includes building the frame, adding guardrails and a headboard, installing the railing and front panel, creating the platform and underneath storage, building the stairs, and applying finishing touches.
The Importance of Loft Bed Plans and Ideas
Before embarking on your DIY loft bed project, it’s crucial to have a well-thought-out plan in place. Loft bed plans serve as your blueprint, providing detailed measurements and instructions that will guide you through the construction process. Additionally, gathering loft bed ideas can help spark your creativity and ensure that the final design aligns with your specific needs and aesthetic preferences.
When it comes to building a loft bed, having a plan is like having a roadmap. It provides you with a clear direction and helps you avoid costly mistakes or design flaws. Here’s why loft bed plans and ideas are essential for a successful DIY project:
Accurate Measurements and Instructions
Loft bed plans offer precise measurements and step-by-step instructions that make the construction process smoother and more efficient. By following these plans, you can ensure that your bed frame, guardrails, and stairs are precisely sized and properly aligned. This attention to detail will result in a sturdy and well-built loft bed that will stand the test of time.
Saves Time and Resources
Having a well-defined plan in place can save you valuable time and resources during the construction phase. Loft bed plans eliminate the guesswork and minimize the need for trial and error. By following a pre-designed plan, you can avoid costly mistakes and make the most of your available resources, resulting in a more efficient and cost-effective DIY project.
Inspiration and Customization
Gathering loft bed ideas allows you to explore various design options and find inspiration to personalize your loft bed. Whether you prefer a contemporary, rustic, or playful design, researching different ideas can help you discover unique features, color schemes, and decorative elements that will make your loft bed truly one-of-a-kind. Don’t be afraid to unleash your creativity and incorporate your personality into the design.
Remember, loft bed plans and ideas provide a solid foundation for your DIY project. They ensure that your loft bed is not only functional but also meets your aesthetic desires. Take the time to carefully select plans and gather ideas that align with your vision, and you’ll be well on your way to creating a stunning and practical loft bed.
Materials and Tools Needed for DIY Loft Bed with Stairs
To build a DIY loft bed with stairs, you will need the following materials:
- 2x6x8 lumber
- 2x4x8 lumber
- Plywood sheets
- Tongue and groove boards
- Trim
- Screws
- Bolts
- Washers
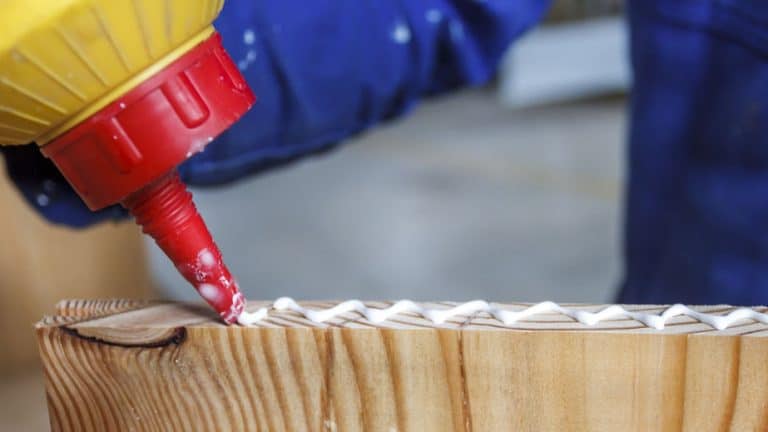
- Liquid nails
- Joist hangers
Having all the necessary supplies at hand before starting your project will ensure a smooth construction process.
Using Quality Materials for Durability and Safety
When selecting materials, opt for high-quality lumber that is sturdy and able to support the weight of the bed. Plywood sheets should be thick enough to provide a stable platform for the mattress. Tongue and groove boards add a decorative touch and enhance the overall look of the bed.
Tip: Choose materials that are resistant to wear and tear, as a loft bed with stairs will likely see regular use. This will ensure the longevity of your DIY project.
Essential Tools for the Construction Process
In addition to the materials, you will need the following tools to build your DIY loft bed with stairs:
- Workbench or sawhorses
- Tape measure
- Circular saw or miter saw
- Drill and drill bits
- Screwdriver or impact driver
- Chisel
- Safety goggles
- Clamps
- Sanding block or sandpaper
- Paintbrush or roller
Having the right tools will make the construction process more efficient and ensure precise measurements and cuts.
Making the Right Measurements
Prior to purchasing materials, it is crucial to take accurate measurements of the room where the loft bed will be placed. Measure the height of the ceiling to ensure that there will be sufficient clearance for the loft bed. Measure the length and width of the bed, including the stairs, to ensure a proper fit in the room.
Materials
| Materials | |
|---|---|
| 2x6x8 lumber | |
| 2x4x8 lumber | |
| Plywood sheets | |
| Tongue and groove boards | |
| Trim | |
| Screws | |
| Bolts | |
| Washers | |
| Liquid nails | |
| Joist hangers | |
Building the Loft Bed Frame
The first step in creating your DIY loft bed with stairs is constructing the bed frame. This crucial foundation will provide the stability and support needed for a safe and functional loft bed design.
To begin, you will need 2×6 and 2×4 boards, which will be attached to the walls of your room. These boards will form the framework of the bed, ensuring its durability and strength.
Using joist hangers, secure the boards to the walls, ensuring that they are level and firmly in place. Joist hangers are essential for reinforcing the connection between the frame and the walls, providing added stability.
Once the bed frame is complete and securely attached, you can add 2×4 slats horizontally across the frame. These slats will serve as the foundation for the mattress, ensuring a comfortable and supportive surface for a good night’s sleep.
Before proceeding to the next steps, take a moment to ensure that the frame is sturdy and level. This will ensure the overall stability and safety of your loft bed.

Adding the Guardrails and Headboard
Once the loft bed frame is built, it’s important to prioritize safety by adding guardrails and a headboard. Guardrails are crucial to prevent accidental falls, especially for younger children. To create guardrails, you can use 2×4 lumber, a sturdy and reliable choice for this purpose. Secure these guardrails to the frame to ensure they are well-supported.
In addition to safety, a headboard adds a touch of style and personality to the loft bed. You can choose to customize the headboard based on your preferences and the overall look of the room. Tongue and groove boards are a popular choice for a simple and elegant design that complements the loft bed’s aesthetic.
Ensure that the guardrails and headboard are securely attached to the frame using appropriate screws or fasteners. Taking the time to properly add these elements will not only enhance the loft bed’s visual appeal but also provide peace of mind knowing that your bed is safe and well-designed.
Guardrail and Headboard Installation Steps
- Measure and cut 2×4 lumber to the desired length for the guardrails.
- Attach the guardrails to the loft bed frame using screws and ensure they are level and securely fastened.
- Measure and cut tongue and groove boards to the width of the loft bed frame for the headboard.
- Attach the tongue and groove boards to create the headboard, ensuring proper alignment and symmetry.
- Secure the headboard to the back of the loft bed frame using screws or other suitable fasteners.
Once the guardrails and headboard are installed, your loft bed will not only provide a safe space to sleep but also exude a stylish and well-designed appeal.
Installing the Railing and Front Panel
Now that you have built the foundation of your DIY loft bed with stairs, it’s time to install the railing and front panel to give it a finished look and ensure stability.
Start by attaching vertical posts to the bed frame using bolts. These posts will provide additional support and hold the railing in place. Make sure to secure them tightly for maximum stability.
Next, take a 1×10 board and use it to cover the front of the bed. This board will serve as a panel that adds both functionality and aesthetics to your loft bed. Attach it securely to the frame, making sure it fits snugly.
Add horizontal support to the front panel by attaching 1×3 boards. These boards will not only enhance the overall look of the bed but also provide additional support and strength to the front panel.
Installing the Railing
Attaching a railing to your loft bed is crucial for safety, especially if the bed is intended for children. A railing will prevent accidental falls and give you peace of mind.
Measure the height you want for the railing based on your needs and preferences. Cut the railing to the appropriate length, ensuring a snug fit along the length of the bed.
Using screws or bolts, attach the railing to the vertical posts you installed earlier. Make sure to fasten it securely, checking for any wobbling or loose connections.

Front Panel Design Inspiration
“The front panel of your loft bed can be more than just a functional piece. Use your creativity to personalize its design. Consider painting it with vibrant colors, adding decals, or even creating a chalkboard surface for your child to express their artistic side.” – Interior Design Expert, Sarah Thompson
Remember to align the design of the front panel with the overall aesthetic of the room or your child’s preferences. This will create a cohesive and visually appealing space.
Summary of Steps:
- Attach vertical posts to the bed frame using bolts
- Securely attach a 1×10 board to cover the front of the bed
- Add 1×3 boards for horizontal support
- Measure, cut, and attach the railing to the vertical posts


Creating the Platform and Underneath Storage
Once the loft bed frame is built, it’s time to create the platform and maximize the space underneath for storage or a play area. The platform not only provides a sturdy surface for the mattress but also enhances the overall design of the loft bed.
To construct the platform, you will need 2×4 boards and plywood sheets. Cut the boards to the appropriate length and attach them securely to the bed frame. Ensure that the boards are level and evenly spaced to provide a stable platform.
The plywood sheets should be cut to fit the dimensions of the bed frame and placed on top of the 2×4 boards. Secure the plywood sheets to the boards using screws or nails, ensuring a tight and secure fit.
To cover the bottom of the platform and create a polished look, use beadboard panels. Cut the panels to size and attach them using nails or adhesive. The beadboard not only adds a decorative touch but also helps to prevent items stored underneath the bed from being visible.
For a clean and finished appearance, add quarter round trim along the edges of the platform. This trim serves as a border and covers any exposed plywood edges, giving the platform a professional look.
With the platform in place, you now have ample storage or play space underneath the loft bed. Use this area to store bins, baskets, or other organizational solutions to keep belongings neat and tidy.

Benefits of Creating Underneath Storage:
- Maximizes the use of space in the room
- Provides a designated storage area for toys, books, or clothing
- Keeps the room organized and clutter-free
- Creates a defined play area for children
“Adding underneath storage to your loft bed design allows you to make the most of your available space, keeping everything tidy and within reach.”
Building the Stairs
Constructing the stairs is an important step in building your loft bed design. To create sturdy and secure stairs, you will need 2×4 boards. Start by cutting the boards to the desired size, ensuring each step is equal in length.
Next, attach the boards to the bed frame using screws. Make sure to align each step properly and securely fasten them to provide safe access to the bed. It’s crucial to double-check that the stairs are level to prevent any tripping hazards.
For additional strength and stability, add support below each step. This will ensure that the stairs can withstand everyday use and provide peace of mind. With the stairs securely in place, your loft bed with woodworking is one step closer to completion.
Remember to follow the loft bed woodworking instructions carefully and take your time to ensure proper construction. Safety should always be a priority when building a loft bed design.
With the stairs built and installed, your loft bed is now functional, offering convenient access to the elevated sleeping area. Take a moment to appreciate your progress and get ready to move on to the next steps in the construction process.
Finishing Touches and Painting
After all the construction is complete, it’s time to put the final touches on your DIY loft bed with stairs. Adding a coat of paint or stain not only enhances the overall appearance of the bed but also protects the wood from wear and tear. Follow these steps to achieve a smooth and durable finish.
Step 1: Sand and Prime
Before applying any paint or stain, it’s crucial to prepare the surface of the wood. Start by sanding the entire bed with fine-grit sandpaper to remove any rough edges or imperfections. This will create a smooth canvas for the paint or stain to adhere to. After sanding, wipe down the bed with a clean cloth to remove any dust.
Next, apply a coat of primer to the wood. Primer helps to seal the surface, enhances paint adhesion, and provides a more even finish. Use a brush or roller to apply the primer evenly, making sure to reach all areas of the bed.
Step 2: Fill and Sand
Inspect the bed for any holes, gaps, or cracks that need to be filled. Use wood filler to fill these imperfections, following the manufacturer’s instructions. Once the filler is dry, sand the filled areas with fine-grit sandpaper until they are smooth and flush with the rest of the bed.
Step 3: Apply Paint or Stain
Now it’s time to add color or preserve the natural beauty of the wood with paint or stain. Choose a paint or stain that is suitable for interior wood surfaces and complements your overall design aesthetic.
If you prefer a painted finish, use a brush or roller to apply the paint in even strokes, working in the direction of the wood grain. Apply multiple coats as needed, allowing each coat to dry completely before applying the next. This will ensure a rich and even color.
If you prefer a stained finish, use a brush or cloth to apply the stain, again working in the direction of the wood grain. Wipe off any excess stain after a few minutes to achieve your desired color intensity. Apply additional coats if necessary, allowing ample drying time between each coat.
Step 4: Protect and Seal
To protect your newly painted or stained bed, consider applying a clear sealant. This will provide an extra layer of protection against scratches, spills, and fading.
Allow the paint or stain to dry completely before moving the bed or installing any bedding. This will ensure that the finish is fully cured and will not be marred by contact.
By taking the time to finish your DIY loft bed with stairs with care and attention to detail, you can create a beautiful and durable piece of furniture that will bring joy and functionality to your space for years to come.
Paint Colors and Stain Options
| Paint Colors | Stain Options |
|---|---|
| Classic White | Natural Oak |
| Soft Gray | Rich Mahogany |
| Pastel Blue | Warm Walnut |
| Mint Green | Ebony Black |
Personalizing the Loft Bed
To make the DIY loft bed with stairs your own, consider personalizing it with your child’s favorite colors or themes. You can add curtains, lights, or storage solutions to enhance the functionality and style of the bed. Get creative and make it a space that your child will love.
Customizing your loft bed design allows you to incorporate your child’s personality and preferences into the space. By adding personal touches, you can create a unique and inviting atmosphere that reflects their individuality. Here are some loft bed ideas to inspire your customization:
Create a Colorful Oasis
Add a splash of vibrancy to the loft bed by painting it in your child’s favorite colors. Use bright and playful shades to create a cheerful and energetic ambiance. Consider incorporating color-blocking techniques or using stencils to create patterns that match the overall theme of the room.
Add Cozy Curtains
Install curtains around the loft bed to create a cozy and private sleeping area. Choose fabrics that complement the room’s decor and your child’s taste. Curtains not only provide visual appeal but also offer the flexibility to create a den-like space for imaginative play.
Illuminate with Lights
String lights or fairy lights can add a magical touch to the loft bed. Hang them along the perimeter or drape them over the bed frame to create a whimsical atmosphere. The soft glow of the lights can create a soothing and comforting ambiance for bedtime.
Incorporate Storage Solutions
Maximize the functionality of your loft bed by incorporating storage solutions. Install shelves, bins, or baskets underneath the bed to provide a designated space for books, toys, and belongings. This not only helps keep the room organized but also adds a practical element to the design.
“Personalizing the loft bed design allows you to create a space that resonates with your child’s personality and interests, making it a special place they can call their own.”
Remember, the possibilities for personalizing your DIY loft bed with stairs are endless. Let your imagination run wild and create a space that your child will cherish and admire. Adding unique elements and customizing the design will transform the loft bed into a dreamy retreat tailored to your child’s taste.
Benefits of a DIY Loft Bed with Stairs
Building a DIY loft bed with stairs offers several benefits. First and foremost, it maximizes the use of space in a room by utilizing vertical space effectively. Instead of occupying a large footprint on the floor, a loft bed with stairs takes advantage of the unused vertical area, freeing up valuable floor space for other activities.
Additionally, a DIY loft bed with stairs provides additional storage or play area underneath the bed. This added space can be utilized for storing toys, books, or other belongings, helping to keep the room organized and clutter-free. It can also serve as a dedicated play area, creating a fun and imaginative space for children to enjoy.
One of the key advantages of a loft bed with stairs is that it eliminates the need for a separate ladder. Unlike traditional loft beds with ladders, which can be steep and potentially hazardous, stairs offer a safe and convenient way for children to access the bed. The inclusion of stairs provides added stability and ease of use, making it safer for children to navigate up and down without the risk of slipping or falling.
To give you a better idea of the benefits of a DIY loft bed with stairs, here’s a brief comparison:
| Traditional Loft Bed with Ladder | DIY Loft Bed with Stairs |
|---|---|
| Requires a separate ladder, which can be steep and potentially unsafe for children | Uses stairs instead of a ladder, providing a safer and more convenient way to access the bed |
| Limits under-bed space due to the presence of a ladder | Maximizes under-bed space for storage or play area |
| May be less stable due to the reliance on a ladder for support | Offers increased stability and structural integrity with the inclusion of stairs |
As you can see, a DIY loft bed with stairs not only offers practical benefits but also provides a safer and more functional sleeping solution for your space. Whether you’re looking to save space, create additional storage, or enhance safety, building a loft bed with stairs can be a worthwhile project that delivers long-lasting benefits for you and your family.
Cost and Time Considerations
When embarking on a DIY loft bed project with stairs, it’s important to consider the cost implications and time commitment involved. By understanding these factors upfront, you can plan accordingly and ensure a smooth and successful building process.
Cost of Building a DIY Loft Bed with Stairs
The cost of building a loft bed with stairs will largely depend on the materials and tools you already have on hand. If you need to purchase materials, the average cost can range from $300 to $500. Keep in mind that this estimate may vary depending on factors such as the size of the bed, the quality of materials chosen, and your location.
To help you better understand the potential costs, refer to the table below:
| Materials | Estimated Cost |
|---|---|
| Lumber | $100 – $200 |
| Plywood Sheets | $50 – $100 |
| Screws, Bolts, and Washers | $20 – $50 |
| Joist Hangers, Liquid Nails, and Other Hardware | $30 – $60 |
| Paint or Stain | $30 – $80 |
| Other Miscellaneous Supplies | $70 – $100 |
Please note that the above figures are rough estimates and may vary based on individual circumstances.
Time Considerations
The time needed to complete a DIY loft bed with stairs will depend on factors such as your skill level, experience, and the complexity of the design you choose. It’s essential to allocate an appropriate amount of time to ensure a thorough and satisfactory construction process.
On average, you can expect to spend at least a few days to a week on constructing the bed and adding the finishing touches. This timeframe allows for adequate planning, cutting and assembling the materials, attaching the stairs and railings, and applying any desired paint or stain.
Factors Affecting Timeframe:
- Your level of experience and familiarity with woodworking projects.
- The availability of tools and equipment needed to complete the project.
- The complexity and design of the loft bed with stairs.
- The amount of time you can dedicate to working on the project each day or week.
Remember to allow yourself enough time to work at a comfortable pace and ensure quality craftsmanship.
Now that you have a clear understanding of the cost and time considerations involved in building a DIY loft bed with stairs, you can confidently move forward with your project. With careful planning and patience, you’ll be able to create a functional and stylish loft bed that meets your needs and enhances your living space.
Safety Guidelines for Loft Beds with Stairs
When building a loft bed with stairs, safety should always be your top priority. Follow these guidelines to ensure a secure and well-constructed loft bed:
- Sturdy Bed Frame: Make sure the bed frame is robust and securely attached to the walls for stability.
- Appropriate Materials: Use high-quality materials that are suitable for loft bed construction. Opt for strong and durable lumber, plywood, and hardware.
- Proper Construction Techniques: Adhere to the loft bed building instructions carefully. Follow each step and ensure accurate measurements and joinery.
- Level Stairs: Ensure that the stairs are level and securely attached to the bed frame. Use screws or bolts to fasten them tightly.
- Handrails for Stability: Install handrails on both sides of the stairs for added safety and stability. These will provide support while ascending or descending the bed.
- Regular Inspections: Regularly inspect the loft bed for any signs of wear or damage. Check the frame, stairs, and handrails to ensure they are in good condition.
By following these safety guidelines, you can construct a loft bed with stairs that provides a secure and functional sleeping solution for you or your child.
Conclusion
Building a DIY loft bed with stairs opens up a world of possibilities for maximizing space and creating a functional sleeping solution. By following a step-by-step guide and personalizing the bed to your preferences, you can craft a unique and practical space for yourself or your child. Not only will you have a comfortable place to sleep, but you’ll also have extra storage or play area underneath the bed.
Embrace your creativity and enjoy the process of woodworking as you construct a custom loft bed. From selecting materials to adding finishing touches, each step contributes to the satisfaction of building something with your own hands. The result will be a stylish and functional loft bed that fits perfectly in your home.
Whether you’re looking to save space in a small room or want to create a cozy sleeping nook, a DIY loft bed with stairs is an excellent choice. With the right ideas and plans, you can customize the design to match your room’s decor and meet your specific needs. So, roll up your sleeves, gather your tools, and let your DIY skills shine as you embark on this exciting woodworking project!
FAQ
What materials do I need to build a DIY loft bed with stairs?
You will need 2x6x8 and 2x4x8 lumber, plywood sheets, tongue and groove boards, trim, screws, bolts, washers, liquid nails, and joist hangers.
How do I construct the bed frame for a DIY loft bed with stairs?
Attach 2×6 and 2×4 boards to the walls to create the foundation, using joist hangers for stability. Add 2×4 slats for the mattress base.
How do I add guardrails and a headboard to the loft bed?
Use 2×4 lumber to create guardrails attached to the frame. Add a headboard to the back of the bed using tongue and groove boards.
How do I install the railing and front panel for the loft bed?
Attach vertical posts using bolts for support. Cover the front with a 1×10 board and add 1×3 boards for horizontal support.
How do I create the platform and storage space underneath the loft bed?
Build the platform using 2×4 boards and plywood sheets. Use beadboard panels to cover the bottom and add quarter round trim for a finished look.
How do I build the stairs for a DIY loft bed with stairs?
Cut 2×4 boards to size and attach them to the bed frame using screws. Ensure the stairs are level and have additional support below each step.
How do I finish and paint my DIY loft bed with stairs?
Sand, prime, and fill any holes or gaps before applying the final coat. Choose paint or stain based on your preferences.
How can I personalize my loft bed with stairs?
Consider adding curtains, lights, or storage solutions to make the bed your own. Get creative and incorporate your child’s favorite colors or themes.
What are the benefits of a DIY loft bed with stairs?
A loft bed maximizes space, provides additional storage or play area underneath, and offers a safe and convenient way for children to access the bed.
How much does it cost to build a DIY loft bed with stairs?
The cost can range from 0 to 0, depending on the materials and tools you already have. Plan for at least a few days to a week to complete the project.
What safety guidelines should I follow when building a loft bed with stairs?
Ensure the bed frame is sturdy and securely attached to the walls. Use appropriate materials and construction techniques. Regularly inspect the bed for wear or damage.