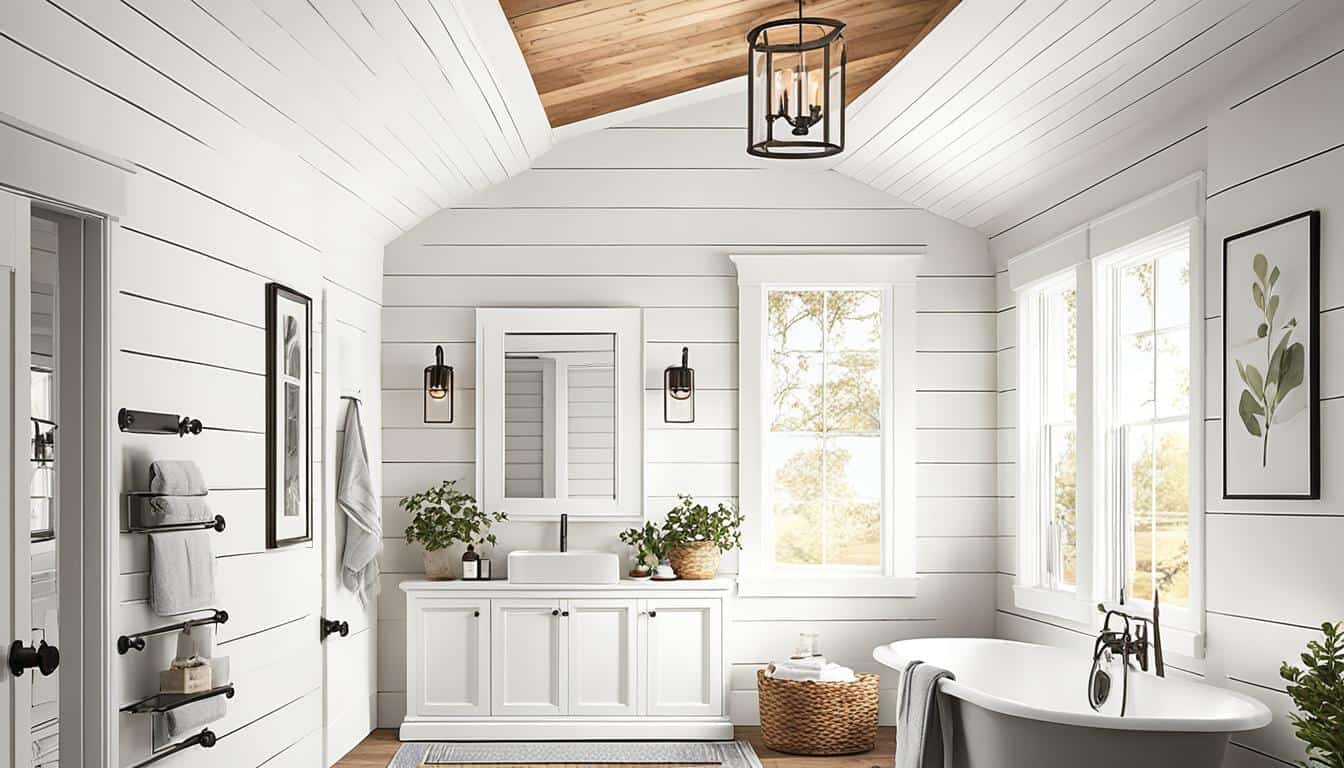
Are you looking to add a touch of rustic charm and texture to your bathroom? Do you want to create a cozy and inviting atmosphere that will transform your space into a captivating retreat? If so, then it’s time to consider a shiplap bathroom ceiling.
Shiplap, characterized by horizontal wooden planks that overlap each other, has become a prominent interior design element, especially in bathroom design. But what makes it so popular? And how can it benefit your bathroom? Let’s explore the world of shiplap and discover how it can enhance your bathroom’s aesthetic and functionality.
Key Takeaways:
- Shiplap is a classic design technique that adds a touch of rustic charm and texture to the bathroom.
- It is known for its exceptional durability and moisture resistance, making it ideal for bathroom ceilings.
- Shiplap offers endless design possibilities, from distressed vintage styles to modern farmhouse looks.
- Installing a shiplap bathroom ceiling requires careful measurement, cutting, and attachment techniques.
- Regular maintenance is important to preserve the beauty and longevity of shiplap bathroom ceilings.
The Popularity and Benefits of Shiplap
Shiplap has become increasingly popular in modern interior design, and its charm extends beyond the living room and bedroom. In bathroom design, shiplap has emerged as a favored choice for creating a visually appealing and inviting space. By adding texture and warmth, shiplap provides a cozy atmosphere that instantly elevates your bathroom’s aesthetic.
What sets shiplap apart from other materials is its exceptional durability and moisture resistance. Unlike traditional drywall or plaster, shiplap can withstand the humid environment of a bathroom without warping or deteriorating. This makes it a reliable option for installing on bathroom ceilings, allowing you to enjoy the timeless beauty of shiplap without worrying about maintenance or damage.
Additionally, shiplap offers the benefit of easy installation. Whether you’re a seasoned DIY enthusiast or a first-time renovator, installing shiplap on your bathroom ceiling is a straightforward process. Its straightforward design and interlocking installation method make it accessible to homeowners of all skill levels. With a few basic tools and some patience, you can transform your bathroom space and achieve a stunning shiplap ceiling.
Once installed, shiplap requires minimal maintenance. Since it is naturally resistant to moisture, cleaning is as simple as wiping down the surface with a soft cloth or mild cleaning solution. Your shiplap ceiling will maintain its beauty and charm with little effort on your part, allowing you to enjoy its benefits for years to come.
“Shiplap ceilings bring a touch of rustic elegance to your bathroom, creating a cozy and inviting atmosphere that is perfect for relaxation.”
Ultimately, the popularity and benefits of shiplap in bathroom design are undeniable. Its versatility, durability, and easy maintenance make it a worthwhile investment for transforming your bathroom space into a captivating retreat.
Take a look at the table below to see some of the key advantages of using shiplap for your bathroom ceiling:
| Benefits of Shiplap | Description |
|---|---|
| Visual Appeal | Create a visually appealing and inviting bathroom space |
| Texture and Warmth | Add texture and warmth to your bathroom atmosphere |
| Durability | Withstand the humid bathroom environment without warping or deteriorating |
| Easy Installation | Straightforward installation process accessible to homeowners of all skill levels |
| Low Maintenance | Requires minimal maintenance and easy to clean |
Shiplap Bathroom Ceiling Design Ideas
When it comes to designing your bathroom ceiling, shiplap offers a plethora of options to suit your style and preferences. Whether you’re aiming for a rustic charm or a classic and elegant touch, shiplap has got you covered. Explore the various design possibilities and let your creativity run wild.
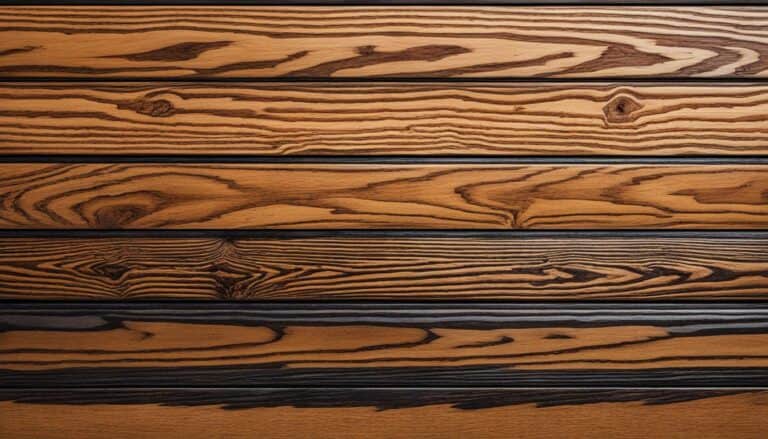
For a vintage-inspired look, consider distressed shiplap that adds a touch of character and rustic appeal to your bathroom. The weathered texture and worn appearance of distressed shiplap create a cozy and inviting atmosphere.
If you prefer a timeless and sophisticated aesthetic, opt for primed nickel gap shiplap. This classic style adds elegance and refinement to your bathroom while maintaining the warmth and texture that shiplap is known for.
For a polished and contemporary look, pre-painted nickel gap shiplap is the way to go. The smooth and refined finish provides a sleek backdrop for your bathroom, offering a modern and sophisticated appeal.
If you’re a fan of simplicity and a farmhouse aesthetic, classic farmhouse white shiplap is the perfect choice. The clean and crisp white finish adds brightness and charm to your bathroom, creating a space that feels airy and inviting.
For a minimalistic and sleek look, consider charred wood smoke white shiplap. The dark charcoal hue exudes a sense of sophistication and modernity, adding depth and intrigue to your bathroom design.
The wide shiplap design is perfect for creating a sense of spaciousness and openness in your bathroom. It makes the ceiling appear larger and adds a touch of grandeur to the overall aesthetic.
Whether you prefer a modern farmhouse look or a rustic-chic style, shiplap in farmhouse white or rustic white can transform your bathroom with its captivating charm. These designs bring together the timeless appeal of shiplap with a contemporary twist, creating a space that is both stylish and welcoming.

| Shiplap Design | Description |
|---|---|
| Distressed Vintage Shiplap | Brings rustic charm and character to your bathroom |
| Primed Nickel Gap Shiplap | Offers a classic and elegant touch to your bathroom |
| Pre-painted Nickel Gap Shiplap | Provides a polished and sophisticated look |
| Classic Farmhouse White Shiplap | Exudes simplicity and adds a touch of charm |
| Charred Wood Smoke White Shiplap | Creates a minimalist and contemporary aesthetic |
| Wide Shiplap Design | Enhances the sense of spaciousness in your bathroom |
| Modern Shiplap in Farmhouse White or Rustic White | Combines timeless charm with a modern twist |
Shiplap Bathroom Ceiling Installation Tips
Transforming your bathroom with a shiplap ceiling is an exciting project that can enhance the overall aesthetics of the space. To ensure a successful installation, follow these essential tips:
Measure and Prepare
Start by measuring the dimensions of the wall to determine the number of shiplap boards needed for the ceiling. Using a miter or circular saw, cut the boards to the correct lengths, considering any corners or obstacles that may require special cuts. It’s essential to have all the necessary tools and materials handy before starting the installation.
Begin from the Bottom
When attaching the shiplap boards to the wall, always start from the bottom and work your way up. This approach allows for a more stable and secure installation. Begin by aligning the first board horizontally along the bottom edge of the wall, ensuring it is level.
Snug Fit and Gap Considerations
Apply a bead of caulk to the back of each shiplap board before placing it against the wall. This will provide a snug fit and help prevent moisture from seeping behind the boards. Additionally, leave a small gap between each board to allow for natural expansion and contraction of the wood due to changes in temperature and humidity.
Secure Attachment
Nail the shiplap boards to the wall, making sure to hit the wall studs for a secure attachment. This will ensure the boards are firmly in place and prevent any potential shifting or sagging over time. Use a nail gun or hammer and nails suitable for the thickness of the boards for a professional and durable installation.


Attention to Detail
Pay close attention to the details during the installation process. Use a level to ensure that each board is perfectly horizontal and aligned with the adjacent boards. Take care to maintain consistent spacing between the boards and check for any gaps or seams that may need additional caulking or adjustment. This attention to detail will result in a polished and seamless shiplap ceiling.
By following these shiplap ceiling installation tips, you can confidently create a stunning and inviting bathroom space that showcases the timeless beauty of shiplap.
Shiplap Bathroom Ceiling Decoration Ideas
When it comes to decorating your shiplap bathroom ceiling, the options are endless. By combining different elements, you can enhance the overall aesthetic and create a stunning focal point in your space. Here are some shiplap ceiling ideas to inspire your creativity:
- Contrasting Textures: Pair smooth timeless farmhouse shiplap with stone, patterned tile, marble, or wallpaper to create a beautiful contrast of textures. This juxtaposition adds visual interest and depth to your bathroom ceiling.
- Fresh and Pristine Look: Embrace harmonious contrasts by combining shiplap with navy cabinetry. The combination of the clean shiplap lines and the bold navy color creates a fresh and pristine look that is both modern and timeless.
- Sense of Openness: Explore the allure of a wide shiplap design. The wider boards create a sense of openness, making your bathroom ceiling feel more spacious and inviting.
- Statement Transformation: Embrace modern shiplap in farmhouse white or rustic white for a space transformation that makes a statement. The clean lines and charming texture of shiplap will instantly elevate the overall aesthetic of your bathroom.
Let your creativity shine as you decorate your shiplap bathroom ceiling with complementary elements that reflect your personal style and preferences. Experiment with different materials, colors, and patterns to create a unique and captivating look that will truly transform your space.
“By combining different elements, you can enhance the overall aesthetic and create a stunning focal point in your space.”
Image:
Maintenance and Care Tips for Shiplap Bathroom Ceilings
Regular maintenance is essential to preserve the beauty and longevity of your shiplap bathroom ceiling. By following these maintenance and care tips, you can ensure that your shiplap retains its allure for years to come.
Clean Regularly
To keep your shiplap bathroom ceiling looking its best, it’s important to dust or vacuum the boards regularly. This will help remove surface dirt and debris that can accumulate over time.
Gentle Cleaning
When it comes to cleaning the shiplap, use a soft cloth dampened with water or a mild cleaning solution. Avoid harsh chemicals or abrasive cleaners that can potentially damage the wood. Wipe down the shiplap gently to ensure a thorough but gentle cleaning.
Focus on Moisture-Prone Areas
Areas near sinks, showers, and bathtubs are more prone to moisture accumulation. Pay special attention to these areas during your regular cleaning routine to prevent moisture-related issues.
Drying is Crucial
After cleaning, ensure that the shiplap boards are thoroughly dried to prevent water absorption. Moisture can cause the wood to warp or deteriorate over time, so take extra care to ensure the boards are completely dry.
Consider Sealing
For added protection, consider sealing your shiplap bathroom ceiling with a water-resistant sealant. This will provide an additional layer of defense against moisture and extend the lifespan of your shiplap.
By following these maintenance and care tips, you can keep your shiplap bathroom ceiling looking stunning and ensure its durability for years to come.
Shiplap Bathroom Ceiling Installation Tools
Prior to embarking on your shiplap bathroom ceiling installation project, it’s crucial to gather all the necessary tools. Having the right tools on hand will ensure a smooth and successful installation process. Here are the essential tools you’ll need:
Nail Gun or Hammer and Nails
To firmly attach the shiplap boards to the wall, you’ll require a nail gun or a hammer along with nails. A nail gun provides a faster and more efficient installation method, while a hammer and nails offer a traditional approach.
Level
Using a level is essential for achieving a straight and even installation. It helps ensure that your shiplap boards align perfectly, creating a visually pleasing result.
Measuring Tape
A measuring tape is a crucial tool in determining the dimensions of your wall accurately. It enables you to cut the shiplap boards to the correct lengths for a precise fit.
Miter or Circular Saw
To achieve clean and precise cuts, you’ll need a miter or circular saw. This tool allows you to cut the shiplap boards to the desired lengths, ensuring a seamless installation.
Caulk Gun and Caulk
Sealing the gaps between the shiplap boards is an important step in achieving a professional and polished look. Use a caulk gun along with a suitable caulk product to seal any openings.
Sandpaper or Sander (for unfinished shiplap)
If you’re working with unfinished shiplap, sandpaper or a sander will be necessary to smooth the surface. This step ensures a flawless finish and minimizes the risk of splinters.
Having these essential tools at your disposal will make your shiplap bathroom ceiling installation process more manageable and efficient.
Step-by-Step Guide to Shiplap Bathroom Ceiling Installation
Transforming your bathroom with a shiplap ceiling is an exciting project that can enhance the overall aesthetic of the space. Follow these essential steps to successfully install a shiplap bathroom ceiling.
- Start by measuring the dimensions of the wall to determine the number of shiplap boards needed. Accuracy is key, so double-check your measurements before proceeding.
- Use a miter or circular saw to cut the shiplap boards to the correct lengths. Take your time and ensure clean, precise cuts for a professional finish.
- Apply a bead of caulk to the back of each shiplap board to ensure a snug fit against the wall. This not only helps with the installation but also prevents any gaps between the boards.
- Use a level to ensure that the first shiplap board is straight before nailing it in place. A level installation is crucial, as it sets the foundation for the entire ceiling.
- Leave a small gap, about 1/8 inch, between each shiplap board to allow for expansion and contraction. This gap will prevent any buckling or warping of the boards over time.
- Nail the shiplap boards to the wall, ensuring that the nails hit the wall studs for secure attachment. This will provide stability and longevity to your shiplap ceiling.
- Continue this process until the entire ceiling is covered with shiplap boards. Take breaks as needed, but be mindful of maintaining a consistent pattern and spacing throughout the installation.
By following these step-by-step instructions, you can achieve a stunning shiplap bathroom ceiling that adds character and charm to your space.
Tips for Shiplap Ceiling Installation:
Before you begin, it’s essential to prepare the area properly. Remove any existing ceiling materials, such as drywall or outdated ceiling coverings, to create a clean surface for the shiplap installation. Additionally, ensure that your tools are in good working condition and that you have all the necessary safety equipment, such as goggles and gloves, to protect yourself during the installation process.
Now that you have a clear understanding of how to install a shiplap bathroom ceiling, you’re ready to embark on this exciting DIY project. Enjoy the process and create a beautiful and inviting bathroom space.

Materials and Tools Needed for Shiplap Ceiling Installation:
| Materials | Tools |
|---|---|
| Shiplap boards | Miter or circular saw |
| Caulk | Level |
| Nails | Tape measure |
| Wood filler | Nail gun or hammer |
| Primer and paint (optional) | Caulk gun |
The Beauty of Finished Elegance Shiplap for Bathroom Ceilings
When it comes to transforming your bathroom space, Finished Elegance shiplap is the perfect choice for your ceiling. With its durable and moisture-resistant properties, this shiplap offers a lasting solution that can withstand the humid bathroom environment without warping or deteriorating. Its coated surface on all four sides provides an added layer of protection, ensuring the shiplap maintains its beauty and elegance over time.
What sets Finished Elegance shiplap apart is not only its exceptional performance but also its attention to detail. The Finished Elegance Collection offers a variety of trim options to complete the look of your shiplap bathroom ceiling. The beautiful finish and matching caulk create a seamless and professional appearance, elevating the overall aesthetic of your bathroom to new heights.
With Finished Elegance shiplap, you can embrace the timeless charm of shiplap while enjoying the benefits of a finished and elegant ceiling. Whether you prefer a classic or contemporary style, this shiplap provides the versatility and sophistication to complement any design concept you have in mind.
The appeal of Finished Elegance shiplap extends beyond its practicality and aesthetics. Its ease of installation makes it a favorite among DIY enthusiasts and professionals alike. With a few simple steps, you can transform your bathroom ceiling into a stunning focal point that showcases your unique style and taste.
Experience the beauty of Finished Elegance shiplap for yourself and create a bathroom ceiling that exudes elegance and refined sophistication. Elevate your space with this timeless design element that adds both character and charm to your bathroom.
How to Install Finished Elegance Shiplap on a Bathroom Ceiling
Prior to installing Finished Elegance shiplap on your bathroom ceiling, follow these steps for a successful installation:
- Locate the ceiling joists using a magnetic joist finder.
- Mark the joist locations on the ceiling for reference.
- Install furring strips on the joists to provide support for the shiplap.
- Use 2″ finish nails to attach the shiplap to the furring strips, ensuring a secure and durable installation.
- Trim out the ceiling with door and window stop moulding for a finished look.
- Fill any nail holes or seams with the matching caulk for a seamless appearance.
Following these steps will help you achieve a stunning shiplap bathroom ceiling using the Finished Elegance Collection. With its moisture-resistant nature and beautiful finish, Finished Elegance shiplap offers a durable and aesthetically pleasing solution for your bathroom space.
Installation Steps in Detail
| Steps | Description |
|---|---|
| 1. | Locate the ceiling joists using a magnetic joist finder. |
| 2. | Mark the joist locations on the ceiling for reference. |
| 3. | Install furring strips on the joists to provide support for the shiplap. |
| 4. | Use 2″ finish nails to attach the shiplap to the furring strips, ensuring a secure and durable installation. |
| 5. | Trim out the ceiling with door and window stop moulding for a finished look. |
| 6. | Fill any nail holes or seams with the matching caulk for a seamless appearance. |
Benefits of Shiplap Ceiling in Bathroom Remodeling
Installing a shiplap ceiling in your bathroom remodel offers numerous benefits that can elevate the overall aesthetics and functionality of the space. Let’s explore the advantages of incorporating a shiplap ceiling into your bathroom renovation:
Durability and Moisture Resistance
One of the primary benefits of a shiplap ceiling is its exceptional durability and moisture resistance. The natural properties of shiplap wood make it resistant to warping or deteriorating in the high-humidity environment of a bathroom. This ensures that your shiplap ceiling will maintain its beauty and structural integrity for years to come.
Texture and Visual Interest
Shiplap adds a unique texture and visual interest to your bathroom space. The horizontal wooden planks create a distinctive pattern, adding dimension and character to the ceiling. This texture can transform your bathroom into a cozy and inviting retreat, providing a warm and rustic ambiance.
Versatility in Design
Another advantage of shiplap is its versatility in design. Whether your bathroom style leans towards modern, farmhouse, coastal, or traditional, shiplap can seamlessly complement any interior style. You can paint the shiplap in a variety of colors or leave it in its natural wood finish for a timeless and classic look.
Easy Installation and Maintenance
Shiplap ceilings are relatively easy to install, making them an ideal choice for DIY enthusiasts. The interlocking planks can be easily nailed or screwed onto the ceiling, creating a secure and stable design. Additionally, shiplap ceilings require minimal maintenance. Regular dusting and occasional wiping with a damp cloth are usually sufficient to keep them looking their best.
Overall, the benefits of a shiplap ceiling in bathroom remodeling are significant. From its durability and moisture resistance to its ability to add texture and versatility in design, shiplap can elevate your bathroom space and create a stylish and inviting oasis.
Conclusion
In conclusion, a shiplap bathroom ceiling is a versatile and stylish choice for transforming your bathroom space. The exceptional durability and moisture resistance of shiplap make it a practical option that can withstand the humid environment without warping or deteriorating. With its charming texture and rustic appeal, shiplap can add a touch of warmth and coziness, creating an inviting retreat in your bathroom.
This article has provided a comprehensive guide, covering installation tips, design ideas, and maintenance guidelines for your shiplap bathroom ceiling. By following the step-by-step instructions and exploring the various design options, you can achieve a stunning result that perfectly suits your style and preferences.
When considering the cost of installing a shiplap ceiling in your bathroom, it’s essential to factor in the long-term benefits and aesthetic value it brings. While the cost may vary depending on factors such as materials and labor, the timeless appeal of shiplap makes it a worthwhile investment that can significantly enhance your bathroom’s overall look and feel.
As you embark on your bathroom remodeling journey, take a moment to consider the benefits and beauty of a shiplap bathroom ceiling. From its durability and moisture resistance to its versatile design options, shiplap offers a transformative solution that can elevate your bathroom to new heights of style and sophistication.
FAQ
What is shiplap?
Shiplap is a classic design technique characterized by horizontal wooden planks that overlap each other, creating a distinctive and visually appealing pattern.
Why is shiplap popular in bathroom design?
Shiplap adds visual appeal, texture, and warmth to bathroom spaces, creating a cozy and inviting atmosphere. Its exceptional durability and moisture resistance make it an ideal choice for bathroom ceilings.
What are some shiplap bathroom ceiling design ideas?
You can choose from various styles, including distressed vintage shiplap, primed nickel gap shiplap, smooth timeless farmhouse shiplap, charred wood smoke white shiplap, modern shiplap in farmhouse white or rustic white, and more.
What are the steps to install a shiplap bathroom ceiling?
The steps include measuring the wall, cutting the boards, attaching them to the wall, applying caulk for a snug fit, leaving gaps for expansion, and nailing the boards to the wall.
How can I decorate a shiplap bathroom ceiling?
You can pair shiplap with stone, patterned tile, marble, or wallpaper for beautiful contrasts of textures. You can also combine it with navy cabinetry or embrace the wide shiplap design for added impact.
How should I maintain and care for a shiplap bathroom ceiling?
Regular dusting or vacuuming, wiping with a soft cloth and mild cleaning solution, avoiding harsh chemicals or abrasive cleaners, and ensuring thorough drying after cleaning are important for preserving the beauty and longevity of shiplap bathroom ceilings.
What tools do I need for installing a shiplap bathroom ceiling?
You will need a nail gun or hammer, nails, a level, a measuring tape, a miter or circular saw, a caulk gun, caulk, sandpaper or a sander, and a magnetic joist finder for locating ceiling joists.
What is the step-by-step guide to shiplap bathroom ceiling installation?
The steps include measuring the wall, cutting the boards to length, applying caulk for a snug fit, using a level for straight installation, leaving gaps between boards, nailing them to the wall, and repeating the process until the ceiling is covered.
Why is Finished Elegance shiplap a good choice for bathroom ceilings?
Finished Elegance shiplap offers durability and moisture resistance, thanks to its coated surface. It also provides a variety of trim options for a seamless and professional appearance.
How do I install Finished Elegance shiplap on a bathroom ceiling?
The installation process involves locating ceiling joists, installing furring strips for support, attaching the shiplap with finish nails, trimming out the ceiling with door and window stop moulding, and filling nail holes and seams with matching caulk.
What are the benefits of a shiplap ceiling in bathroom remodeling?
Shiplap offers exceptional durability and moisture resistance, adds texture and visual interest, complements various interior styles, and can transform the overall aesthetic of a bathroom.